

AngularJS directives have a wide array of uses, some more difficult to implement than others. Understanding how the link function, directive controllers, scopes, required, restrict all interact and how to implement them can be daunting. Bill Odom and Matt Follett recently gave a talk at the St. Louis Angular Lunch explaining in detail about advanced directives they have written.
Transcript
We have transcribed the talk about to text, provided below. This is a rough, first-draft transcription, so any errors are probably from that process.

Bill: I just want to let everybody know that even though he’s not here with us, John Lindquist is with us in spirit today from Egghead.io. I always wear my Angular shirt when I give a presentation because having John here near my heart really helps. Also, I changed my background so that everybody would know I am a big nerd, just in case there was any doubt about that.
For today, those of you that were here last month or the month before — are we two months out now from your presentation?
Mark: I don’t remember now.
Bill: I think we skipped one — I can’t remember. Anyway, Mark did a presentation on directives essentials, which I thought was phenomenal, even though Mike was just saying the video was a little rough. I think it’s definitely worth revisiting that if you didn’t see it here in person — or even if you did. It was really, really good. I know Matt and I actually went back to that presentation several times just taking notes.
This is my scribbled up copy of your presentation. It was really, really good. I strongly recommend it.
What Matt and I wanted to do — Matt Follet are the, by the way, was to build on Mark’s presentation on directives essentials and talk about more advanced directives topics. One of the things we did is we brainstormed all the different things we could talk about. We ended up with nine single-spaced pages of notes on potential topics for advanced directives. We could easily fill up 16 of these meetings if we wanted to on topics directives.
We’re not going to try to cram in all of that. Instead we’re going to hit some of these points, dive deep a couple of them. But hopefully give you a flavor of the kinds of things you can do with directives that are more than just simple template, things like that.
By the way, I want to make sure you feel free to jump in at any point. Just because I’m sitting here doesn’t mean you shouldn’t stop chewing and talk.
Matt: Okay.
Bill: Perfectly fine with me.
One of the things that Matt and I have found over the last year and a half to two years of Angular stuff is that we didn’t start using directives nearly early enough or earnestly enough as we should have. You’re further along with this now than I am, but I know both of us ended up revisiting a lot of our earlier code, as everybody seems to.
When you first start writing Angular, you end up with this very controller-dense code that, you have your HTML templates and your views and you populate all sorts of stuff inside your controllers and you don’t do nearly enough stuff with directives because directives are hard, directives are a little bit weird. The documentation for directives can be extremely dense. It’s better now than it used to be, but it didn’t start off very easy to deal with.
Because of that, people tend to shy away from it. They just don’t get them. What we found is that the directives properly used actually end up helping you create a DSL for your app. A Domain Specific Language for your application. What would you guess, with some of the early stuff that we did when we went back and revisited it, the amazing amount of code just collapsed out of some of the systems we were building. It was pretty astonishing.
Matt: What we were able to do after we took all the pieces that we “directivized”, we were able to convince most of our states into very common code base. We probably cut out a third of our code by putting them into directives.
Bill: It was kind of funny. We thought we were doing a pretty good job of encouraging reusability, and we were doing okay. It turned out when we really started leveraging the directives mechanism a lot of things became much smaller, much tighter, much more reusable. So, we’ll talk about some of that stuff here today, but we wanted that start off with that in mind. That if you are not using directives or if you’re not using directives much inside of Angular, then you’re probably missing a major point of Angular. So, we would strongly encourage you to take another look.
They’re not just, oh, it would be nice to have another HTMLL tag or two. No, that’s probably the fundamental piece of your application. If you don’t start off an application or if you don’t look at your application trying to decompose it to what could I turn into directives in this app, you’re probably missing to bulk of the power of Angular.
That’s the sermon. I wanted the make sure we got that in early because if you don’t leave here with anything except that in mind, then this will have been a successful meeting for you. Everything else is technique, syntax and specifics, things like that. But really it’s kind of the philosophy of directives and how you use them within Angular that I think is probably the most important point that we can make.
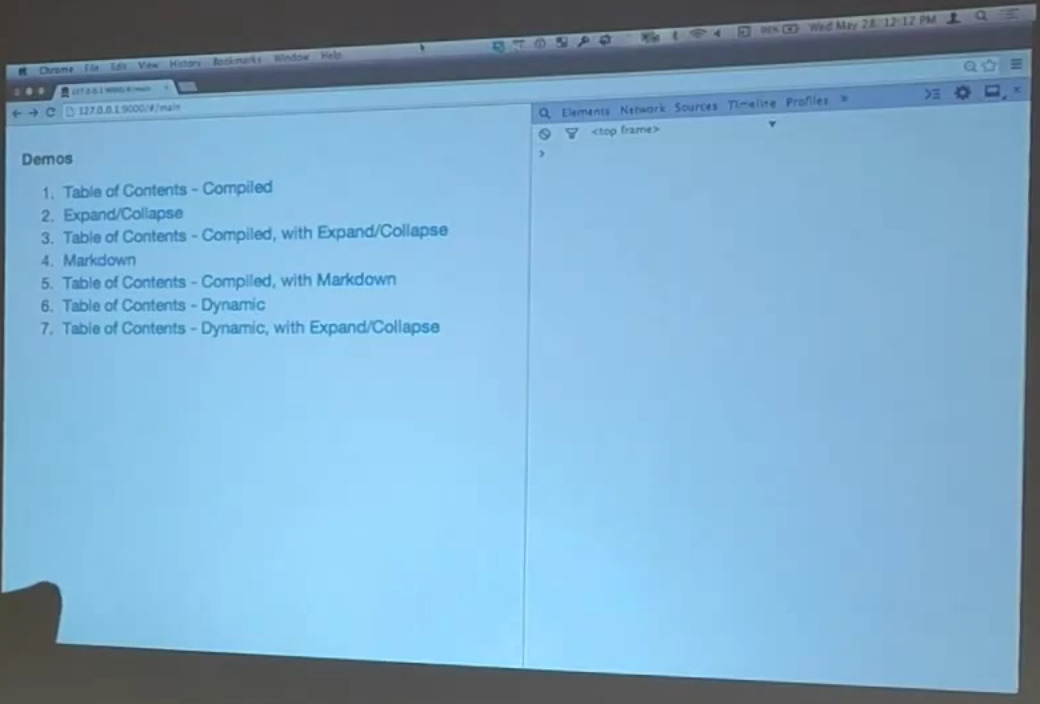
The first place we were going to start — let’s make sure everybody can see this here. We’ve got several little examples we’re going to walk through. To give you a little bit of background on how this happened — I’m going to blame you for some of this, by the way. This is my friend Harry, the unsuspecting victim of today’s presentation. Harry and I were talking — it was weeks and weeks ago about a couple of different ideas for directives.
One of them — do you remember the table of contents directive? You’ve got an entire document structure and you want to be able to have a little summary of it that could jump you around the document. I was intrigued by that. I told my friend Matt about it. I’m like, “That might serve as a pretty good example for our whole Advanced Directives talk.”
Matt, being to kind of guy that he is, he didn’t slow down. He just want ahead and wrote one. I thought I was going to write one. It turns out Matt is faster than I am, so he got onto it first.
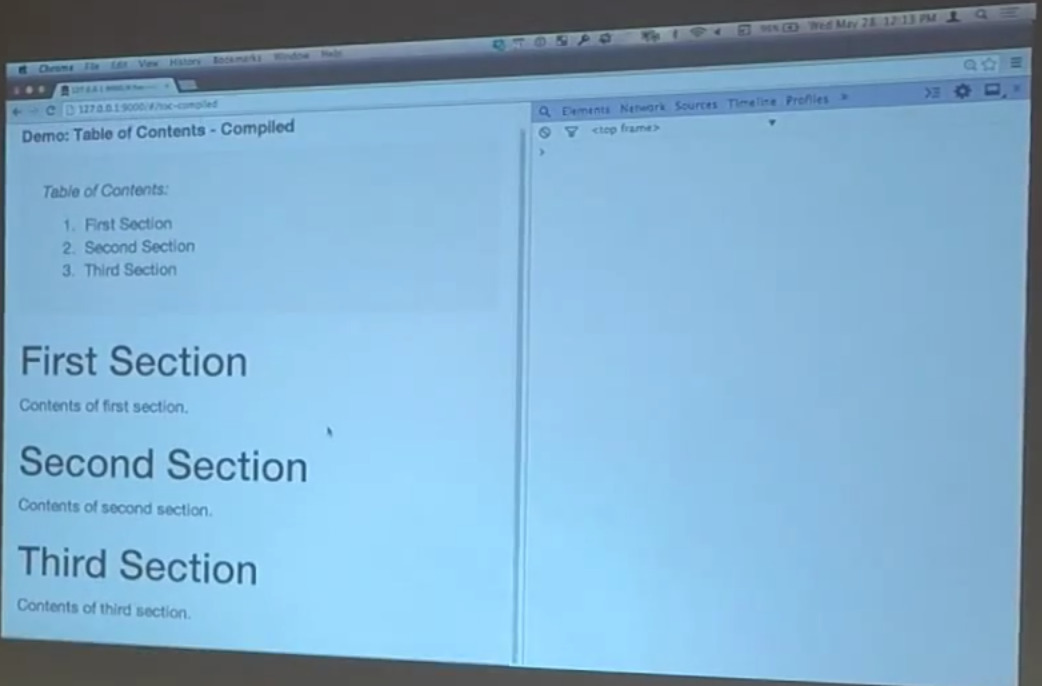
Here’s the way this thing looks.
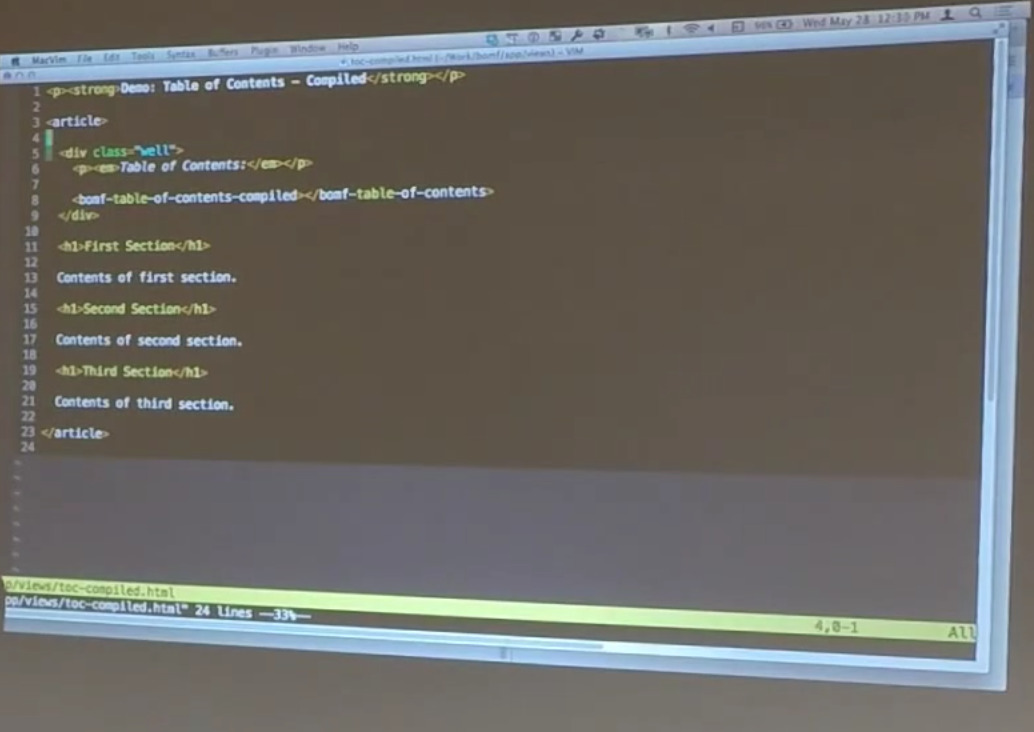
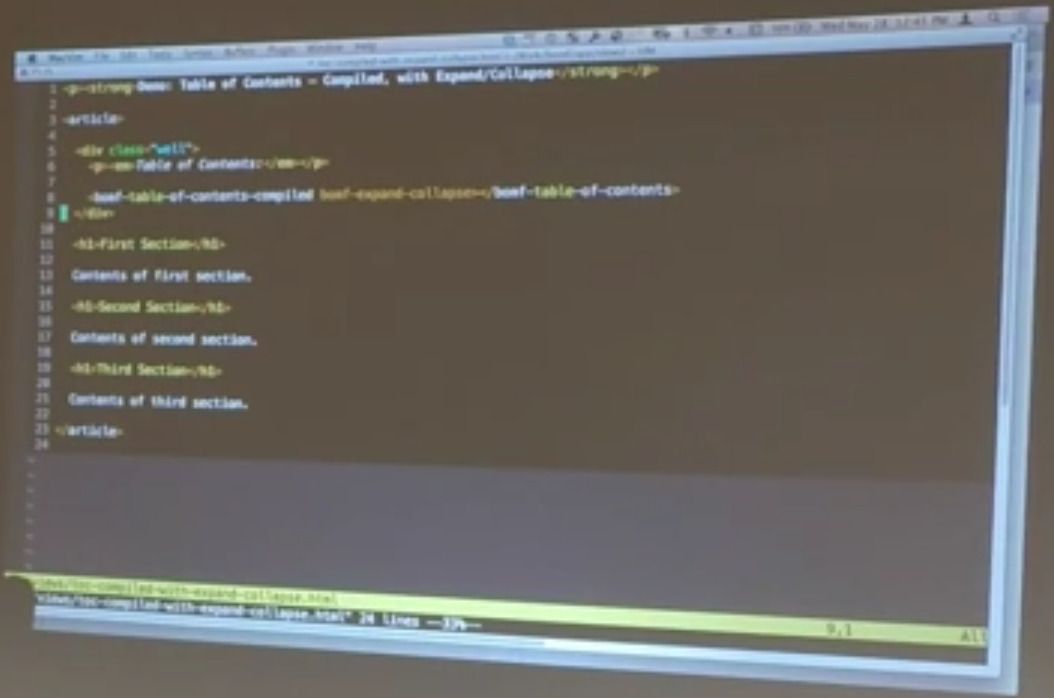
Down here at the bottom — this is your typical HTML document. This is the h1 tags. I can show you what the code looks like. It’s very, very simple.
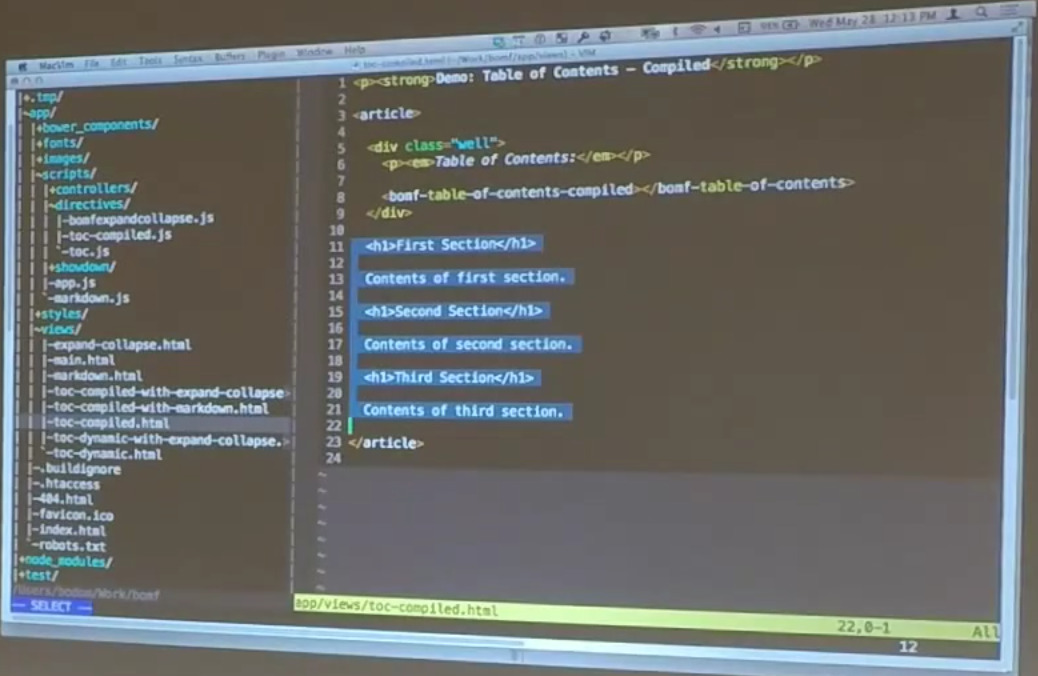
Just exactly what you would expect. h1s all the way down with a little bit of text in the middle. And then there’s this table of contents directive here. It’s got a little verbose name because we’re actually going to have a couple of different versions of this. That’s Bill Odom, Matt Bonf.
Table of contents. This is the compiled version of this directive, which we’ll show you in just a second. That walks through the document, collects up the h1s, and creates a little table of contents out of it.
Did you want the walk through the code for this guy first? What do you want to start with? It’s your directive and I don’t want to go down the wrong path here.
Matt: I guess we can walk it. It’s really simple.
Bill: Yeah. That’s the idea. By the way, I’ve split this into the compiled version and the non-compiled version so this one just has the compiled…
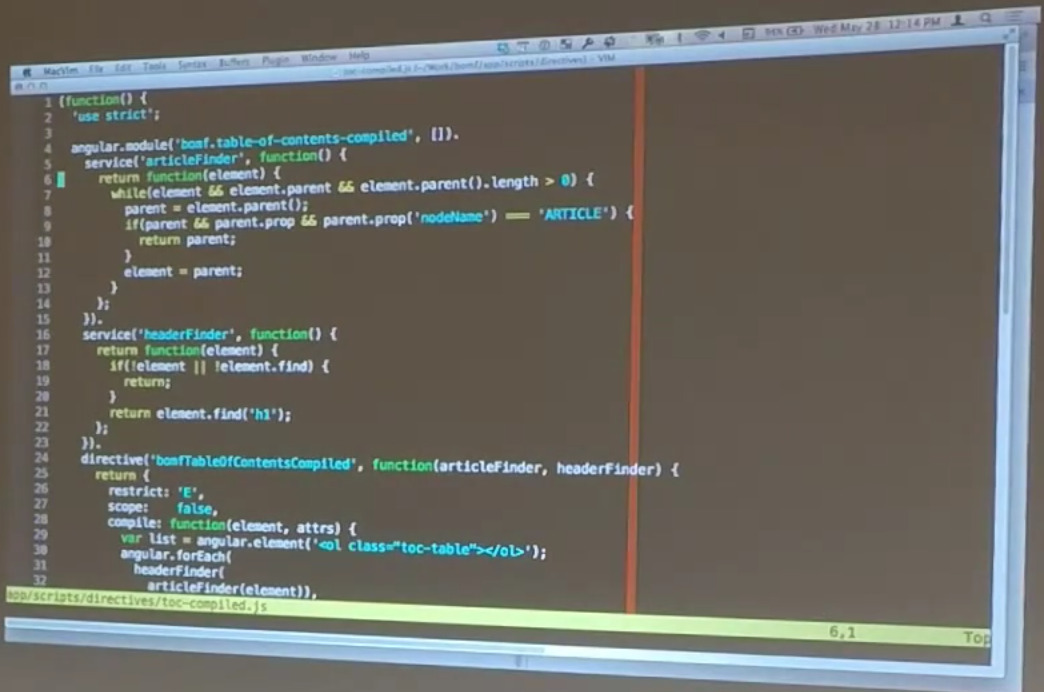
Matt: If we had included jQuery in this, we could have done like all the headers, could have just used the headers finder, like the colon headers finder and gotten all headers. Instead of complicating this by adding all that stuff, we’re only going to be using h1s for the table of contents.
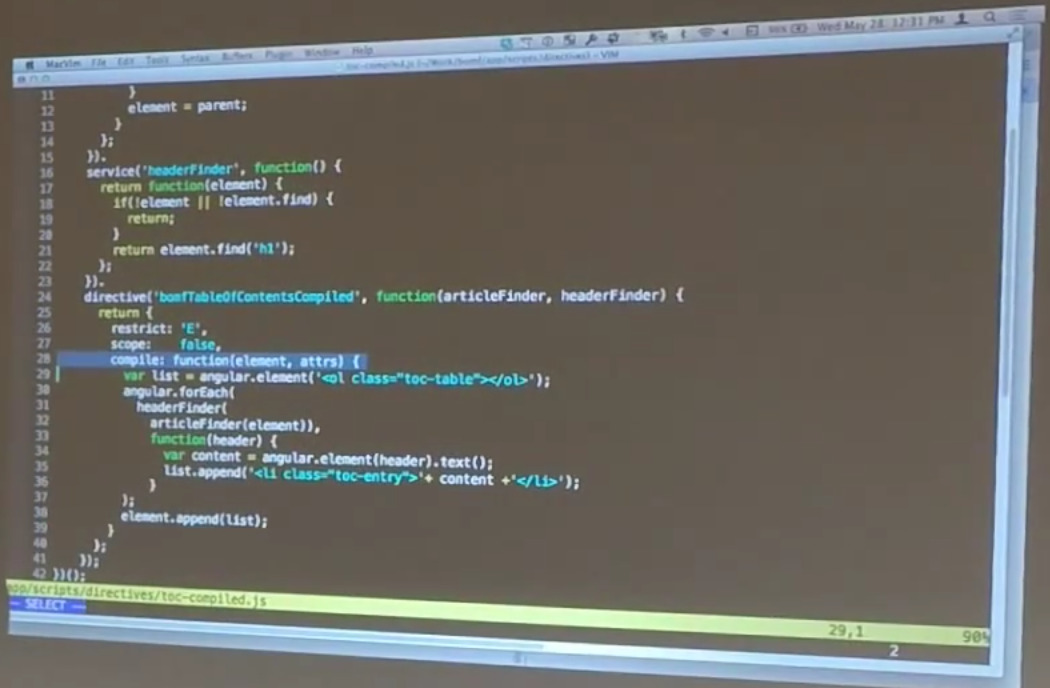
Since we’re putting this into its own module, we can kind of namespace this and add services that aren’t really very useful to the rest of the world but useful for our specific purposes. So we have — it’s a service that, given an element, will go and find all the h1s in it or given an element, it will go and look for the parent article. Unfortunately, Angular JQLite doesn’t allow you to use selectors, so you actually have to walk up the pear tree and find where the article fits.
Bill: If we had decided to use jQuery in this, a lot of this stuff would simply go away. But we were trying to leave jQuery out as much as we could.
Matt: So, those services exist to simplify what the directive actually does. The directive exists solely as something that happens during the compilation phase. When Angular finds our table of contents compiled directive, it calls our compile step which just goes through, and it automatically finds the parent article so it knows what it’s building its table of contents on. Then it finds all of the headers inside of that parent article. And then just for each one of them, it walks through and it adds a list element for that specific header inside of the ol.
It appends that all in so that now, your table of contents after compilation includes the ordered list of all the headers inside.
Bill: Keep in mind the bulk of this stuff is not necessarily Angular specific. We’re simply walking through a very naive walk-through of the DOM. The Angular pieces of this are the fact that we’re doing this in the compile — as the function associated with the compile property. We’re not providing a static template. We’re actually walking through the DOM and generating the HTML that will get turned into our actual directive.
Matt: So, honestly, what the compiler’s actually doing is almost completely irrelevant. We restrict this element now that I think about it, we could add this as an attribute also.
Bill: Yeah, although that led to an interesting problem that we’ll bring up later.
Matt: So, angular.element, it’s automatically wrapping this — it’s creating this new ol and it’s wrapping it into the JQLite, so they can actually have access to various things like append, and then we’re just using JQLite to…
Bill: I do like — one of the things I found interesting about the code that Matt wrote was the fact that he’s dropped a couple of services right here along with the directive. They’re part of the module that this directive lives inside of. I know that one of the things early on when I was writing Angular that I kind of got trapped by was the Angular seed project structure lead me to think certain things had to go in certain places.
It turns out the structure of your application or the module relationships are actually much more malleable than you might be originally led to believe. So, little techniques like this are, I think, valuable to just at least see on occasion because they show you that you don’t necessarily have to do things in the very rigid structures that some of the tutorials show you.
Again, a lot of this stuff, like the header finder and article finder, all that goes away in one big swat if you include something like jQuery. Or if you wrote a service off to one side. It was your own DOM traversal service.
So again, that’s not really the point of this example, but we wanted to make it easy for you to see what’s actually happening. It’s also an example of a directive that isn’t necessarily limited to just its little piece of DOM.
This thing is actually going out and looking at its surrounding environment and doing something interesting with it, which I thought was a neat inversion of what you usually see with directives, which are very inward focused. Like I’m going to build a chunk of functionality and it’s going to live here in this little box. Well, in reality, we are building stuff into our little box, but we’re looking all around us to figure out what goes in there.
Participant: Bill, did you say that those services are only used by this code?
Bill: Right. This is only being used in here.
Participant: So what’s the advantage of making them be services versus just making them be regular functions outside of the Angular module call chain. Because you’re already at immediately invoked functions, so they’ll be scoped to this file anyway.
Bill: You are a phenomenal straight man.
Matt: We promoted those services for testing abilities. Yep. And so we have some tests we can…
Bill: I was going to jump to that next. Here are the tests associated with that. But to answer your question, making those services and not completely hiding them away inside of that encapsulated scope means that now they’re immediately available to Karma, Jasmine, unit testing stuff. There you go.
Matt: Okay. They’re not in this example, but they do exist on the github project. Basically, because we made them services, we could write tests around them and so we could actually write all the tests that we needed. We didn’t have to do the whole, “How do I test my private method without actually having access under the hood, scoped within this function.
Bill: And that’s my bad. I pulled in pieces of your project. I didn’t pull in this one. I apologize. But the idea still stands. By busting them out as services, you now gain access to them that you wouldn’t get otherwise, and they’re just like any other service that you would be testing in Angular. Then you want to go ahead and walk through the actual inspection cells?
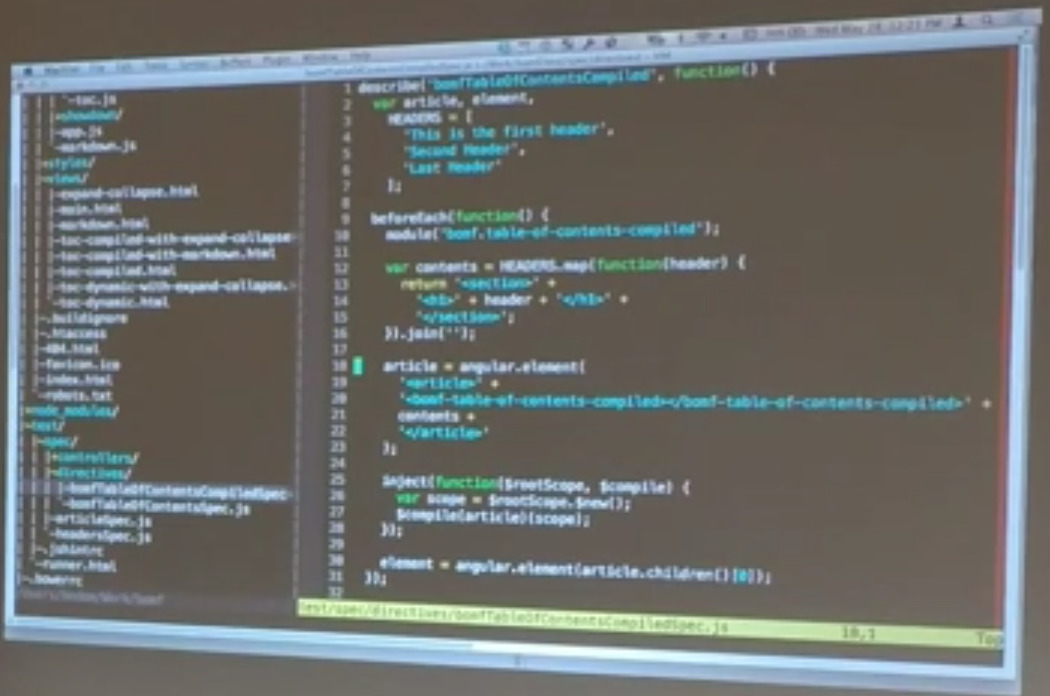
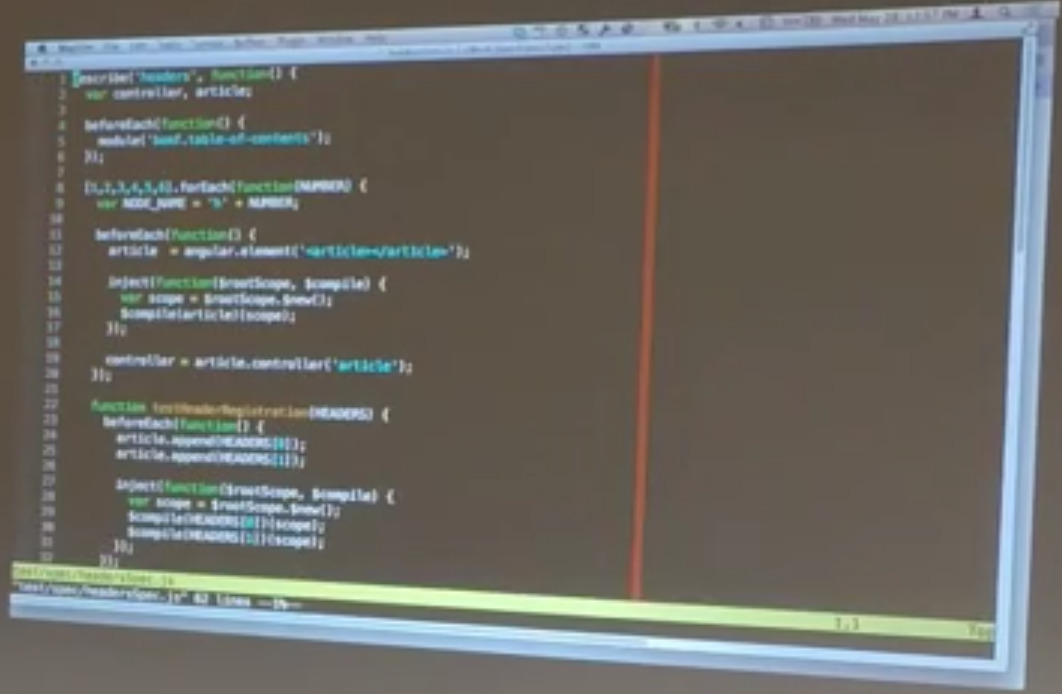
Matt: This stack — because those service specs are testing the actual — a lot of the functionality — this is only testing what the directive is going to be doing. So it’s testing that, given I have some section element that has a child of the table of contents compiled directive and a whole bunch of headers, I want to verify that this works at the level of a directive instead of working at all individual pieces.
And so we kept these specs to that level. What you can see is like, we actually go through and we build out something that has three headers. It just takes each header and it wraps them in h1. So it takes each one, wraps them in h1s and then wraps all that and puts in into a section. We’re going to take each section, and then it takes all those sections and sticks them into the article with the table of contents. And then it just goes ahead and compiles all that.
Bill: This, by the way, is the technique that’s worth talking about in an Angular unit test of directives. This is a technique that I think we picked up from Vojta, the guy who wrote Karma. People are like, “Well, Angular is all about testability and that’s really cool and all, but how you actually test a directive?
There is an argument to be made that unit testing of a directive is a little bit strange. You really should be doing a functional level testing of a directive, but it actually is possible to do some valuable unit level testing of a directive, and this is the way that you do it. You actually create — and this is what Matt was talking about right here. You’re creating an Angular element and then compiling your own little chunk of DOM.
In this case, right here, when we call Angular’s compile service with the article that’s the element that we created, and then hand it the scope that we just ginned up, what we end up with is an element that we can then do things with. An actual compiled Angular element. Just in the same way that Angular walks through the DOM tree in your browser itself and finds directives and compiles them into actual Angular things, that’s exactly what’s happening in this chunk of code. And then we’re extracting that particular element.
So, we’re doing this before each one of our unit tests. So, every one of our unit tests compiles this little miniature chunk of DOM that contains the bonf table of contents compiled directive within it, so that we can now poke and prod in each one of these tests.
Matt: Just for clarity. Element there — all it’s doing is looking at the article, and the first child of the article is that bonf table of contents, if you looked at the…
Bill: So, right there.
Participant: Can I ask you a question on that line? Did you have to manually rewrap that element there because it’s really odd. If you have it and it was an Angular element and you ask for its children, and for it to give you something back that’s not already wrapped for you.
Matt: So, children give you back something that’s wrapped, but then if you pull the first item out of that, that’s not wrapped. There’s probably a method that I could have called…
Bill?: It’s probably a different method..
Matt: Instead of accessing it by an index, there’s probably some way to get this one and then that’d give you back a wrapped element.
Bill: I have run into that myself multiple times. Normally you do get back a wrapped element that’s essentially a jQuery element. But sometimes, like in the case he’s talking about, you end up with this thing that you’ve got to actually rewrap again. So, it’s worth watching out for. It can trip you up.
Participant: I see countless examples of people sort o–
Bill: Like extra layers of parentheses?
Participant: Yeah. Every single time they see something they immediately rewrap it. Like everything. They don’t even wonder if it’s wrapped. They just wrap everything. I think some people wrap in in an Angular element and then wrap that with the jQuery $.
Matt: It’s safe to do that if it gives you a nice feeling.
Bill: No. It’s people doing wrong. Don’t encourage that.
Participant: It’s stupid, but it’s safe.
Matt: Then from here on, we’re just actually checking, did it create the DOM that we expected it to create. In this first test, we’re just making sure that it appended something to it, which is really the ol. And then we go…There was this spec, I thought, somewhere that actually verified that it was an ol. It’s right there.
So, we say, “Make sure there’s only one thing that’s being appended to that bonf table of contents compiled.”
Bill: Because we’re creating an ordered list here. That’s what he’s checking for.
Matt: So, make sure there’s only one of them. Now that we know there’s only one of them, let’s treat that as the subject of the rest of our tests. Is that one thing — is it an ordered list? Does it have as many individual lines as the headers that existed in the previous one? And then, this is cheap, but if I just concat all the text together from that ordered list, does it look the same as the headers that were there before, which is implying a lot. It’s implying order, it’s implying content. Really that could be a bunch of tests.
Bill: These are really more stubs to demonstrate that you can grab a compiled Angular directive element and then inspect it to do different things. These are examples, so don’t go living your life by them, but it’s possible to build these tests so they aren’t quite so brittle.
That is one it the things that Matt and I found when we were trying to figure out what the dividing line was between what makes an effective directive unit test versus what really needs to be moved into functional testing. Where we landed was to do some of these things but try to keep them fairly generic so that the tests aren’t quite so brittle. But to test those things, like the general number of elements that I would expect to get back, the general structure of the directive.
It’s kind of like — it’s not black box testing, maybe it’s gray box testing. We want to make sure we get the rough structure of the directive tested properly. But when it comes to how the thing actually functions, then you would move that off into more functional testing with something like protractor, or in the case of our applications, Cucumber-Selenium-Capybara, something like that. You’re actually pretending to be a browser.
But this can be an effective technique for basic testing of directives. Again, the moral of the story is this little trick right here. Creating your own scope, compiling the chunk of HTML and handing it that scope, and then grabbing the element that you’re actually going to be testing. Those little pieces, that’s the valuable part for actual unit testing of a directive.
Matt: One thing to note. One of the ways we actually do this in our code base, is before we ever enter jQuery to the actual production application, we had jQuery testing-wide, within a couple of days, I think, of starting testing. That gave us all of the selectors and all of the things you get through jQuery. And so a lot of the testing of these sorts of things in a much easier way where we’re testing much more robustly the actual DOM structure. Because then we get all those selectors and what not.
Bill: We held off on production use of jQuery in our main application for a long time, but we used it in testing almost immediately. That is the other thing to keep in mind. Just because you’re in Angular and you’re trying to avoid jQuery as long as possible, doesn’t mean you should avoid it where it doesn’t end up in a production app. Go ahead and use it, it’s a useful tool.
Again, if you do need it in your production application, that’s not a sin. It is okay. Just make sure you’re using in within directives. Don’t go loading up. Just because you decided to use jQuery within your app, that doesn’t mean that all the rules disappear. Don’t start putting jQuery code in your controllers. Again, directives are for DOM manipulation. jQuery is for DOM manipulation. So, use jQuery only within the directives.
Participant: We talked a little bit about the compile phase. Do you want to talk about when compile does it’s thing for Angular in general?
Bill: If you don’t understand this piece, we’ll cover it very, very quickly because it is valuable to understand. This example here is showing the way that a directive can examine the existing document structure during the compilation phase and create essentially it’s own template on the fly.
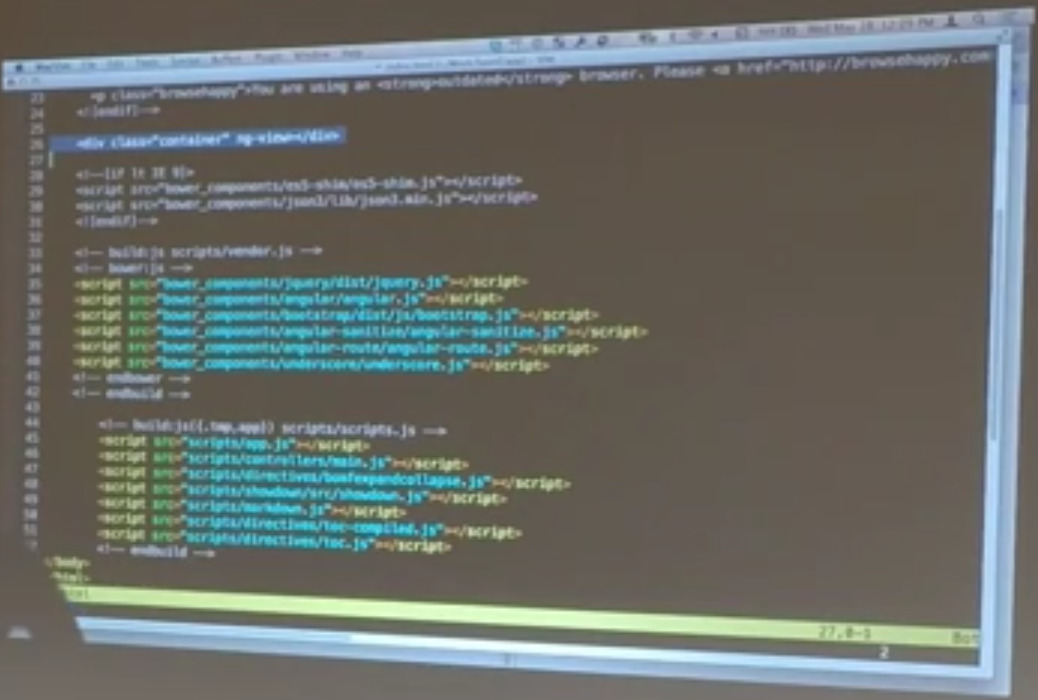
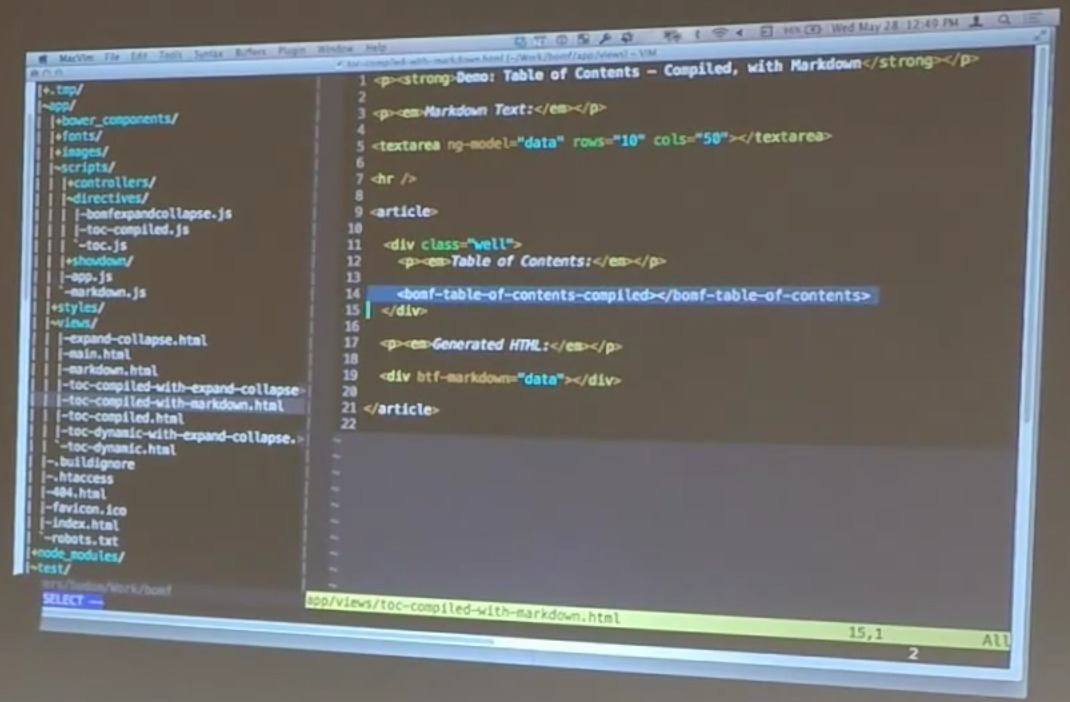
That’s really useful but it’s happening during the compilation phase of Angular. What Angular is actually doing… When you load an HTML page…Let’s see. We’ll pull up index.HTML. So this is a Yeoman-generated HTML page that is for an Angular app. Lots and lots of boilerplate garbage in here. But the important parts are… This is an application that used ng-router, so there’s a view container where you’d expect it to be. And then a bunch of scripts in there at the end of the document because Kyle makes sure that we all put our scripts at the end of the document. We got religion.
All of our third party components and then the components of our application. Here’s where Angular’s actually loaded. But we’ve got an HTML page going on, and Angular gets loaded up, and it goes through a few phases. One of the things it does is goes through a compilation phase. What actually walks the DOM that is created when your browser parses an HTML page. Walking through that tree of nodes and finding Angular directives.
So, in the case of our application, we’ve got this page and p tags and strong tags and article tags and div tags. That’s all fine but as soon as you hit this guy — that’s an Angular — that’s something it doesn’t recognize.
But when Angular is walking through this, it looks up that name in its big list of directives — we’ve got find — and realize, oh, that corresponds to something I care about. Then it builds out that directive, either augments or replaces this structure with the directive definition.
During that compilation phase is when things like this stuff all happens. During compilation is when our directive has the opportunity to go out in the DOM and find stuff and build its little template that it uses. That’s great except for one problem, which is what happens if this stuff changes after the fact. We’ll talk about that in just a second.
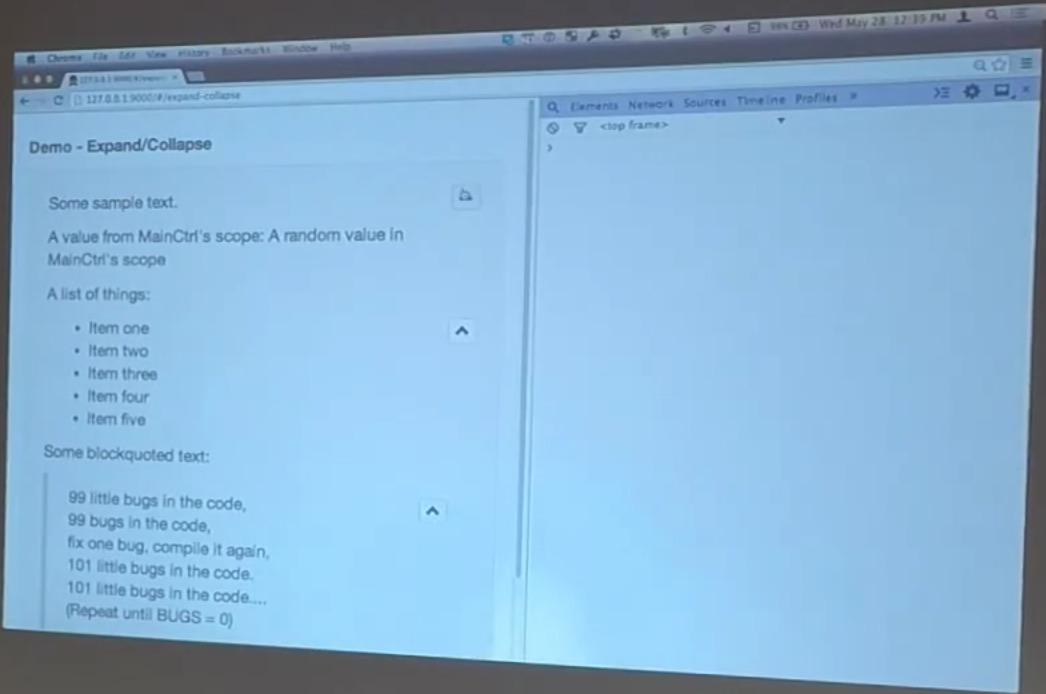
But before we get there, I wanted to show you another directive. This one’s a little simpler, even than the table of contents. It’s an expand collapse directive, so we’re blaming Harry for this one again because this is another one we talked about.
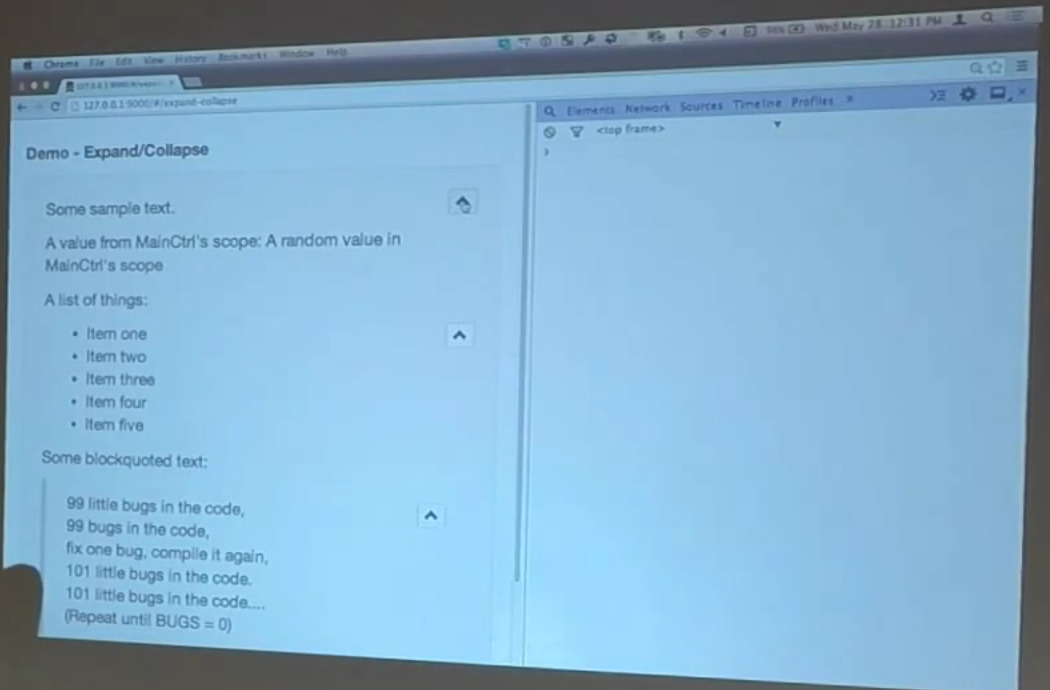
This is, again, a very simple directive. All it does is it attaches a little button to the side of a block element that lets you do things like this. Here I’m expanding and collapsing the entire element. And here I’m expanding and collapsing the individual list item, our unordered list within here. Here I’m expanding and contracting a blockquote.
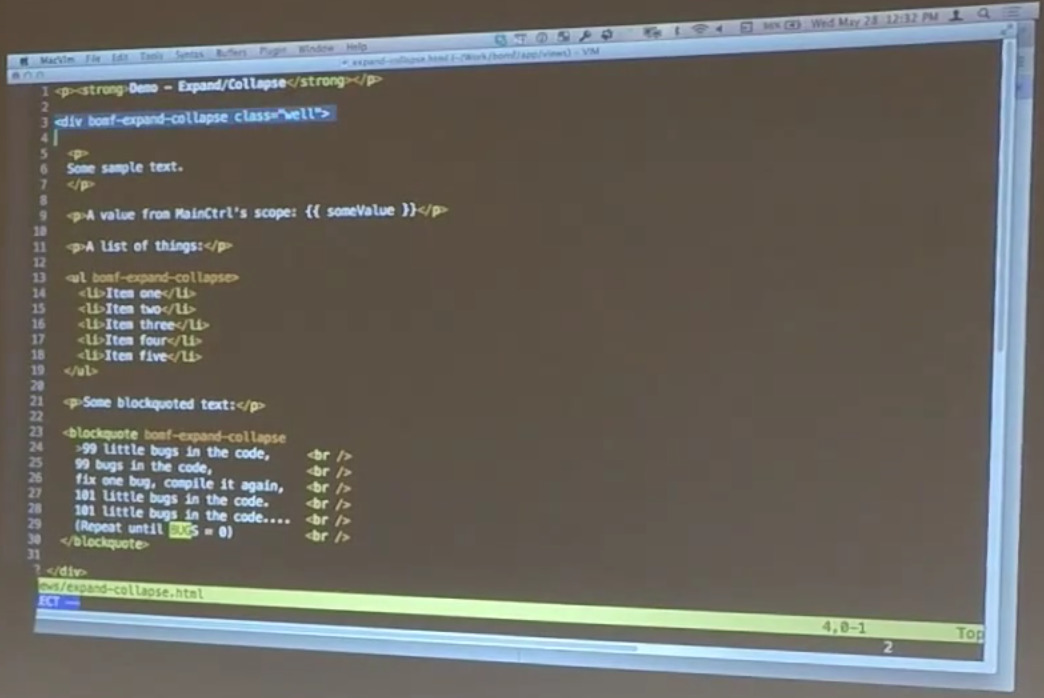
Nothing’s super fascinating about this. The HTML is exactly what you would expect. This one is not an element-level directive. It can be attached to any block level element. So, this is the expand collapse directive that’s hanging off of this div. There’s a similar one hanging off of this unordered list, and another one hanging off of this block quote.
What this does is simply adds that little button off to the side that lets you do a useful thing. The philosophical point here is this is a good example of adding behavior to an existing item with an attribute-level directive. The table of contents directive is an element-level directive, which is great. It works fine. We could also do it as an attribute-level directive.
But in general — you had a really good way of phrasing this in your notes.
Matt: Well, I don’t remember what I phrased in my notes, but basically attribute directives are supposed to be the building blocks of your actual. So, the element directives are kind of your domain language. They are the things that your application is actually doing. You have a button that’s performing some task. That’s the “do something” button, right? That button should be composed of these attribute directives that are the building blocks of that. So, we have, in our production code, attribute directives that do things like pop-up comment modals and pop-up all these different pieces.
And then we have directives that are actual buttons that combine that and a couple of other things together so that when you click a button, it fires off all of these things that all the little attribute directives added to it that perform the greater task.
Bill: What I like about that is thinking of element-level directives as the nouns and verbs of your DSL. And attribute-level directives, like the one you see here, as adding behavior to those higher level elements. In this case, we’re adding behavior to built-in HTML components. I didn’t create a div directive that has the expand-collapse capability. I simply dropped it onto the div element. Same thing with blockquotes and unordered lists.
Essentially any HTML block element should be able to take advantage of this.
Participant: So, are you using document.createElement for those element directives that are to get IE support? Or do you not need that?
Bill: And in the case of these examples, we’re not trying the reach very far back for IE. You can do a lot of that stuff. The Yeoman code that I was showing before adds a bunch of shims in for things like that if you want it, but for the purposes of these demos, we’re forgetting that anything before IE10 exists. It’s possible to do it, but you’d end up gumming up a lot of your code. I know with Maritz, you had the care about a lot of that stuff. Which is why I don’t work with Maritz.
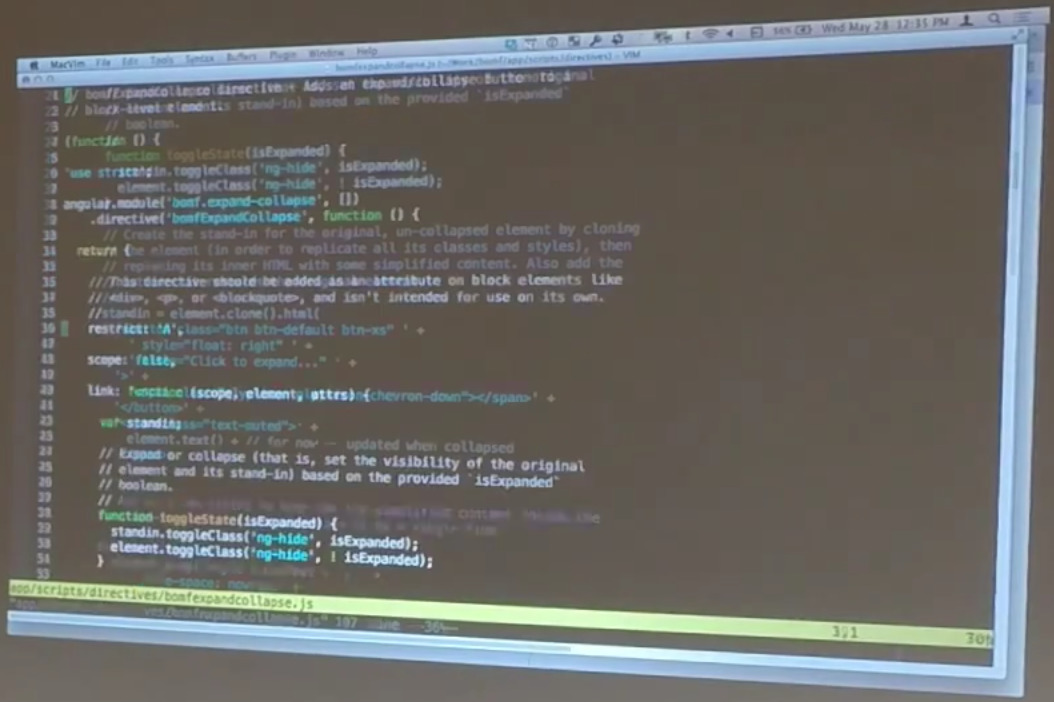
So, what does this code look like? Again, we’re just defining a module that contains this particular directive. In this case, we want it to be used as an attribute directive, again, because we’re trying to restrict its use to block elements, and it’s not something that’s intended for use in it’s own.
It this case, we don’t have a compile function. We don’t have a template. We just have a link function. The idea behind what this guy’s doing, is it’s going to created a stand-in element for whatever we’re expanding and collapsing. To use this block quote as an example. We want to be able to expand and contract. But I don’t want to change the expanded element that we started with. I actually want to swap it out for a different element.
So, that’s what this guy’s doing. I’m creating a stand-in element by cloning the original element. Now, remember with our link function we actually get parameters — our scope, our element, and the attributes for the element that we’re hanging off of. I’m cloning the original element right here, but then I’m immediately replacing its inner HTML with all of this stuff. Why am I doing that? It’s because I want to make sure all the styles associated with this particular element get carried over for me.
And I found quick way to do that. It’s not the only way, but a quick way to do that was simply to start with the existing element, clone it, and then nuke the insides of it.
So, in this case, I’m creating this stand in, and I’m adding this button that you see off to the side. I’m giving it a span that contains the text that I care about. In this case, I’m starting off with the original text of the element. But that won’t be where I keep it. You’ll see a little trick that I do here in a moment to talk about that.
When I collapse this, I just grab the text and throw it in here. Then I add a few more styles to make the effect that you see here. So, when I collapse it, I want to italicize it. I also want to make sure that it’s constrained to a single line, I hide all the overflow. I stick an ellipsis on the end. These CSS styles do all the work for me of making this look the way that it does.
So, again, I’ve cloned the element up here, ripped out all its guts, and then added a few additional styles onto it. Again, this is mostly for demonstration purposes. I wouldn’t necessarily do it exactly this way in a real application. But the technique works well enough. The other trick I do, is I immediately — before I ever add this stand-in element — I add class ng-hide. This is worth knowing about.
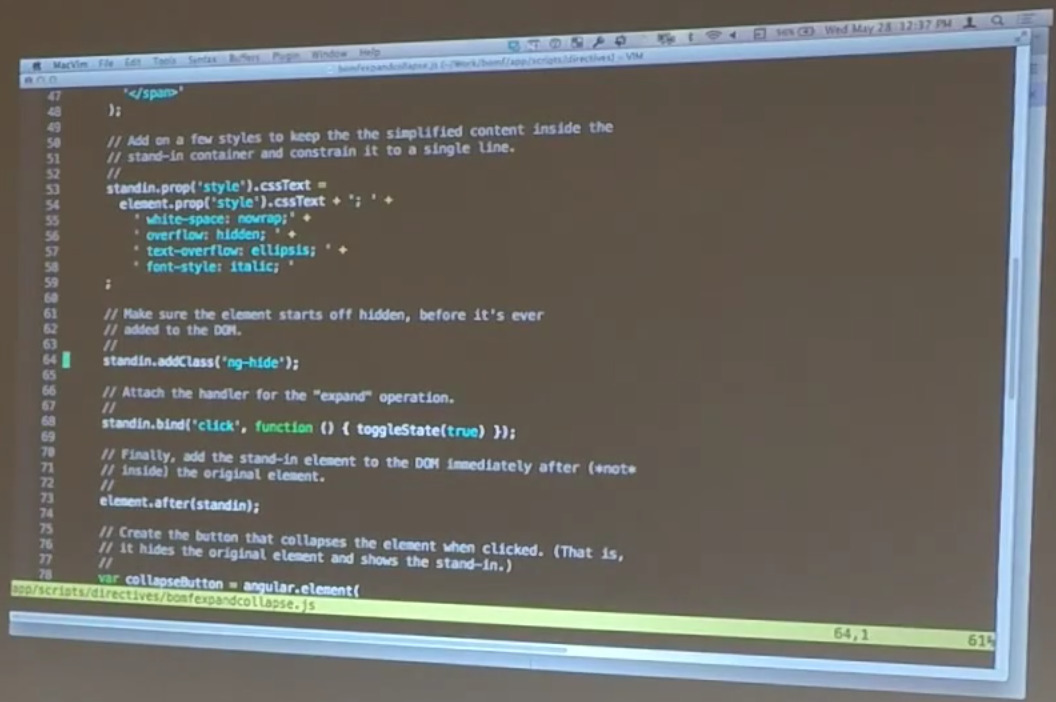
I wanted to be able to add a class that would hide this thing. I’m like, “I don’t want to create my own class. I don’t want to add more — a display-none to my style.” I’m already feeling bad enough about adding styles in manually as it was. Well, it turns out that the way Angular’s ng-hide and ng-show directives — the built-in directives that Angular provides — actually the way they work is by adding and removing the built-in class that’s already inside Angular called ng-hide.
By simply adding the ng-hide class, I’m able to hide the element exactly that same way that Angular would.
Then, finally, on binding a click event to the stand-in element to toggle the state to visible. You can see up here at the top, I have a little toggle state function that toggles the ng-hide class on or off. In other words, adds or removes it based on whether the element is supposed to be expanded. Notice: It’s got the original element that we’re working on and the stand-in element, and they’re just opposite of each other. So, is expanded or not is expanded, so when I hide one I show the other and vice-versa.
Again, that’s attached to the click event.
Finally after I’ve done all this element creation, styling, binding of click events, that’s when I finally add it to the DOM. Now, since it’s hidden, I don’t actually see anything. An important thing the note is I’m adding the stand-in element immediately after — not inside — the original element. That will become important here in a second because the next thing I do — I actually do add a new element inside the one we started with. Again, remember, we’re augmenting block elements, so I can do this.
I’m now adding a button inside of the expanded element. That’s how these guys show up. So, this is the button that’s on the element when it’s in its expanded state. That works basically the same way we saw before. I don’t have an encapsulating div or anything like that because it’s already inside of a block element, but it’s the thing that contains the chevron up or chevron down, depending on the whether I’m going to expand or collapse.
Again, it’s also binding to the click event, toggling the state.
This is the trick I was talking about earlier. Originally when I defined that stand-in element, I gave it the element text. And that’s great unless your text contains like this, a value for main control scope, a random value main control scope. This, in our HTML code, is actually an Angular expression of some value that’s coming from a controller that’s associated with this. If I didn’t go in here and update the text… Notice I still have my value here, but as soon as I collapse it… Notice we’re seeing a little bit of that Angular expression, which is not what we want. We want the actual value after it’s been evaluated and inserted into the DOM.
If I never went back and updated the text based on whatever the current value is in the DOM, then I would begin to see things like Angular expressions. I also can’t just evaluate that expression on the fly because just evaluating the raw text of the element may actually change the nature of the expression. So, I need to grab the text at the actual point where I’m doing the collapsing.
So, in this case, I’m setting the text of the stand-in element to the text value of the expanded element itself. But again, the important part is that I’m collapsing and expanding. Finally after I’ve done all these things, I’m prepending the collapse button into the contents of the block element. Again, this is not a dot after. This is a dot prepend because I want it to be inside of the block element.
So, all of that just to be able to do this trick. Again, there’s a lot more I could do in order to make the spacing correct and all of this, but this just demonstrates that it does actually work. This is an example of it working in a nested fashion because these things are inside. This contains the whole thing.
Participant: I think a potential gotcha here — I can imagine somebody writing this directive might think, “When I create the button, I’ll just put an ng-click on that. I don’t need to do that binding.” That would be problematic.
Bill: Well, you could do that. In fact there was a version of this that I did that on, but you do run into the need to recompile things, which I wanted to avoid. The other thing was — again, you’re like the perfect straight man in the crowd — notice that my scope up here I’ve got set to false. Originally I had an isolate scope on this guy because I default to isolate scopes not matter what I’m writing, until I can’t use an isolate scope for some reason.
Well, the very first thing I wanted to be able to do with this guy is add it to our table of contents directive. I want to be able to expand and collapse the table of contents directive. But it’s got its own scope associated with it. As soon a I tried to use an isolate scope in conjunction with that other scope, I ran into a collision. Angular starts complaining, but I can’t have both of those on the same element at the same time.
So, in this case, I’m saying scope false to just use whatever scope I happen to be sitting in at the time. When I did that, I didn’t want to pollute my scope at all. So, using an ng-click would require that I hang my toggle method off of the scope.
Participant: I didn’t know Angular would complain about that. You’re talking about two directives on the same element that both ask for an isolate scope? I guess I was wrong. I thought what happens in that case is that it creates one scope and that they share it.
Bill: That was my understanding as well…
Participant: So, you’re saying is actually complains about that?
Bill: In earlier versions of the documentation that’s exactly what I saw as well, but in the particular case here, when I tried the do it that way, I got an error from Angular that was, “No. I can’t do that. I can’t have both of those.”
Now, I did play with several different combinations, but I didn’t want to mess with the table of contents directive. So, I figured this is probably a better example of, “How would I do this without adding anything to the scope at all?” For this particular directive, this is an attribute directive that is sitting in a shared scope. What can I do to be the best possible citizen of that scope, and this is just the technique I came up with. But because I ran into that, I’m actually going to go explore that more and see if I can figure out exactly what the combinations are.
Kyle, you may know. I can’t remember
In this case it wouldn’t work for me here because I don’t want this directive to have to be aware of any other directives. I did end up in this case where I need access to things, and I need to be able to do things, but I didn’t want to hang them off the scope because if I did, I’d have to come up with some really ugly name to make sure I didn’t run into a collision. In general, I tried to come up with a way to do this that didn’t require adding anything extra to the scope at all.
So, if I used ng-click, yes, I would have probably had to go through a compile step. And I would have had to hang my methods off of my local scope, in which case, I’m adding something to the scope that may not be expected by the people that are consuming this.
All of this works. Again, this is intended to be used in conjunction with existing elements, but of course, the thing that we immediately want the be able to do with it is add it to our table of contents. This is the same code that you saw before with one tiny addition. Its got this guy in it.
So, in here, we had our table of contents here before, but now I want to make sure that I’m actually able to expand and contract it. So, can I? Indeed, I can.
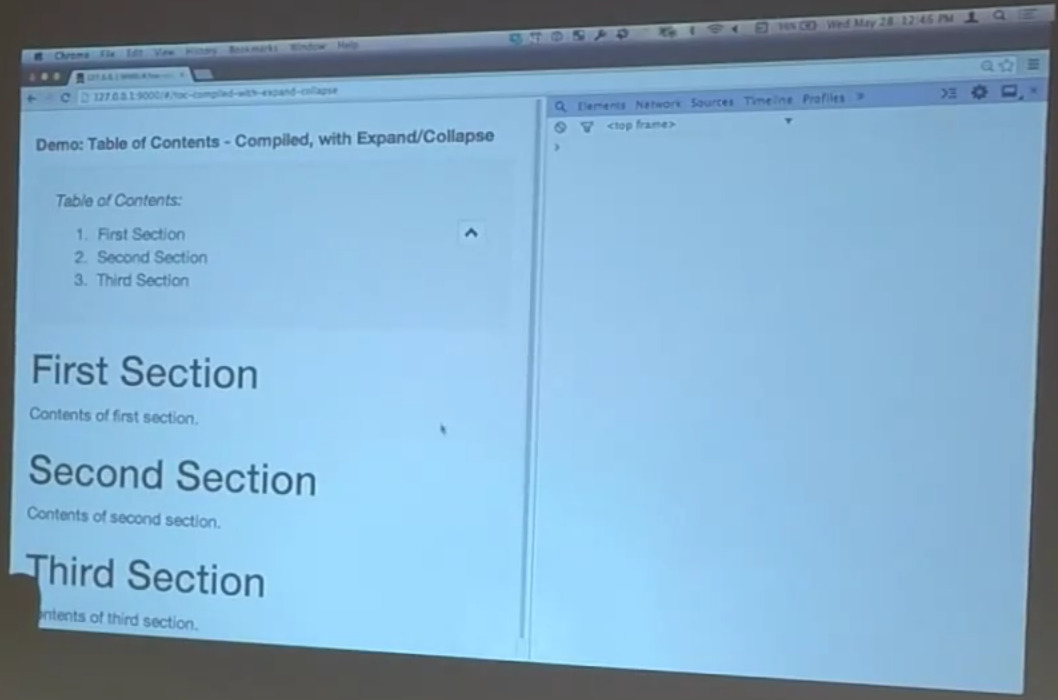
This is an example of exactly what Matt was talking about earlier. We’ve got this top level, element level directive, and we’ve added some additional behavior to it by simply hanging another attribute directive off of it. The table of contents directive knows nothing at all about the ability to expand or collapse things. They’re both just written in such a way that they can live together, and one can add functionality to the other.
This is something that I don’t think we see enough of in Angular applications. Again, people tend the think of, “I’m writing directives. I’m going to be this encapsulated chunk functionality.” that’s great, but it’s just as important to add these augmentation reusable kind of behaviors, often the attribute directives. And if you write your directives properly, you can get a lot of functionality, a lot of behavior, almost for free without having to add it constantly over and over again to lots of different elements.
Was there anything you wanted to say about that?
I know I kind of went off on that expand collapse stuff. Any questions so far by the way? I know I’m rocketing through a bunch of stuff.
Real quick. This isn’t one we wrote, but it’ll be useful for the next demonstration, so I wanted the show it real quick. This is a directive that Brian Ford, who is on Google’s Angular team, wrote that uses a service. He didn’t write the markdown service I don’t think.
Matt: No. It’s showdown.
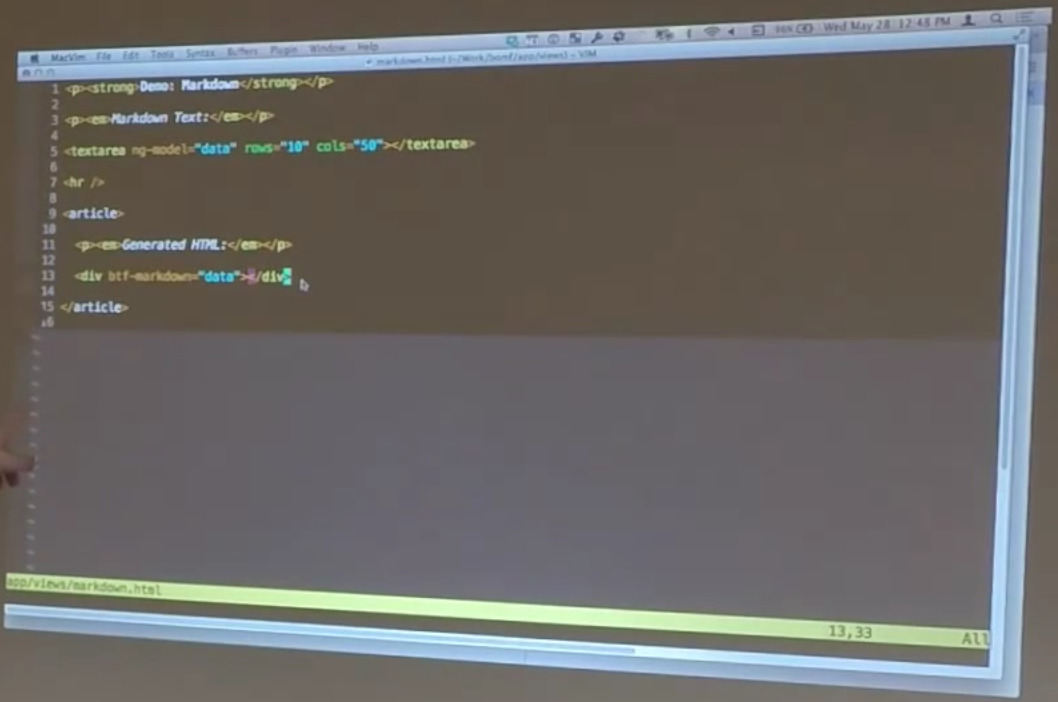
Bill: It uses the showdown, markdown, parsing library wrapped inside a directive so that you can do things like, “This is my text.” As you do that, this is actually being parsed as markdown and turned into HTML. So here in our HTML, all this is doing is you’ve got a text area that’s attached to a data model, and then you have a div that has Brian T. Ford’s markdown directive that consumes the data model and generates the HTML for it.
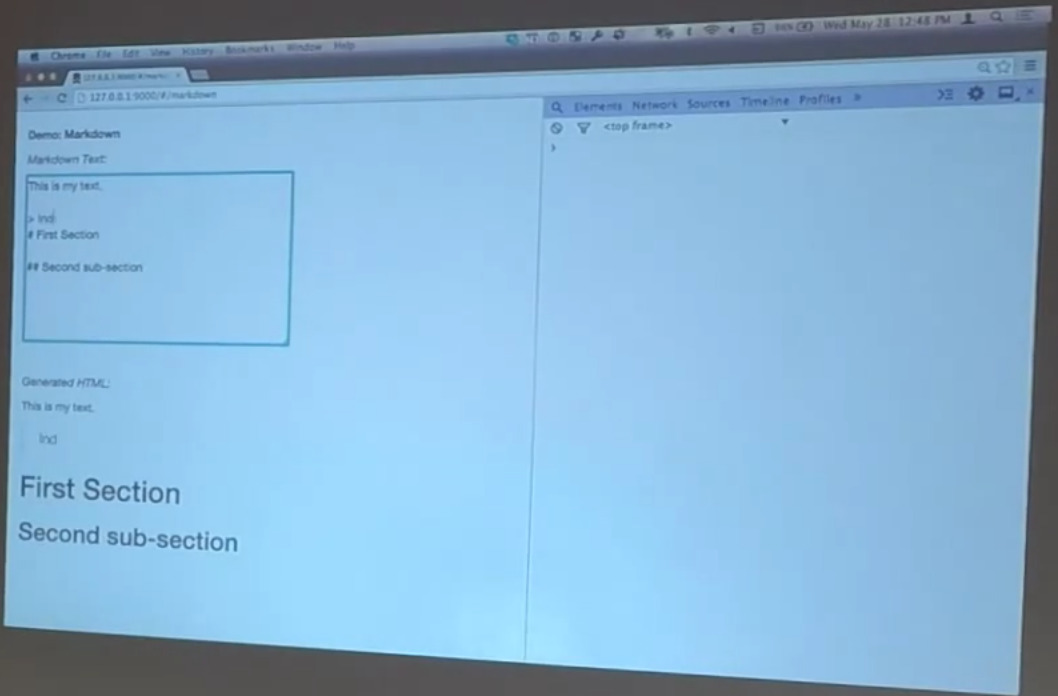
This is really handy. It supports all of the typical markdown stuff, just like you would expect. The reason that we’re showing it to you is because it’s a really good example of dynamically-generating HTML. All of this stuff that’s happening down here inside of this div… We’ve got h1s being created and taken away and all sorts of dynamic things happening down here. And that’s great.
So of course, as soon as we can do that, we obviously are going to want to add a table of contents to it. What do you think the problem’s going the be?
Here in our compiled version of this thing, this guy is happening at compiled time. It’s looking at this document structure here and as soon as we start doing that dynamically, nothing useful is going to happen. Here is my markdown text. I’m generating the table of contents based on whatever happens in here. So, let’s see if it actually works or not. Table of contents using compile directive.
So, here is my text. That’s fine. That’s great. I’m generating the HTML. So, I should get an h1 now. So, section one. Section 2. Nothing’s happening in my table of contents for exactly the reason that we just said. The table of contents directive only had a chance to look at the HTML during the compilation phase. Unless we’re willing to do something like what we were talking about a second ago and actually rerun the compile manually, then we’re not ever going to get this updated table of contents. And that’s a problem.
So, Matt, being the incredibly productive dude that he is, went back and rewrote the table of contents directive. In this case we have a dynamic version of this. So, the table of contents now is no longer the dash compile version. Its just the table of contents. Same code otherwise, so what does that actually look like?
You see it’s actually beginning to update. So what’s different?
Matt: Actually there’s a lot of things different. In this version, we actually played with kind of a fun topic. We overloaded the article and header directives. So, now a standard HTML article or header element shows up, it actually does stuff now. If you can go down to the bottom where we do the headers.
Basically all we’re doing is, during the linking phase, we automatically register a new header with the article. This one actually doesn’t even exist, but it’s there. And then when the element’s destroyed, we go back and we unregister it with the header, so we just keep a registry of all of our headers that existed.
For this to work, it requires that there is an article above it. The article controller above is the one that’s actually keeping track of this header registry. So, its controller has some methods that it provides publicly. Unregistered header and registered header and list headers. That allows you to easily say, “Okay, push a new header on, take a header off.” Every time the registry has been changed it broadcasts that event for anything that’s listening on that.
Because we have that parent child relationship that we created from elements that already existed of article and header, now when a header is added, the link step fires up a message — it calls out to the articles controller, adds itself to the list, and then when the header is removed, it removes itself from the list.
Bill: Just to point out… This require here with the carrot article basically says this table of contents directive has to live inside of an article element. By doing that, that’s what gives us this additional parameter on the link function that the articles control.
Matt: Just to be clear, there are other ways and probably easier ways to have done this. This was a little bit out of the fastest path, but it kind of got to show the whole parent child hierarchy and how it requires stuff. So, we basically made that article as our common communication between all of our adult headers and our table of contents. Now, during the link phase, our table of contents sets a handler for when headers are registered or unregistered. It automatically regenerates the table of contents.
So it clears out and then it just looks through that registry and builds out that table again.
I was lazy, so this does not properly work at the header level, but that’s an exercise you can do.
Bill: A couple of things to point out here that are actually slight changes from when you gave the code to me yesterday. Originally when this code was created, there was a step in here that blew away the entire contents of element. So, remember, we’re in the link function. We get the reference to the element. Matt’s original code was saying element.empty. It is just nuking whatever was inside of the element.
That worked great for this particular directive, but remember the expand collapse directive adds things to the DOM, actually to the element inside of this block. So, what I had to do was come in here and make a minor modification that specifically removes just the ordered list that Matt’s putting list items in. In this case, I also added a little stub for when the table of contents is empty. So, I remove both of these things if they happen to exist, just so it doesn’t blow away anything that another directive adds to it.
In this case, the expand collapse directive is adding that button. If I didn’t get rid of the original .empty call, as soon as this ran the first time, it would blow away anything that got added to it. Do you want to go ahead and talk about the tests as well.
Matt: One of the neat things… Because we wrote the tests for the original version, we used a very high level, like, this is how we expect the table of contents to act in the world, not how is it actually implemented. One thing that you get is all of the original specs are still here. As brittle as they were, none of them failed. We were able to copy them over. The only thing we had to change was the name of the elements since the previous one was called bonf table of contents compiled. We changed that to bonf table of contents.
And then we added a bunch of additional tests that go through because the old one didn’t actually handle headers one through six. It verifies that. Actually I don’t think any of the new specs are all that terribly exciting. It’s just additional. Since we’ve written specifications at the level of this is how the directive should act in the DOM, we didn’t have to rewrite those. We didn’t have to change anything. We just got to add in new stuff, and the new functionality came out.
If we switch over the to article or the header specs, though, we also have to add specification for this stuff.
Bill: This is the same trick we saw before where we’re creating our own little miniature…
Matt: This was a little bit roundabout, but what we’re doing is we’re verifying that — when you register — It’s just passing the registration stuff. When you register a header, you get the registered headers back. When you register multiple headers, it doesn’t screw up the order… I want to jump to the header specs.
And then we have specs on the headers themselves that say, put some headers under the article and then every time that we add one, make sure that the headers actually show up in the spec. So, we go ahead and we create a header, and then we make sure, like, okay, I’ve added a header. Make sure that header shows up in the registry. I’ve added two headers. Make sure it shows up in the registry. I add headers of different types and they all show up in the registry. It just does all those permutations and we had headers one through six.
Bill: Again, we’re getting into all this stuff by instantiating just the article element. And remember, this is the article element which is a default HTML element that we have augmented with additional functionality behind it with a directive. And then it compiles it and we’re grabbing the controller off of the compile element. Again, another good technique, whereas before, we were looking at the actual element itself. In this case, we’re saying we want the element’s controller associated with it. Then we can actually do all these things with the controller.
Matt: For testing purposes, it’s very useful to know that an element, you can call .controller on it. You say controller and then the name of the controller, and it will give you the controller with that name on the element. If you say .scope, it will actually give you the scope that’s associated with that element. And if there’s an isolate scope associated with it, you can call .isolateScope() and it will give you that. That’s really useful for when you’re testing or honestly, if you’re just in pro devtools, you can quickly pull up the scope and start looking at what’s going on inside of your application.
Bill: Last piece here in the last minute that we have. I wanted to demonstrate that with the new dynamic version, we now have our ability to expand and collapse even on that one as well. All of the pieces still continue to work together. No changes were necessary on the expand collapse directive to make it work with this new directive. Again, it’s exactly the same directive as before, so it continues to work just like it the before.
We are at 12:59. We’re shooting for finishing by 1:00 and demonstrating a handful of techniques, getting a little bit of philosophy of directives out there, demonstrating how it’s possible to test some stuff. We hit things like require. We didn’t talk much about destroy, but you can see some examples of destroy, dealing with the event handling stuff that Matt was doing before. Any questions on the whole, what we’ve shown, or about anything else that you saw us talk about and mention?
Participant: It was interesting to me that you had that subtle bug that you fixed where the one directive was clobbering the collapse directive … that kind of encapsulates — microcosm all that’s bad, terrible about unrestricted access to the DOM, right? The whole purpose of directives, I guess, is to insulate you from that.
Bill: Right. It this case, I brought that up to give you an example of the kinds of things you might run into when you’re trying to do this surgical insertion of something in somebody else’s sandbox. But also if you’re trying to build directives that allow for that sort of augmentation, then that’s something to keep in mind. Being a good citizen can go in both directions. In this case, I would have written the directive in exactly the same way as Matt did initially because it is just simplest. Just blow away everything inside and put something else in the middle.
But with a tiny bit of additional, somewhat defensive coding, you can be a little more careful, a little more surgical about the way you actually create your own directive, and then allow for other people to do things in an intelligent way to your own directive. So, kind of a lightweight best practices sort of thing to keep in mind.
Participant: In one of these things when you were assembling your table of contents… Why the you do that 1996 style string concatenation?
Bill: Oh, that’s exactly it. Because I didn’t want to have other places… It this case, it was originally this much text. As I built out the example, it got bigger and bigger. But that’s a very good point to raise. Again, a lot of demo code here to just get some of the ideas across. There are definitely better ways than putting a big blob of concatenated string in the middle of your code.
Participant: One thing to be aware of: the Angular guides actually recommend that when you’re writing directives that your element directives are primarily the ones modifying the DOM because you can’t have two element directives on the same thing. That’s generally what they recommend as the best practice. You can’t do it all the time because if you want to reuse something, then it’s going to be hard for an attribute directive, so you have to fight that. But that’s how they recommend getting around that in most cases. Your elements modify the DOM and your attributes modify the …
Bill: In this case, this is something of a special case because we’re deliberately wanting to go inside of a block directive. It would have been 100 times easier just to wrap the directives. Like I’m going to expand or collapse something, so in order to do that, I’m just going to wrap whatever is already there. There’s lots of examples in some of our other code where we take an existing HTML tag and just put boilerplate code around it. The whole point of the directive is to not have to actually specify that code in your template. By augmenting the input tag, for example, we can wrap it with some other tags.
So, in this case, if I wanted to, I could wrap a block element with another block element that would contain that stuff, and then I wouldn’t be having to dig around in the innards of something else. But I thought it was an interesting example to show. In a single example, it shows both going inside and adding another sibling element along with something else. And then a couple of techniques going back and forth between the two.
The point you raised is a good thing to keep in mind when you’re doing stuff like this because if you’re building directives, be nice to the people who might use them. And if you’re doing this sort of things to other directives, keep in mind the things that can trip you up.
Matt: One of the crazy things that we we looked at the Angular … project is their mobile is actually a service. It’s not a directive. You actually get the mobile service and then you say, “Open,” or whatever. And that actually open a modal dialog, like a window will pop up. That seemed really weird to me for the longest time, but one of the things that that means is your directives that you have that are attribute directives that are not modifying. They don’t have to modify the DOM, they’re not touching the DOM at all. They’re using this one modal service that happen to actually go into …, but your one attribute directive — you could have like six of them on there — while they’re modifying the behavior because they’re causing things to happen, they’re not actually modifying the DOM in that case. They’re not creating anything in terms of …
Bill: Any other questions?