Analysis Projects – expedited, insightful project review

We deliver a wide range of services at Oasis Digital – training, mentoring, development, and plenty in between. Occasionally we do an “analysis project”, in which we thoroughly review a project’s code and related assets, then prepare a written report and discussion of recommendations. Customers typically request such an analysis for the usual business reasons:

  • Acquisition or investment diligence
  • Budget has gone awry
  • New opportunity drives a decision of whether to update or replace a software system
  • As part of a technology “bake-off”
  • Etc.

Although we work across a wide range of technologies, our project analysis work is focused on the technologies that we use most often, such as Angular, React, TypeScript, and Node, and many related technologies. The projects we analyze often have portions which span other technologies, and if they stray too far from areas where we have the greatest expertise, we caution customers that our analysis of those portions will be less deep.

Typical Analysis Project Scope of Work

The scope of work on an analysis project typically looks something like this:

  1. Meet with customer project managers and product owners to understand the business purposes for a project.
  2. Meet with customer developers to understand the technical background and status of the project.
  3. Study source code, documentation and other materials provided by customer.
  4. If there are multiple candidate sets of source code, use comparison tools and try to determine which is the most complete or up-to-date.
  5. To the extent possible, set up a development/test environment to execute the project. For some projects this is straightforward, rarely it proves impossible, usually it is somewhere in between.
  6. Assess use of third-party tools (open-source and commercial).
  7. Prepare a written report of our assessment and recommendations for the project.
  8. Prepare a screen video code review of some critical portions of the source code, if appropriate.
  9. One or more meetings with customer stakeholders (developers, product owners, etc.) to discuss the results.

Deliverables are:

  1. the written report
  2. optional screen video code review
  3. discussion meetings

The scope and deliverables for an analysis project do not include features, bug fixes, or other development work.  We do many projects which deliver those things – but those are not analysis projects,.

Typical analysis project report outline

An analysis report will typically include sections like so:

  1. Introduction and summary of customer situation
  2. Summary of analysis work performed
  3. Analysis of how data is stored and managed in the software as it executes
  4. Analysis of how data is persisted long-term, i.e. how data is stored to a database/files/backend/etc
  5. Listing of third-party code libraries used
  6. Assessment of the currency and future prospects of such libraries
  7. Analysis of coding techniques used in the software, relative to popular or best practices
  8. Commentary on any potential security issues we notice (although as a company we do not specialize in security analysis)
  9. Assessment of the user interface
  10. Assessment of the overall amount of functionality relative to the quantity of source code
  11. Overall assessment of the maintainability and future prospects of the code

Of course the specific outline varies from one analysis to another, and we often have special requests from a customer to look in particular depth at one area or another.

Schedule and Cost

Depending on the size of a project, the duration can vary from days to weeks, and the cost can also vary widely. We generally can quote a price, once we know some statistics about a project, and discuss the project with someone who is familiar with the code.

For example, on a project that uses AngularJS, we would inquire about:

  • How many Javascript files?
  • How many total lines of JavaScript code? Ideally the tool used to count this would skip blank lines and comment lines. For both this line count in the file counts, it is best to count only project code – sometimes these numbers can get artificially inflated by third-party code you are merely using which happens to sit in a library directory in your project.
  • How many template files?
  • How many total lines of template?
  • How many angular directives?
  • How many angular components?
  • How many angular services?
  • How many different third-party JavaScript “widgets” are used?
  • Mention any major add-on libraries that the application uses extensively; for example Lodash.
  • Subjectively, how many distinct screens/pages are there in the sites/applications? Is there a large amount of code driving a small number of complex pages?

Sounds good, how do I buy this?

This is just a blog post, but if you contact us we can discuss your particular project in need of analysis, get a sense of its size, and prepare a service agreement to begin.

Environment-specific modules, services and components in Angular

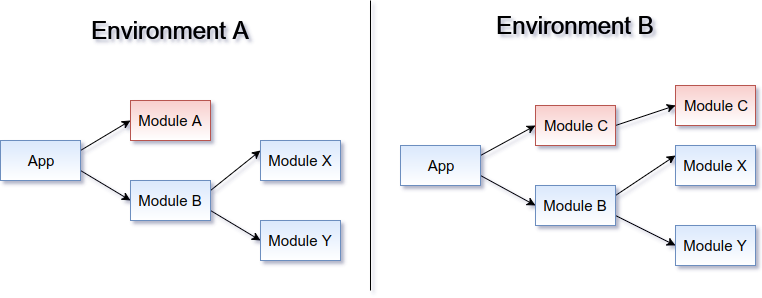
Sometimes your Angular application needs to be a little bit different depending on the environment. Maybe your local development build has some API services stubbed out. Or you have two production destinations with a little bit different behavior. Or you have some other build-time configuration or feature toggles.

The differences can be on any level: services, components, suites of ngrx/effects, or entire modules.

For example, it could look like this:

The dependency injection and module mechanism in Angular is pretty basic, and it does not seem to offer much to answer such use cases. If you want to use ahead-of-time (AOT) compilation (and you should!), you can’t just put random functions in module definition. I found a solution for doing it one service at a time, but it’s pretty ugly and not flexible enough. The problem does not at all seem uncommon to me, though, so I wanted to describe a nice little trick to work around this.

Sample app

Let’s study this on a sample app. To keep things interesting, let’s make a realistic simulator of various organization hierarchies.

We’ll need a component to tell us who rules the “organization”:

app.component.html
<h1>Who owns the place?</h1>
{{(ruler | async).name}}!
app.component.ts
@Component({
  selector: 'app-root',
  templateUrl: './app.component.html',
  styles: []
})
export class AppComponent {
  ruler: Observable<Ruler>;

  constructor(rulers: RulersService) {
    this.ruler = rulers.ruler;
  }
}

As well as a service:

rulers.service.ts
export abstract class RulersService {
  abstract get ruler(): Observable<Ruler>;
}

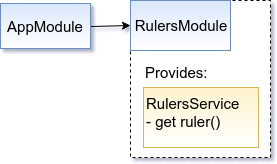
On a picture it could look like this:

Now, let’s say we have two environments:

  • Playground, where little Steve would really like to own the place… except that he can only do that when the local bully is not around, and that’s only when he’s eating. To determine the ruler we need to ask the Bully’s mother about his status. So it goes.
  • Wild West, where the rules are much simpler in comparison: It’s sheriff who runs the show, period.

In other words, we need something like this:

So, how to achieve that?

Solution

The solution is actually pretty straightforward. All it takes is a little abuse (?) of Angular CLI environments. Long story short, this mechanism provides different environment file to the compiler based on a compile-time flag.

If you check the documentation or pretty much any existing examples, the environments are typically used to provide different configuration. Just a single object with a bunch of properties. You might be tempted to use it in some functions on module definition, but it’s not probably not going to work with AOT. Oops.

However, at the end of the day it’s just a simple file substitution. You can put whatever you like in the file, and as long as it compiles everything is going to be OK. Classes. Exports from other files. Anything.

In our case, the AppModule can import the RulersModule from the environment. It doesn’t care much what the module actually contains.

app.module.ts
import { AppComponent } from './app.component';
import { RulersModule } from '../environments/environment';

@NgModule({
  declarations: [
    AppComponent
  ],
  imports: [
    BrowserModule,
    RulersModule
  ],
  providers: [],
  bootstrap: [AppComponent]
})
export class AppModule { }

The environments would export it from the relevant “package”. They could have the classes inline, but I prefer to keep them in separate files closer to the application.

environment.playground.ts
export const environment = {
  production: true
};

export { PlaygroundModule as RulersModule } from '../app/rulers/playground/playground.module';
environment.wild-west.ts
export const environment = {
  production: true
};

export { WildWestModule as RulersModule } from '../app/rulers/wild-west/wild-west.module';

Now, the modules:

playground.module.ts
import { RulersService } from '../rulers.service';
import { PlaygroundRulersService } from './playground-rulers.service';
import { BullysMotherService } from './bullys-mother.service';

@NgModule({
  providers: [
    BullysMotherService,
    { provide: RulersService, useClass: PlaygroundRulersService }
  ]
})
export class PlaygroundModule { }
wild-west.module.ts
import { RulersService } from '../rulers.service';
import { WildWestRulersService } from './wild-west-rulers.service';

@NgModule({
  providers: [{ provide: RulersService, useClass: WildWestRulersService }]
})
export class WildWestModule { }

The final trick that makes these work is that there is an abstract class/interface for the RulersService, and AppComponent (or other services, if we had them) only depends on that. Actually, this pattern has been around for a while. This is the old good programming to interfaces.

The same goes for the RulersModule: In a sense it’s abstract too, AppModule doesn’t know or care what concrete class it is. As long as the symbol with the same name exists during compilation.

This sample demonstrates it on the module level, but you can use the same trick for any TypeScript code, be it a component, a service, etc.

I am not sure if such use of environments is ingenious, or insane and abusive. I have not seen this anywhere. However, it does solve a real problem that does not seem to have a solution in the Angular toolbox (and it’s not particularly toxic).

Sample app on GitHub

Check out this sample app at my GitHub repository.

Angular universal / server side rendering

The current state of server-side rendering (so-called “universal”) for Angular is somewhat in flux in mid-2017. There had been an early Angular Universal effort by an outside group, which has now been absorbed into the core Angular team at Google. They are working toward a new release (to become part of an Angular release) which integrates it tightly is a fully supported first-class piece of the Angular tool suite.

Very eager developers, it is possible to use some of these tools now; but it should become easy and mainstream in the coming months. The primary use cases are:

1) SEO

Site/applications which have publicly exposed pages for which search engine optimization is needed, prefer to statically render (and serve) the key SEO pages. Historically this was vital, because search engines did not execute JavaScript on the pages being indexed. However, for at least the last several years, Google and its other top-tier search engine competitors do execute JavaScript on a page, so the SEO use case is not as important as it used to be. Many still prefer to statically render pages for maximum SEO, nonetheless.

2) Progressive Web Applications

This is the current leading edge of aggressively performance web applications for mobile devices. The idea is to statically load the outer “shell” of an application with some initial static content displayed, then replace that initial content with fully dynamic content a few seconds later. That initial load involves the smallest feasible amount of HTML, CSS, JavaScript.

PWA is a compelling idea, but there are practicalities to its appeal:

* PWA is mostly relevant on mobile devices. An optimized Angular application will load very quickly on a desktop machine regardless.

* PWA is most important on down-level devices and networks. It doesn’t make as much difference on those of us sitting in well-networked places on LTE with current generation smart phones – or on fast corporate networks.

* PWA matters most on the first load of a page/application. After that, many of the assets will be cached so the real content will load very shortly after the progressive pre-render.

The coming default

We believe the tooling will eventually work so nicely, that static pre-rendering and PWA become straightforward, or even become the default path for new applications. But keep in mind the practicalities above – for many use cases, pre-rendering and PWA make sense to adopt only when the tooling makes it very straightforward. Developer efforts between now and then probably pay off more if directed toward application functionality and polish.

Angular 4 rc.1 AOT build options – with example projects

From the summer 2016 production release of Angular, most users have treated AOT as a future curiosity. As of late fall 2016 though, many (particularly those working on larger applications) have been much more eager and interested to use AOT. Here at Oasis Digital, we have recently updated our Angular 2+ curriculum to ensure the numerous code examples used in class are AOT-ready.

Although most of our production Angular 2+ work uses the Google-sponsored Angular CLI (which was excellent AOT support), we’ve also been working with various alternative tooling stacks. Some of our customers integrate their Angular applications with broader build processes and are looking for more fine-grained control than they get with the official CLI.

Last week, Angular 4 rc.1 shipped with additional library packaging bundles, FESM and ES2015 FESM. These should support tighter production builds them before, and more easily; the official CLI does not take advantage of these yet (though I expect it will soon), and I was eager to experiment.

The results

https://github.com/OasisDigital/angular-aot-es2015-rollup/tree/master

In this example, the build is performed using:

  • AOT (ngc
  • Rollup
  • Buble
  • Uglify

See the README in the project for a lengthy explanation of how it works and why these tools were chosen. It was mostly straightforward to make this work; the configuration is quite simple. However, as of the beginning of March 2017 there is an important Rollup plug-in which does not yet have the ability to consume the new Angular ES2016 FESM bundles. To work around that, I published a (hopefully temporary) fork of that plug-in, “@oasisdigital/rollup-plugin-node-resolve“.

Another variation

The boring, excellent, proven, and still frequently updated Google Closure Compiler can often produce better results than newer, hip tools. Therefore the following variation/branch:

https://github.com/OasisDigital/angular-aot-es2015-rollup/tree/closure-compiler

…replaces a couple of the tools with Closure Compiler. It uses only:

  • AOT (ngc)
  • Rollup
  • Closure Compiler

With fewer tools, it produces a smaller results. The configuration is slightly more complex (mostly because the Closure Compiler JavaScript port is not quite the same as the Java edition yet), but is still quite manageable.

I have not yet compared this with an even shorter stack (using Closure Compiler for the tree shaking as well), as there are examples around already doing that; but I expect an upcoming enhancement to Closure Compiler will add the “es2015” package field support needed for the ES2015 FESM bundles, once that is in place I am curious as to whether Rollup or Closure (both very respected as excellent tree shaking tools) will produce tighter results.

Why this matters

For projects deployed on an intranet, it’s possible that none of this matters. A very large internal enterprise project might ship a total of 6 MB of compressed JavaScript (hopefully divided across various bundles littered on demand) with the default tooling, or 5 MB with tweaked tooling. That won’t matter across a gigabit network with people mostly using an application frequently (and therefore with the JavaScript mostly in cache.

But not all projects are huge or internal. Angular is also well-suited for medium-to-large projects deployed on the open Internet to a huge number of sporadic users. For these users, who might be on slow connections, saving bytes counts. Faster load times translate to more user engagement. Better production bundling expands the reach of Angular two more kinds of projects.

The above is not even counting mobile; as Angular mobile application development continues to increase, the tightest possible production bundles will matter more and more.


The Heart of BI / OLAP is your data

There are plenty of vendors eager with a sales pitch for BI/OLAP projects, eager also to give you the impression that all you need to do is buy their product. This is wrong, perhaps dangerously so, because **the heart of BI / OLAP is your data** and the core challenge is to transform your data into a form where it can be easily **and correctly** analyzed.

The principles of operation are similar regardless of which products you choose. Your toolset will consist of, at minimum:

  • An OLAP tool, with or without a RDBMS behind it
  • An ETL tool, which might be a software product or might be a set of scripts
  • Hardware to run it on, chosen and configured to server an analytic load well;
    this could be hardware you own, or a SaaS or cloud offering
  • Configuration thereof

But this analysis understates perhaps the most important part. ETL needs extensive configuration (for moderate cases and powerful ETL software, and some luck) and more likely, carefully crafted software to transform business data from whatever form it lies in, to a suitable shape for analysis.

Of course I cannot help but mention that Oasis Digital works on such projects; but regardless of us, effective OLAP involves an astonishing amount of “getting your hands dirty” digging in and understanding the precise meaning of bits of data flowing out of one or more (perhaps many more) operational systems. This work is arguably so unpleasant that it leads many organizations to skip OLAP, but that actually misses the point. The work can’t be avoided, without also avoiding the full value that could otherwise be obtained from a correctly populated analytical data store.

Alternatively, the work could be skipped, if you don’t mind incorrect analytical data and incorrect conclusions drawn from it. This doesn’t seem like a strategy for success.


How we use Git, and why

Here at Oasis Digital, we use Git for source control for nearly all of our projects. There are numerous different ways to use Git, and after many projects we have evolved on a set of effective practices. We have found the approach described here works very well for almost everything we do, though of course as a consulting organization we sometimes adjust things to meet a specific customer need.

Why Git?

Ubiquity

A decade ago, distributed source control arrived suddenly in the mainstream, after years as a niche segment. There were a number of contenders, but Git “won” by a large margin. Today Git is essentially the default choice, the powerful choice, the ubiquitous choice.

Incidentally, Git’s endless flexibility is a major reason it won the race. Various other competitors typically had better ergonomics, easier adoption, easier understanding… but less flexibility. Flexibility means that organizations large and small can use it in a way that meets specific needs.

Technical excellence

Unlike some other systems, we have never lost a line of code due to a defect in Git. Further, we have never needed a permutation which is fundamentally impossible with Git. We have found that, within the confines of our project sizes, it scales extremely well. (Though see a section at the end about limitations in this area.)

Multiplatform

Our projects are often developed across Linux, Windows, and Mac. Git works very well across all of them. Notably, it offers solutions (rather than a “head in the sand”) for differences around line endings among platforms. Yes, it is inconvenient to deal with line ending differences. Git has the tools to do it and get good results, without trying to pretend that one platform is another.

Distributed

Git can operate without a network connection, and more importantly, it operates locally at the speed of a local machine rather than at the speed of a potentially overwhelmed, faraway server. 90% of Git operations are completely local. This is an enormous benefit during daily use, though it has a downside – more risk of a developer forgetting to push code to a server. We handle that concern so well in other ways (project team discussions) that it has never caused difficulty.

Ecosystem

Due to ubiquity, Git has spawned a vast ecosystem of related tools. Nearly every editor and IDE understands Git. Nearly every build or continuous integration mechanism understands it. Nearly every code review tool understands it. There are numerous graphical Git tools for every platform, it is not dependent on any one vendor or team to continue producing quality results.

How we use Git

Use it as an expert

As with most other tools we use, we are committed to expert level mastery, not muddling through. Oasis Digital developers learn to understand the fundamental Git data model of a tree of commits each containing a tree of files. We learn the essential operations and common variations. We learn to understand what the commit tree looks like, what we wanted to look like, and to choose the right command to get from one state to the other. We are “source control nerds”.

We believe this makes sense because source control is not merely an ancillary tool; this is because change management is deeply fundamental to robust long-lived systems. Source control is not an inconvenience, it is an accelerator.

We to treat (portions of, read on) the Git commit tree as putty in our hands.  This is an intentional trade-off, versus the notion of using a restricted subset of Git, but we believe for our use cases is the right trade-off.

Develop on branches

We develop on branches, not on master. In all but the smallest projects, branches go through review and discussion before landing on master.

We use many branches, large and small. We don’t pointlessly mix unrelated changes in the same branch. Git switches among and manages branches almost instantly, so the cost of using additional branches is nearly zero.  We have found that the mental overhead of managing more than one branch using a tool, is much less than the mental overhead of juggling multiple unrelated changes in the same branch, a phenomenon we see regularly when developers use tools which make branching difficult or slow.

Branching model – varies

We manage those branches differently, depending on the needs of a project:

  • small branches, directly off master
  • shared branches, as needed
  • release branches, to support old releases
  • development branches
  • trunk-based development, with small or large branches


Master always works

Master (and for more complex projects, certain other branches) always works. Code is reviewed and tested before going on master, not only after. If you read and adopt only one bit from this whole page, this is the most important. Review and commit and make the code good before it goes on master, don’t put junk on master and hope for a drive-by review-fix later.

Master strictly improves

Because we test and review and fix code before it goes on master, master (again, for complex projects, certain other branches) strictly improves. Each master commit adds at least one improvement or fixes at least one problem, without making the software worse. Of course we do not reach the standard perfectly every time, but this is the standard we aim for, and we reach it most of the time.

Immutable master; mutable development branches

Except in rare cases, once commits are on master we treat them as permanently immutable. They form a long-term record of the history of the project. They are a curated, comprehensible telling of the story of the development.

The work performed on branches, is iterated repeatedly on branches. Sometimes it is squashed and often it is rebased. Only when it is ready (to act as a strict improvement to master) does he get a final review, squash, rebase, merge. (As with everything else, except for certain special cases.)

Incidentally, this means that we very rarely have a merge commit on master. The long-term history of our development efforts are easy to read, as a mostly straight-line of medium-sized (not too large, not too numerous) commits.

Most of our developers on most of our projects are not even able to push to master – and are hardly affected by this restriction and daily work. Even with this process, a typical developer will have a commit land on master between one and a few times per week – Depending on numerous factors around how fine-grained the work is divided in the project.

Commit early, commit often, commit anything, push

The corollary of our high bar for work that goes on master, is an extremely low bar for work that can go on to a branch and be pushed. We rarely go to sleep with uncommitted on pushed code. When we need another developer to look at our work in progress, we commit it and push it as work in progress.  When a new developer starts, they often commit and push code to a branch the first day. By keeping this bar low, we provide the maximum opportunity for new developers to become fluent with source control and to use our tooling as a communication mechanism (“here is some code, when you look at it for me?”) Early and often.

Squash out the mess

There is an inevitable, human tendency to be careful with anything that will be “part of your permanent record”. This is built into all of us, though it seems to be more pronounced in some cultures than others. But by combining our very low bar for what can be committed and pushed, with a policy of squashing minor steps together to yield an aggregated, high-quality change, we moderate this tendency very effectively.  Code can be pushed any time for just a casual look. It won’t be part of the permanent history until it is good enough. No fear.

Left to its own, the tendency to be careful would force developers to “raise the bar” of what gets committed or pushed. A rational developer (regardless of policy) in such an environment must be careful about what they put in source control. We have found that this inevitably pushes developers to do more of their work without source control. For example, by shuffling files locally outside of the source control tool, by leaving work on pushed, etc.

Source control is a very powerful tool, and a low-bar-push-often-squash-rebase approach enables that power into the hands of every developer, individually as well as all developers working together.

But squash carefully

Still, squash and rebase are potentially troublesome features. So when we squash, we do not squash arbitrarily. We aim to squash groups of related changes, worked on along a path to achieve a specific feature, but not to squash unrelated work. One minor caveat though: to tell the story of the development in the most comprehendible way, the permanent master commits should be both of medium-size and medium number. Therefore we sometimes squash together a set of individually very small changes, when we can do so without creating difficulties.

Use a GUI

Many very skilled developers are fond of command line interfaces, for many good reasons. The Git command line interface, while slightly problematic in some ways, is extremely powerful for making changes. However, it is not particularly well-suited for understanding a Git commit tree, especially on a busy project with numerous concurrent branches. For this reason, when working heavily with Git we always use a graphical interface at least to visualize and understand the commit tree, even when we use the command line for manipulation. There are various high quality choices for GUIs on each platform, and on all platforms the built-in “gitk” interface is very helpful in a pinch to understand the commits – without any additional tool selection, download, or install.

Work together, learn, teach

We work together regularly. A group of developers working on the same project will set in a collaboration space together (inviting remote members online) at a giant screen attached to a fast development machine. We work on the hard problems together, we refer you tricky code together. We learn and teach together, how to use all of our tools, including Git.

Caveats, limitations, and context

Small, medium, and large, but not huge

Git, and the practices here are useful on our projects of small, medium, or largish size. Beyond a certain size, many of the practices would still work but Git becomes awkward. For example, some of the largest software operations in the industry (Google, Facebook) use a “monorepo” with all of the code for all of their projects and nearly all dependencies thereof. A different kind of toolset is needed for such extremely large repositories.

Source code, but few binary assets

Further, we keep small, medium and somewhat large collections of source code in Git; when our work has occasionally involved many large media assets, we have used other means to track them. Git specifically, is probably not a suitable choice for (for example) a large-scale game development effort with hundreds of gigabytes of binary assets.

Skill and understanding needed

Here at Oasis Digital, we are not in the “get a bunch of people to grunt out some code” business. Instead we are in the “recruit and hire good people, and help them become great” business. This is necessary for us, because of the premier customers we serve, and because we not only develop, we also teach. We are all about deep mastery of tools. Our Git approach fits very well with this context.

We’ve sometimes heard the objection to Git, that it is difficult for less skilled developers to understand fully and use correctly. This is possibly true, but it is not that important to our context – and we think it is not that important at all. Anyone with the capability of understanding software enough to develop quickly, efficiently, and with quality, certainly has the capability to master Git.

With great power…

Even with good understanding, Git is still relatively easy to misuse. It offers numerous very powerful commands, it is like a chainsaw and a machine shop. It is not like a set of safety scissors.

We have found that this power punishes developers who don’t look at a graphical representation of the commit tree regularly. It rewards developers who do.

Syntax

Even keeping in mind the power of the Git command vocabulary, it’s CLI syntax leaves much to be desired. It shows clear signs of having evolved awkwardly, and had early accidental complexity retained for backward compatibility.

However, we have found that developers who have the discipline to look at a graphical representation of the commit tree, generally gain a better understanding of the operation they want to perform and are more likely to perform correctly even when using the CLI.

Beware neutered GUIs

Some Git GUI products aim to simplify Git “for the masses”. In the process they managed to do a terrible job of the most essential function, visualizing and understanding the commit tree. Beware of a tool which resists showing you this tree. Even following our practices described here (where master will be a straight line most of the time), it is necessary frequently to understand a bunch of concurrent possibly tangled branches when a project is under heavy many-developer work. The right GUI makes this fast and easy.

Churn

I think the Git community is now on the third major mechanism for subproject use. We avoid subprojects as much as possible, but experience some frustration when we must use it.

Revisionist history

Our approach clearly and intentionally yields a revisionist, streamlines history. As described above, the resulting history is crafted for understanding, and for (rarely) backing out the final set of related changes for some work rather than miscellaneous partial changes. Still, some people are uncomfortable with the revisionism, and prefer a full record of every step along the way. This is a trade-off, where we have found the revisionist approach has more upside than downside.

Discipline needed

Even with the restrictions, it still requires discipline, to avoid creating a branch from a spot in history (something not on master) that will change in the future.

The Oasis Digital Spectrum of Services

In the early years of Oasis Digital, we offered exactly one service: outsourced software development contracting. Since then, we’ve expanded to a spectrum of related services. The result doesn’t fit in an “elevator pitch”, but it meets the needs of customers much better. Our “spectrum of services” will be more clear on our main website and elsewhere over time, but this blog post explains it as succinctly as we can. Ranked in approximate order from smallest to largest, we offer:

1) Free technical content

Our expert developers/trainers speak and write about relevant technical topics, and the results are almost always freely available: talks on our YouTube channel, posts on our blog, our twitter accounts, and so on. Further, we attend various conferences and are always happy to speak to people who come talk with us there.

2) Tickets to public classes

We teach on several technical topics, most prominently Angular Boot Camp. Class tickets are a great fit for an individual developer or small group, who can purchase, then attend online or in person around the US and occasionally around the world.

3) Private training classes

To train a whole team at once, we offer private classes, both online and in-person. Private classes can also easily be extended with add-on days of customized consulting and training, for customers looking for added value. Some customers engage us for a series of private classes.

4) Application assessment

An application assessment is a short consulting engagement (typically 1 week, with 1 or 2 of our experts) in which we meet with a new customer in-depth, to assess an application (or understand the vision of an application). The assessment includes a written report, and (if needed) a proposal for future recommended work.

5) Ongoing expert assistance

Oasis Digital can provide ongoing expert assistance, in a retainer-like arrangement. We regularly meet with your developers, to help with questions, issues, code review, design guidance, and implementation of key areas. We have different packages depending on how much assistance each month you need.

6) Agile product development

In an Agile development project, a Oasis Digital works with a customer on an iterative basis, prioritizing features (“stories”), responding to changes and guidance. Such a project is especially amenable when the product vision is established but feature needs are still evolving. An Agile project is straightforward to contract and price (based on the team size), and can start quickly then last as long as needed. We often begin Agile projects with Oasis Digital developers, then gradually integrate customer developers over time for an eventual handover. The project style is also well suited when Oasis Digital is joining an existing effort already in progress.

7) Scoped product development

In a scope product/project, the features needed are worked out in advance (a scoping effort might be part of an application assessment, for example) so that Oasis Digital can provide a price and schedule to achieve that known list of features and surrounding goals. This style of project is decidedly less agile (changes and additional features are generally implemented after successful delivery of the initial scope), but can also ultimately be more efficient – our experts are especially adept at skipping directly to a high quality approach, avoiding false starts and reducing rework during iteration.


Building a proof of concept – off the ground in a few weeks

Many iterative-development thinkers have a notion of an “iteration zero” at the beginning of a project, that does not involve much software development but rather understanding the problem, choosing technology, choosing a set of features for a first major release, and so on. That work is often described as what happens at the beginning of a project, the beginning of ongoing work.

Having worked with many customers in the early stages of a project, we see a place for a small project-before-the-project. Not necessarily a first iteration to start ongoing work; but rather work before decision has even been made about when or whether to do a full project, to commit to ongoing work.

A customer comes to us, eager to show the potential of a project, but not yet in a position to commit to a long-term effort, nor eager to create a pile of non-software artifacts. Rather, they want to quickly show that something could work, how it could work, have some code in hand to serve as a working rough prototype. These needs will not be met by starting an effort that will take many months and many dollars to yield the first working result.

This is the problem we solve with a proof-of-concept engagement: One short pass through the whole development cycle. Such a project is a limited time and scope effort to understand a problem domain (just a little bit) and then write some software (just a little bit) that demonstrates the value of a customer’s idea. Such a project looks something like the description below, of course the details vary.

(A proof of concept effort is very workable for a greenfield project, not applicable inside a system that has an existing substantial code base. For those, we have another kind of initial engagement, to get an existing system up and running and survey its code base.)

Scope

  1. Meet with customer domain experts, typically for half the day for a couple of days. Understand enough to do initial, relevant work.
  2. Sketch (with a mix of code, drawing tools, and paper) what some of the most critical screens will look like.
  3. Verify with customer domain experts that the ideas we have captured are the most relevant to their vision.
  4. Implement: expand the most important aspects from mere static screens or drawings. Create working prototype code.
  5. Integrate working screens with other static mockup screens.
  6. Present the working prototype software to the customer, including source code.
  7. Assist the customer with installation of the working prototype in their environment, to enable easy internal demonstrations.
  8. Present a video demonstrating the working system, we have found this valuable especially when the prototype needs to be shown to a potentially wide audience around the customer organization.
  9. Discuss future steps with the customer.

The bulk of this work is understanding the problem and creating working code. A proof of concept effort is not about creating another long requirements document. It is not about working through all the details. It is about code that demonstrates a working implementation of the essence of the customer vision, demonstrating that if implemented it would solve a problem worth solving.

Technology

To get the maximum benefit from a short effort, we use technologies our team has extensive current experience with. Typically that will be (as of early 2017) Angular or React on the front-end, Node or Java on the backend. We work with numerous other technologies for production efforts, but some of them are less amenable to shipping a working result within days of project start.

Team

To delivery a working result in a a short time, the team on this kind of project consists of:

  • Two core, highly experienced developers (developer / trainers)
  • Assistance from other developers
  • Assistance from a designer
  • Assistance from a project manager

Schedule

The work happens over a 1-2 week period. Scheduling can be tough, because the developers involved will also be developers who have the deepest mastery of the technologies to be used – developers who also teach our classes, lead project teams. We work with customers to choose the right start date to do this successfully.

Location

Typically this work happens at our headquarters; with the meetings conducted with the usual remote meeting technology, or occasionally with a customer expert visiting. It is also possible to send a team to a customer site for this work – although with that variation, there is less opportunity for additional Oasis Digital team members to jump in.

Price

We charge a fixed, all-inclusive price for a fast proof-of-concept effort. Since the investment is known up front, there is no risk of exceeding an agreed budget, missing an estimate, and so on.

Where to go next

After a completed proof of concept project, our customer has working prototype software; but it is not a prototype in the sense of very poorly, hastily built code; because it is built by our instructor/developers, it is of surprisingly good quality, ready to form a starting point for a more substantial development effort.

If a development effort is warranted (sometimes the thing you learn from a working prototype, is that the idea is not worthy of major investment after all!) a customer in-house team could pick up a working prototype source code and run with it; or of course we at Oasis Digital can be involved in ongoing work.

Sounds good, how do I buy this?

This is just a blog post; there is no “buy now” button. Contact us to talk about your project, if it is suitable for proof of concept project, we can send a proposal.


Angular 2+ Build Tooling – Recommendation

As of December 2016, what tooling should be used for a new Angular 2 project?

This is a question we get from customers and students frequently. Here is our current best advice, which will change over time. The context is critical: projects that may start small but are likely to grow to significant, complex enterprise applications.

Here is the path we have been following and recommending. At Oasis Digital Digital we have had excellent results with Angular 2 (soon to be 4, and beyond).

Use the official Angular CLI, which is full of excellent ideas but is also still in development, working toward a solid “V1”. As your project starts out simple, it is extremely easy to get up and running this way, and to get very good results. Highly recommended.

As your project grows in complexity, consuming and using CLI will need some ongoing attention from a team member on your project. A complex Angular project needs at a build guru, who should:

  • Tune into the Angular CLI community, become aware of what is going on with CLI
  • Visit the Angular CLI issue tracker once a week or so, read some recent issues
  • Read some recent commits, especially when thinking of upgrading
  • Visit the Angular CLI Gitter channel from time to time
  • Choose an Angular CLI version wisely. For example, as of mid-December 2016, CLI Beta 21 is the right choice for most projects while the more current Beta 22 will land you among some current challenges around AOT compilation and third-party libraries.

With this awareness, when you encounter difficulties you will likely recognize what is going on, and be able to work around it quickly. This has been our experience, certainly; we have never had our progress delayed by more than a short time, by build issues. But if you don’t have this awareness, you risk a build issue derailing your project for days or more.

If your project becomes so complex that this strategy for using Angular CLI does not work, Eventually it may be necessary to set aside Angular CLI for a while, and instead adopt one of the Angular 2 “seed” projects. These projects typically ship with a surprising amount of complexity which will become part of your project, and to the extent you edit any of this complexity, upgrading becomes difficult. Therefore we recommend not starting with a seed, rather having it only as a fallback plan if your project reaches a point where it cannot proceed with CLI.


Managing State in Angular 2 Applications

Here is a video of the talk “managing state and Angular 2 applications” from the October 2016 St. Louis Angular lunch. The post below has roughly the same ideas, but with much less detail, in text form.

Managing State in Angular 2 Applications

The 6 stages of Angular 2 state management

Here at Oasis Digital in our Angular Boot Camp classes we meet developers working on Angular 2 projects at lots of companies, in addition to the projects we work on ourselves. As a result, we have a sense of the challenges faced while working with Angular 2 at scale.

The “at scale” part is important; we focus on serious, scaled use of Angular 2 and other tools; generally people building small things don’t have budget to take classes or engage consulting assistance. So take everything we write with a “grain of salt”: we are writing and thinking and talking and working on large complex projects.

Over time and across multiple projects, we have gone through a progression of how to think about and implement state management in Angular 2 applications, and our advice to customers is generally about moving along these stages.

What is state?

From a computer science point of view, state is any data that can change. The source of the change can vary, and the presentation of the change can vary. Regardless of those things, state leads to complexity, and in particular desired or accidental interaction between aspects of state is often, ultimately the greatest source of either value or cost in a complex software system.

Be wary of arguments that something is “not part of the state”; it often ends up part of the state as after all. For example, any of these often turn out to be part of the state that must be managed:

  • URL / “route”
  • Error conditions
  • “Local” state
  • Partially entered data
  • Partially arrived data
  • Reference / lookup data

Stage 0: State per component

Some small, simple programs have little meaningful state. The most obvious and easy place to store state in Angular 2 applications is in the components which “own” the state. For example, a component which displays a list of contacts retrieved from the server might simply:

  • store that list of contacts in a field
  • loop over the contacts with NgFor for display
  • retrieve the contacts from an API using HTTP and subscribe.

In such simple cases, there is little to think about, and Angular change detection just works.

There are also slightly more complex programs in which the state can easily reside in a handful of independent components. If the components don’t interact in any way, even if each one has a small amount of state the overall state full complexity of the software remains very low.

We see very few programs “in the wild” that remain in this stage of simplicity.

Tip: Watch the video instead of just reading. The video has diagrams.

Stage 1: State in interacting components

Slightly more complex applications have some interaction between components. The most straightforward and obvious way to handle this interaction is to have each component “own” a portion of the overall application state. Then use events and bindings to push that state up and down and across the component hierarchy to other components which need to receive it.

This design starts straightforward, and continues to match what new developers are shown in the documentation, in the QuickStart, and so on. This stage of complexity is what we most often see developers begin to create as they learn Angular 2. Depending on the complexity of interactions, some applications can get quite far with this design.

Unfortunately, the complexity and difficulty can begin to increase depending on the details of the interactions of these various state full components. In particular, things get painful when you realize there are many copies of various aspects of the state of your systems spread throughout a component hierarchy – and you have lost track of exactly which component “owns” which aspect of the state.

With increasing fury at the keyboard, it is possible to keep the relevant parts of the state in sync with each other, sometimes resorting to awful hacks:

  • ngOnChanges methods which implement business logic, pushing state back and forth between components
  • Even worse, set timeouts and other means to notice data has changed in one place and needs to be copied another place
  • Begging or raging on StackOverflow for something like $scope.watch() from Angular 1

Still, it’s important not to be overly negative about this approach. For applications with only a little state complexity, it can work fine. Few of the applications we build that Oasis Digital remain in such a condition though.

Stage 2: State in one component at the top

In a quest to bring order to the chaos that occurs with different bits of state owned by different components spread across a hierarchy, a wise developer will study the Angular 2 documentation and learn the key organizing principle:

Bind data downward, emit change in events upward

To implement that, move state ownership upward through the component hierarchy, such that each piece of state is owned at a high enough level that it can be pushed down to any other components that need it. In extreme cases, some applications have essentially all of their state all the way in a top-level component.

This fixes the “sync” problem, and is very compatible with Angular. In particular, it enables many of angular’s key performance optimizations, it lets you specify change detection as OnPush.

However, with a more scale the problems appear:

  • Topmost or other high-level components and up looking a lot a bin of global variables
  • Extensive code throughout the component hierarchy, a “bucket brigade” carrying numerous events upward and numerous aspects of data downward.
  • As of October 2016 (with comments by core team members about a fix coming), the numerous event and data bindings are all completely untyped, outside the realm of where TypeScript can detect and assist with them.

We got quite far on applications with this approach. It can handle applications of modest complexity with no trouble at all, and it is very compatible with the Angular binding/event view of the world. Ultimately though, the problems noted above became unworkable and we have ceased using or recommending this approach.

Stage 3: State in services

In a project where the bucket brigade is out of control, developers will often switch to a common technique from Angular 1: put the primary representation of each aspect of the state of the software, in services which are then injected wherever they are needed.

To do this, you must set aside OnPush, and rely on Angular 2 change detection. That change detection is surprisingly efficient, so this compromise is not particularly problematic in many applications. Moreover, each state full service can be injected only and exactly into the components where that state is needed. The bucket brigade is gone, and instead the dependency structure of the source code maps to the use of state. The software becomes much easier to reason about.

Unfortunately, reacting to change in the state is still quite difficult with this approach. That can become obvious when the project starts using the following hacks:

  • Create a component which injects services and then binds data from those services using its template, into a function. Write code in that function to perform computation based on that joint state changing.
  • Create a component which injects services and then binds the data from those services into another component underneath it; inside that lower component, use OnPush for efficiency and then write business logic in ngOnChanges to be notified and take action when the data has changed.

Why are these hacks? We consider them hacks because they abuse Angular capabilities primarily intended for manipulating the view/UI of an application, to instead call business logic. If you find yourself writing “business logic” in ngOnChanges, things have gone horribly awry.

Even with the hacks in place, with a tiny bit more complexity, getting programmatic control over the changes in state of the system becomes very difficult and tangled.

Stage 4: State in Observables (in services)

Fortunately, while using Angular 2 you already have a tool in your toolbox very well suited for reacting to change: Reactive eXtensions for JavaScript, RxJS. To take advantage of it for managing state:

  • Remove/disallow state in components
  • Remove/disallow (most) state in service class fields
  • Put the state inside Observables (sometimes Subjects or BehaviourSubjects actually) in those service classes instead
  • Inject the services to whichever components need them
  • Use the async pipe in the components to get the data from the observables into the view
  • Write code in the services which uses the RxJS API to respond to and propagate changes to state stored in these Observables

This general pattern has already been reinvented numerous times in the Angular 2 world. It has many advantages:

  • Easily bring state to where it is needed
  • Single copy of each piece of state
  • Clear obvious place to write reactive business logic
  • Extensive selection of RxJS operators to manipulate the state
  • Efficient use of Angular 2 view binding with OnPush

An observable centric, application-specific state management mechanism can work very well. At this stage really the only downsides are:

  • Each team or application reinvents a way to do this, and therefore is not benefiting from any common libraries or tooling.
  • A large complex state spread across many observables becomes unwieldy to the extent the front aspects of that state interact.

Also at this stage, developers generally have the feeling that they should have seen this problem before. And in fact many developers have, and already worked on solutions:

Stage 5: Choose and Use a State Library

We consider this the stage that any nearly every mature Angular applications to reach. Choose and use a proven library or approach for state management.

State library options

The two libraries that come to mind most often are those which implement the Elm architecture / Redux pattern with Angular integration.

Regardless of which you choose, you obtain generally the same benefits:

  • Your ideas and code are useful across Angular and other, non-Angular platforms
  • Write mostly unencumbered TypeScript code, rather than code which only makes sense and executes meaningfully with the help of a library
  • Excellent control of change
  • Excellent test-ability – in most cases the essential logic of your application can be tested apart from Angular itself
  • Tooling support, for things like “time travel debugging”
  • Community – when you have a problem, you’re likely not the first to have this problem, and you will likely find hopeful and useful discussion online

Beyond the libraries

Alternatively, you might find that the Elm/Redux approach is not ideal for your needs. Here are some other directions to consider.

  • Over in the React world, MobX is receiving substantial attention as a less tedious way to obtain most of the same benefits as Redux. Perhaps it will find its way here to Angular.
  • If you store your state in Firebase, Firebase itself will handle propagating the state around your application (as well as between numerous devices). In some it can serve most of the needs for state management.
  • The State Action Model pattern (also see some code samples) contains many of the same ideas, and appears more similar to MobX than Store or Redux.
  • Andre Staltz, author of CycleJS, argues that Observables-all-the-way-through is compelling. Even if you never use his CycleJS library, watch a few talks and take it for a spin.
  • For some applications we are loading data with GraphQL; although are currently doing so in the context of the state management systems, the opportunity is out there for certain aspects of local state management to be abstracted away. The future around this is still unfolding, but it seems inevitable that this new direction of abstraction will strongly affect application state management in the future.

How big before this matters?

Now you might think from this description but I’m talking only about huge complex enterprise apps. Not true. Even fairly small applications, can end up having surprising difficulty in state management. We have a piece of training curriculum which attempts to manage state responsibly in a tiny application whose code can be fully reviewed in just a few minutes. It ends up at stage 4 (in the list above) without really trying.

You might also think, “but I’m not talking about application state, I’m just talking about whether a checkbox is checked on a form”. This sort of thing initially seems like it can be omitted from a broad notion of application state, and that is true, until you want to implement certain features, and then it is not true anymore.

Most broadly, if you are not working on an application complex enough to care about state management, why are you using a library as large, complex, feature full, and powerful as Angular?

In our work at Oasis Digital, we have concluded that for most projects, the right answer is to proceed directly to full powered state management.

An alternative view

Our point of view here may be contentious, and is certainly not the only point of view among experienced Angular developers. Most notably, Ward Bell, and all-around experienced Angular guru and key author of the Angular official documentation, argues that only a small minority of Angular applications warrant a complex state management approach.

One wish for Angular 3: Stateless components

Currently, components and Angular 2 are classes, classes are a deeply OO concept which mix behavior and state. For some uses, this is excellent. For others, and for some of the architectures described here, the tight coupling between stateful components and the Angular 2 view mechanism is not so beneficial.

A second wish: Higher-order components

If we had stateless components, that gets us halfway to tooling support for rigorous separation of state and view. How do we get the other half of the way? We get there using higher order components, you could think of these as components that emit components, meta-components, functions that emit components, something like that.

The point being that sometimes you want to specify all the gory details of the component, and the current Angular decorator mechanism is perfect for that. Other times you want to programmatically say, “please wrap my component with another component defined by the following function”. There is not currently a way to do that. There are technical challenges with it, around how Angular compiles components statically.

However, I have great confidence that the core Angular team will eventually (Angular 3/4/5/6/N) will grow something akin to higher order components.

Summary

If you are working on nontrivial Angular applications, as soon as you hit state management difficulty start learning about sophisticated, powerful state management approaches and tools ASAP.

Angular 2.0.0

Major congratulations to the Angular team, who just shipped version 2.0.0. In development somewhere approaching two years, it is an extraordinarily ambitious effort and the result is very much ready for prime time.

It also seems like a good time for a snapshot of what we at Oasis Digital have been doing with Angular 2, prior to the release:

  • Created curriculum, in some cases before there was official documentation available.
  • Trained numerous students and teams at Angular Boot Camp.
  • Presented on various Angular 2 topics, often at St. Louis Angular Lunch.
  • Launched customer projects, both “proof of concept” and headed for production.

These are all things we will continue to do, and it feels very good, as of September 2016, to be doing them for a product which has shipped in production-blessed form.


Angular 2, angular-cli, 2 minutes, Cloud 9.

Spoiler

Sorry, the title is actually a lie. It takes 2 minutes of human work to get up and running, but you have to wait about 10 minutes in the middle for node modules to install. You can wander away during that long process, so we will politely pretend it really only takes 2 minutes.

Watch it happen

Explanation

For our Angular Boot Camp, we have been assisting lots of students as they configure their computer to work on Angular 2 projects. Recently we have been including the nascent Angular 2 CLI in this process. Either way though, installing the needed tools is fast and easy if you have a generic, off-the-shelf computer, with an extremely fast CPU and disk on an extremely fast network. It is less fast and easy if you are running on something like an older computer, with various old versions of software installed, and it can be quite painful on a locked down corporate computer.

To skip past this and start teaching our students Angular 2 with its CLI as quickly as possible, we sometimes suggest they try out Cloud 9. C9 is a web-based IDE; we are not affiliated with it in any way, other than as fans and customers. While we prefer more typical desktop IDEs (like VSCode and WebStorm) for most use, Cloud 9 is very useful for sharing a development session across the group of developers around the room or around the world. So it is a great tool to have in the toolbox.

To get up and running though, requires a few gymnastics. We have bundled up these gymnastics to a script which you can “source” into a Cloud 9 terminal window. See the video for details; here is the line of text you will need:

source <(curl -s https://angularbootcamp.com/c9a2cli)

As with any such command, there are security concerns. I don’t advocate running commands like this on your local computer, but if you’re running it in a freshly created throwaway Cloud 9 instance, security is not such a concern.

Downsides

There is currently one major downside of Cloud 9 for Angular 2 development: code completion, formatting, and other important IDE features are not yet available for Typescript in Cloud 9. The syntax highlighting works well but the other features have not yet arrived.