Environment-specific modules, services and components in Angular

Sometimes your Angular application needs to be a little bit different depending on the environment. Maybe your local development build has some API services stubbed out. Or you have two production destinations with a little bit different behavior. Or you have some other build-time configuration or feature toggles.

The differences can be on any level: services, components, suites of ngrx/effects, or entire modules.

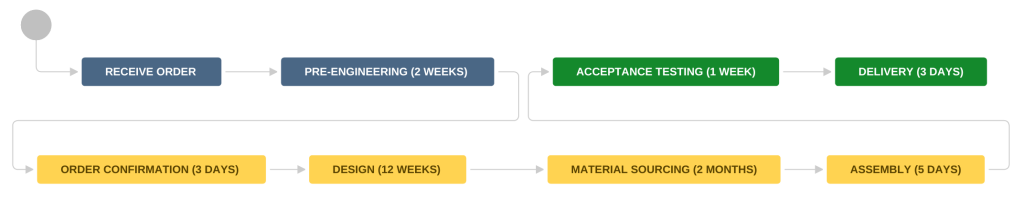
For example, it could look like this:

The dependency injection and module mechanism in Angular is pretty basic, and it does not seem to offer much to answer such use cases. If you want to use ahead-of-time (AOT) compilation (and you should!), you can’t just put random functions in module definition. I found a solution for doing it one service at a time, but it’s pretty ugly and not flexible enough. The problem does not at all seem uncommon to me, though, so I wanted to describe a nice little trick to work around this.

Sample app

Let’s study this on a sample app. To keep things interesting, let’s make a realistic simulator of various organization hierarchies.

We’ll need a component to tell us who rules the “organization”:

app.component.html
<h1>Who owns the place?</h1>
{{(ruler | async).name}}!
app.component.ts
@Component({
  selector: 'app-root',
  templateUrl: './app.component.html',
  styles: []
})
export class AppComponent {
  ruler: Observable<Ruler>;

  constructor(rulers: RulersService) {
    this.ruler = rulers.ruler;
  }
}

As well as a service:

rulers.service.ts
export abstract class RulersService {
  abstract get ruler(): Observable<Ruler>;
}

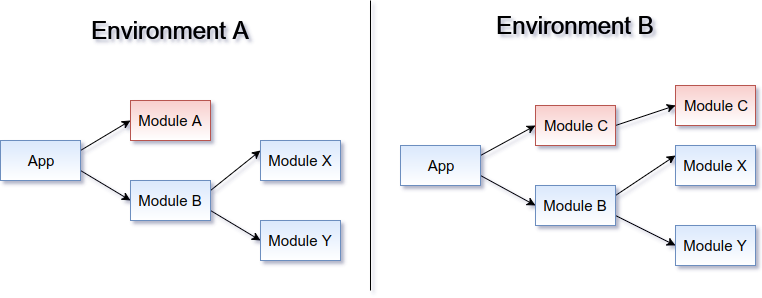
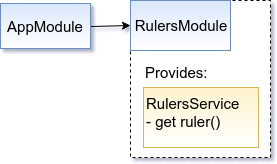
On a picture it could look like this:

Now, let’s say we have two environments:

  • Playground, where little Steve would really like to own the place… except that he can only do that when the local bully is not around, and that’s only when he’s eating. To determine the ruler we need to ask the Bully’s mother about his status. So it goes.
  • Wild West, where the rules are much simpler in comparison: It’s sheriff who runs the show, period.

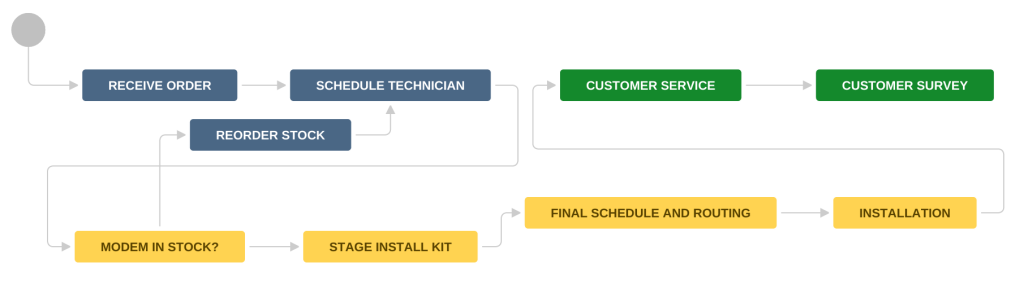
In other words, we need something like this:

So, how to achieve that?

Solution

The solution is actually pretty straightforward. All it takes is a little abuse (?) of Angular CLI environments. Long story short, this mechanism provides different environment file to the compiler based on a compile-time flag.

If you check the documentation or pretty much any existing examples, the environments are typically used to provide different configuration. Just a single object with a bunch of properties. You might be tempted to use it in some functions on module definition, but it’s not probably not going to work with AOT. Oops.

However, at the end of the day it’s just a simple file substitution. You can put whatever you like in the file, and as long as it compiles everything is going to be OK. Classes. Exports from other files. Anything.

In our case, the AppModule can import the RulersModule from the environment. It doesn’t care much what the module actually contains.

app.module.ts
import { AppComponent } from './app.component';
import { RulersModule } from '../environments/environment';

@NgModule({
  declarations: [
    AppComponent
  ],
  imports: [
    BrowserModule,
    RulersModule
  ],
  providers: [],
  bootstrap: [AppComponent]
})
export class AppModule { }

The environments would export it from the relevant “package”. They could have the classes inline, but I prefer to keep them in separate files closer to the application.

environment.playground.ts
export const environment = {
  production: true
};

export { PlaygroundModule as RulersModule } from '../app/rulers/playground/playground.module';
environment.wild-west.ts
export const environment = {
  production: true
};

export { WildWestModule as RulersModule } from '../app/rulers/wild-west/wild-west.module';

Now, the modules:

playground.module.ts
import { RulersService } from '../rulers.service';
import { PlaygroundRulersService } from './playground-rulers.service';
import { BullysMotherService } from './bullys-mother.service';

@NgModule({
  providers: [
    BullysMotherService,
    { provide: RulersService, useClass: PlaygroundRulersService }
  ]
})
export class PlaygroundModule { }
wild-west.module.ts
import { RulersService } from '../rulers.service';
import { WildWestRulersService } from './wild-west-rulers.service';

@NgModule({
  providers: [{ provide: RulersService, useClass: WildWestRulersService }]
})
export class WildWestModule { }

The final trick that makes these work is that there is an abstract class/interface for the RulersService, and AppComponent (or other services, if we had them) only depends on that. Actually, this pattern has been around for a while. This is the old good programming to interfaces.

The same goes for the RulersModule: In a sense it’s abstract too, AppModule doesn’t know or care what concrete class it is. As long as the symbol with the same name exists during compilation.

This sample demonstrates it on the module level, but you can use the same trick for any TypeScript code, be it a component, a service, etc.

I am not sure if such use of environments is ingenious, or insane and abusive. I have not seen this anywhere. However, it does solve a real problem that does not seem to have a solution in the Angular toolbox (and it’s not particularly toxic).

Sample app on GitHub

Check out this sample app at my GitHub repository.

Filters are the “Language” of JIRA

Often I describe JIRA as a large set of Legos in a bucket. JIRA is one of those tools that is so flexible it is hard to get your head around how to use it.

The Lego analogy works on many levels. Using the predefined project types, JIRA Agile, JIRA Service Desk, etc is like opening Lego kits. Yes, they still include regular legos, but the fun stuff only works when it is built in a certain way, and will only make what someone else imagined. While working with the standard block shapes you can put together almost anything you can imagine. With this in mind, there are three main components of JIRA that make up the core building blocks of a system: issues, workflows, and filters.

Every feature in JIRA revolves around one of the three. I want to focus on filters and their broad impact in JIRA. It is incorrect to think of all the issues in JIRA broken up into projects because this is simply not true, even a project is simply one filter of the greater issue store. All the issues created in your JIRA instance are in the same bucket. When JIRA moves to display items to the user it first looks to see what subset of issues this user has permission to see (regardless of project), and then shows the list based on the filter being used at the time.

A good way to think of this concept is the diagram included here. There is the larger issue bucket of the whole instance, and individual users can see the issues that span the projects, issue security, and permissions given to them. They are then able to apply filters within that cross-section they have rights to.

Filters are used for all Reporting, Agile boards, Dashboard Gadgets, Wallboards, API calls, and of course filtered issue lists. If you are looking at more than one issue on your screen, filters are at work.

Once you grasp this idea you can really start to use filters in a powerful way. I often see the light bulb come on in either day 1 or day 2 of our JIRA Boot Camp class. Users will often say, “So that is why <insert situation here> happens!” and then they will be empowered to fix some long-standing problem that has caused frustration with JIRA.

An important aspect of filters that is often overlooked is sharing. The lack of understanding runs across a wide spectrum. On one end people struggle with the idea that users cannot see a particular Agile board or a gadget on a Dashboard without having the necessary filter shared with them. Often in these environments the company is only organizing everything at the project level. These are also often the companies that only use the built-in issue types and avoid customized workflows. They will find it hard to have desired data and functions available where users need it.

The other extreme is the system where everyone automatically shares every filter with all users. In this situation people can easily get frustrated by having hundreds and sometimes thousands of filters to deal with. Over time the list just gets larger and larger as employees come and go within the company. Imagine if an average employee has 25 filters and the company turns over 100 employees per year. In two years you could have 5000 abandoned filters in the system.

It does not help that the interface adds confusion to an already complex idea. in the words of Inigo Montoya:

“You keep using that word, I do not think it means what you think it means.”

On the main filter page is this big, obvious button that says “Share”. This is not actually how you share a filter! You must click into the less obvious “Details” hyperlink and add permissions to the filter. I do hope this gets fixed soon by the removal or re-purposing of the share button.

Neither of these extremes is actually necessary. The proper balance is to have an intentionality to sharing of filters and an administrative discipline to curate the issue list in the System Admin area of JIRA. See the image shown. In this area an admin can delete abandoned filters and change ownership of important ones. Keeping this list manageable is simply good JIRA hygiene.

Filters are a core building block of JIRA. Understanding them and guiding your users to apply them properly can dramatically improve the user experience.

User Adoption = Success

System Administrators often find themselves caught trying to fulfill the promises and hype that come with a new system purchase. As ERP companies learned the hard way over the last twenty years, a system is only as good as its user adoption. Metrics cannot flow to management without individual users, on a consistent basis, doing their part. Those caught in this position are at the mercy of the original system designers. Fortunately there are some strategies that can help.

I would like to use JIRA, a project management platform from Atlassian, as an example. JIRA is one of a new generation of SaaS based, deeply configurable, business tools. I teach a class that empowers organizations to make this powerful tool their own. Reducing user friction is what I have found is the key to user adoption of a tool of this type.

Remove the clutter

An effectively designed product will present you with an incredible combination of configurable features. In the case of JIRA, you can have an almost unlimited number of:

  • Workflows
  • Fields
  • Issue Types
  • External Inputs
  • Outgoing Connections

When a company purchases a product with this many options, most new administrators open the floodgates to their users. Every field looks useful, and managers have a long list of things they want to track in their work. The result can be a menagerie of poorly named and organized fields that are tedious and overwhelming.

Clutter Lowers Productivity

Fields are the single largest source of clutter in business apps so I will point my attack there. It is good to list out all the fields that you want. If a field is up for discussion, it must have value to some aspect of the business. There are three approaches that can be taken to reduce the number of fields presented to the user:

  1. Present a field only at the time it will be used. If you present 50 fields at the beginning of a process, they won’t all be observed and used properly. If you present fields to users only at the moment those traits appear in the process, the screen never becomes intimidating and fields are not missed or ignored.
  2. Prioritize. Work from the key business goals backwards to the user. When you work in this direction, it will expose obsolete and non-critical fields. These can then be eliminated or put on a secondary screen.
  3. Combine related fields into combination elements. Often a flat set of fields can be placed into a hierarchy. A hierarchy is far more approachable to a user than a flat list. Related fields are attacked together instead of needing to be found.
  4. Relate fields to particular issue types. Just as common as fields that have no relevance, are fields that have a default value for many issue types that rarely changes.

Similar ideas can be applied to other complex work processes common in business applications.

Push your user toward action

Keyboard with Time For Action Button.
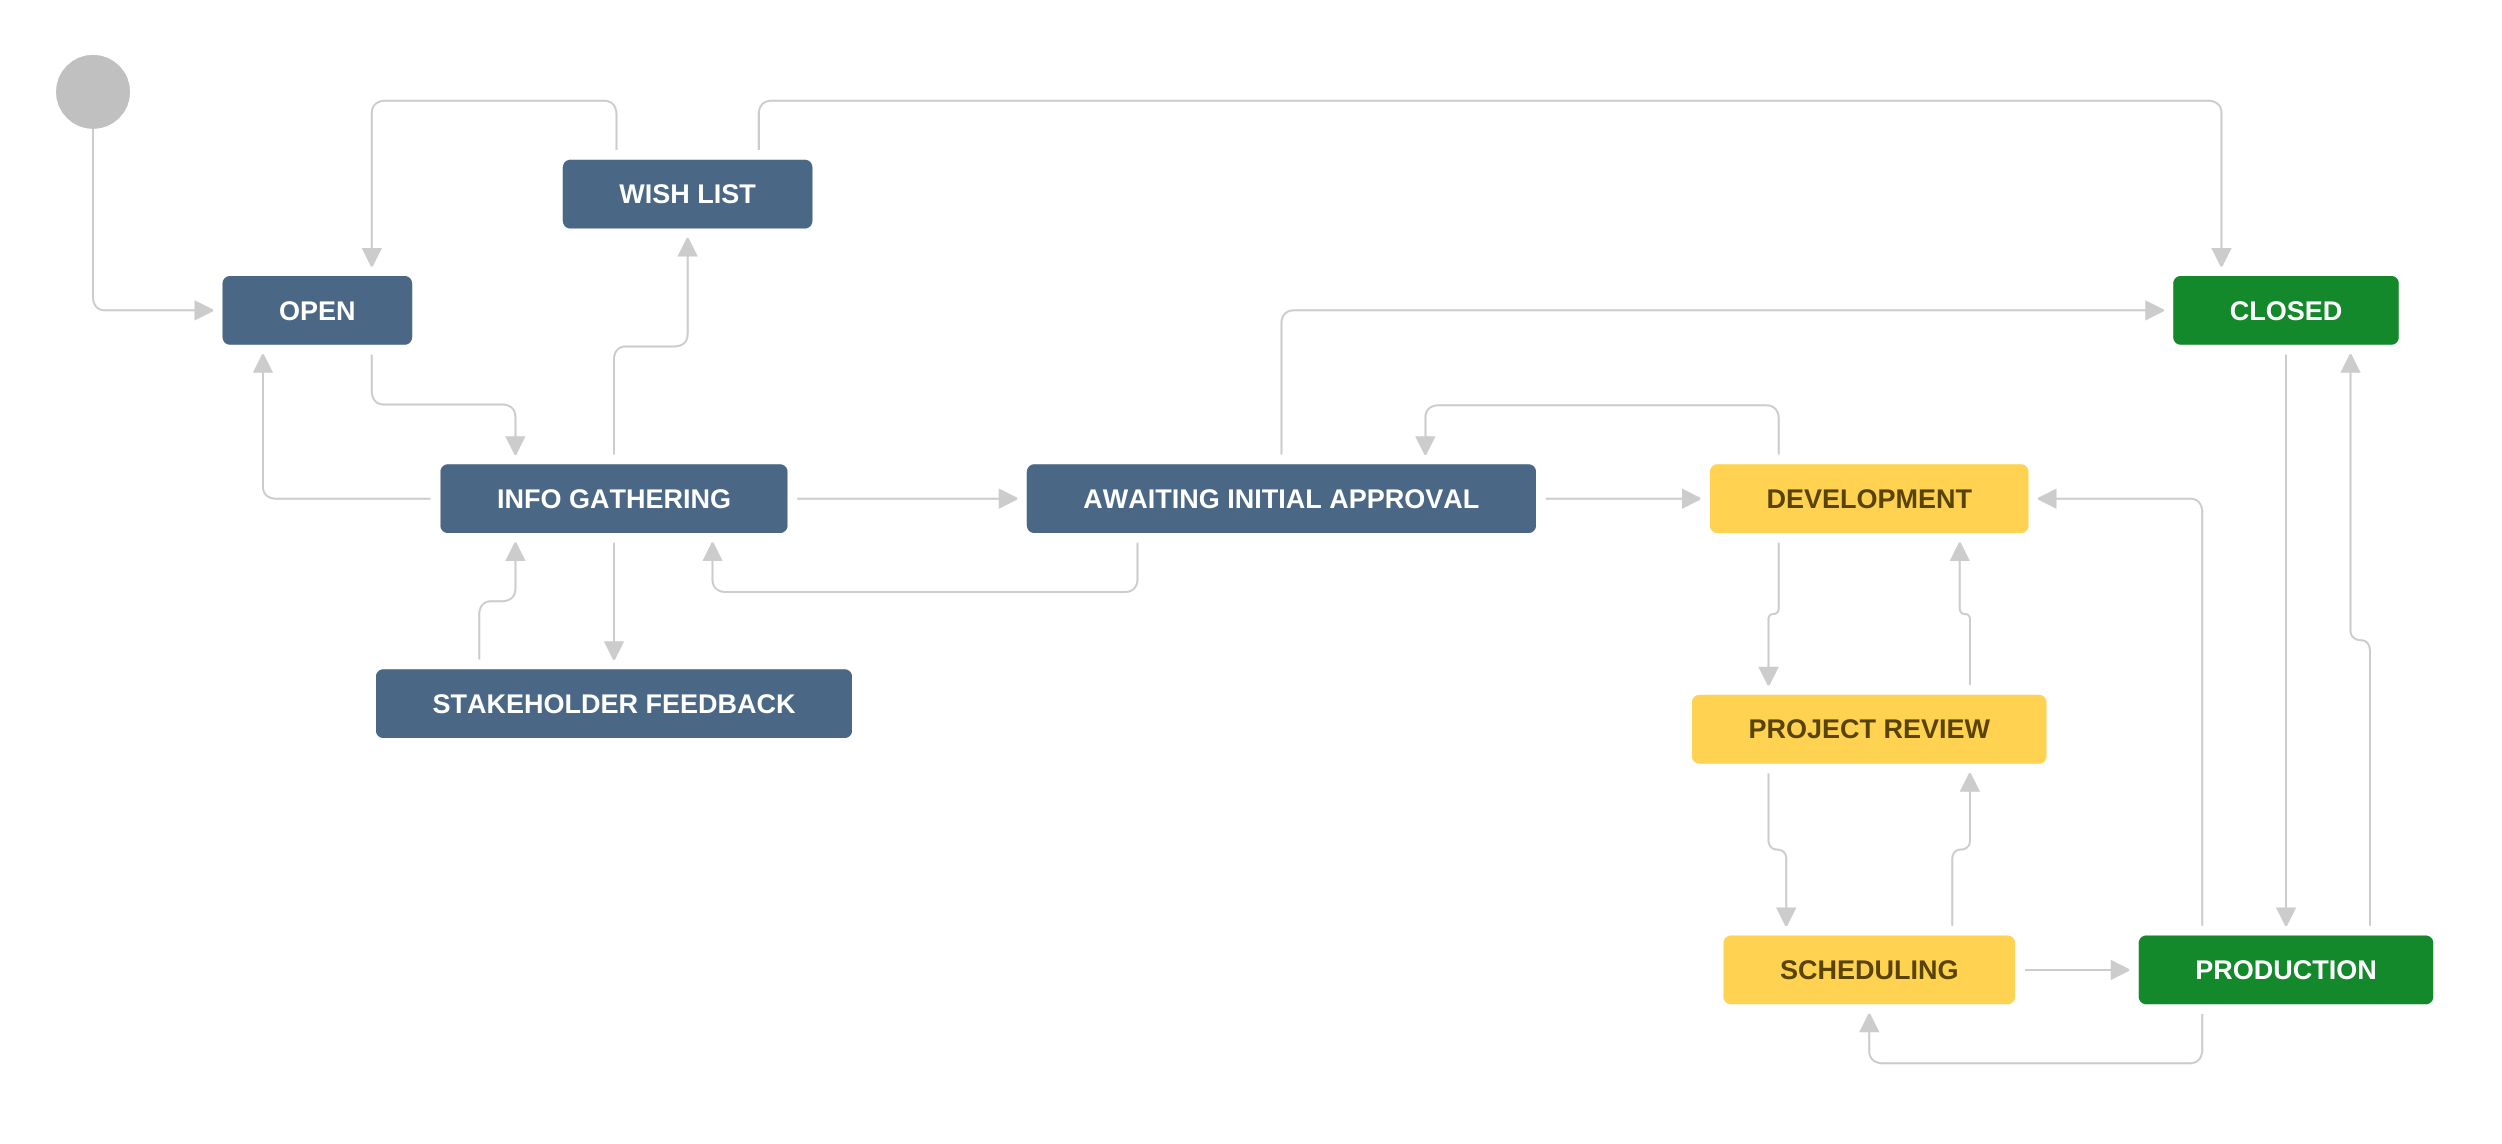
In every task within every job there is a context, and a certain set of information that is needed. System designers have learned to present the information the user needs at a particular point in the work process. There are many mechanisms in a JIRA workflow to assist with this. The most powerful is the idea of screens associated with transitions in a workflow.

In a JIRA workflow there are Statuses and Transitions, the primary building blocks of the workflow. I always describe Statuses as places of rest, with Transitions being the action of moving between those places of rest. When new administrators first build a workflow, they INEVITABLY focus on the statuses. After about the third try, they realize that transitions are where the action is, literally and figuratively.

Focusing on the transitions, or forward movement, means giving users the ability to speed up their work by making the important information available. A major caveat here: do not take away access to all the other fields and information. For example, it is common to “pop” a screen on a transition. If you do so, add a tab to the screen with quick access to all the fields and information. This will allow users to correct previous mistakes or misunderstandings without disrupting their workflow.

Business systems commonly are based around a workflow. Try to understand what moves your user forward in their daily efforts and push it forward in their view.

Focus, focus, focus

It is almost impossible to overstate the importance of this in any organization. We often preach focus in the business world but then we constantly break our workers’ focus throughout the day. I have written pretty extensively about workflow design and the need for focus. Here are a couple of points.

If you have task-driven work, then always present the user with task-oriented workflow transitions and statuses. It is common for a workflow to start out being about tasks and end up being focused on deadlines and time. This confuses users and causes them to have to think harder than they should to stay focused.

Maintaining user focus is an area where user personas are quite valuable to the person configuring a system. If the administrator has a good understanding of a particular job, and can visualize what that user is going through, they will build a better system.

Listen and empower

Listen Closely words on a ripped newspaper headline and other nePride of authorship can be devastating to a system. Every organization is different, and your users matter. Listen to them and iterate on your workflows. Provide a mechanism, often another JIRA project, where users can make suggestions. Ask your users to critique screens and provide feedback about ways to improve their productivity.

Erring on the side of empowerment early in a system implementation can be the difference in making or breaking system adoption. It is common to want to restrict access early on and only give access when needed. This is very frustrating to users and I have witnessed the abandonment of systems over this particular issue. Users need to get their jobs done, and they will resort to Excel to make it happen! Once they abandon using a system because of restricted access it is very difficult to turn things around.

Conclusions

The success of implementing JIRA, or other extensive business systems, is like any other endeavor. It goes better with a proactive plan that considers implications rather than reacts to them. A system is only as good as the data entered, and a user that is empowered by a system will enter far more accurate and complete information than a user that must simply comply. By using these strategies you can chart the path to system adoption rather than abandonment.

The Cobbler’s Kids

The old saying about the cobbler’s kids that have no shoes is as true in concept now as it was a millenia ago. At Oasis Digital, where we find great solutions to increase the success of our customers, we have been so focused on those projects that we find ourselves lacking our marketing shoes. Our marketing efforts have been tertiary at best.


A few years ago we realized the need to develop our brand, a few months ago we started moving forward, and a few weeks ago we sat down and started the process with our team. I asked them to articulate what we are really good at, what they were proud of. The list was broad, and spoke to their understanding of the value they bring to our clients. Here is the list:

  • We don’t just build what the customer describes, we address needs in a well-thought out manner. We creatively solve problems, not just execute.Fists-shoes-216x300
  • What we build can last (longevity). and scale
  • Our teams communicate and collaborate
  • Challenges/problems are shared in the team
  • Our tech stack stays fresh
  • We teach about what we use
  • High quality, comprehensive design documents that hit the mark the first time.
  • Continuous learning/continuous improvement professionally
  • We can bridge the gap between techies and lay people
  • Our team can communicate effectively
  • Always look to improve, solve the problem with less code
  • We push for regular delivery, to finish items, not have long-standing open work items

This is the first bit, what we do well. The further question is how do we do these things. Very often, how you do things communicates your value to your customers. For example, people find our training very valuable because it is intensely workshop based, and taught by an actual practitioner of the craft, not a professional teacher.

  • We build high quality software
  • We empower our customers to prosper
  • We leave customers and projects better than we found them

We are a values based organization, so the “what” and the “how” are not the full answer. When you answer the “why” you find the values that motivate your work. The answer I came to was two-fold:

  • We love to solve problems
  • We love to help people

The wording will change over time but our core motivator is solving hard problems that have value. We really enjoy that process. Adding value, helping people and businesses to be successful, those are solid values that we believe will resonate with the right kinds of customers.

I love the powerful words pushed forward by the team. They are full of meaning and demonstrate the consistency through the team of our values.

love, empower, build, communicate, help, teach, improve, finish, learning, effective, collaborate

I cannot wait to have these ideas permeate our web presence and our marketing communications. If we can push this to conclusion I believe we will finally have a nice pair of shoes!

JIRA: A Fluid Interface

Strategies for successfully traversing the ever shifting Atlassian UI

Atlassian’s JIRA is a fascinating platform for me to use, teach about, and study. I have been working with computers since I was a child in the 80’s. My parents did not buy an Atari game machine when they were popular, we bought an Atari 400 computer. I did play games, but I had to type them in from the back of Byte magazine first.

To those who understand that last reference, we are few in number but we understand why so much works the way it does today. As I keep my eye on staying current in this field, I watch what develops in the context of the full path of the personal computer (pun intended).

In many ways, the fluid JIRA interface is a triumph of SaaS over the technical lethargy that typically comes with enterprise software. The application rapidly improves in any area the company focuses on. Missteps in design are sometimes corrected surprisingly quickly. Soft launches of new features are incredibly valuable, the new project interface is a perfect example. With the first soft launch it was horrid, now it works pretty well. With hundreds, and possibly thousands, of talented developers working on the application, the scope of the management problem is hard for many to fathom. It does yield some interesting results.

Multiple-generations-same-screen

Over the last few years there have been various waves of updating the UI in JIRA and other Atlassian products. I currently see four concurrent waves of UI modernization in JIRA. I am sure some of them will not expand much further but disappear, although not without creating potential confusion for users.

This challenge hits us directly in almost every class I teach. I will regularly run into a UI change that occurs during the class or while I am traveling to a class. This leads to some interesting results when, for example, you are setting up a project and end up in the administration pages without warning. It keeps you on your toes as an instructor.

Share-1

Above and below are two very different examples of interfaces to share something you create with other users.

Share-2

As a prime example, many more can be found in the images throughout the article, lets look at what users manage in the system. They manage Dashboards, Filters, and Agile Boards. The important features for users are creating, editing, sharing, showing favorites, these are just a start. Yet when you compare the UI mechanisms for all three, it is very rare for the three areas to work the same way. This simply confuses users.

From my perspective, there are three types of organizations using JIRA Cloud.

  1. Enterprises
  2. Mid sized organizations
  3. Small teams

Enterprises

If an Enterprise is using JIRA Cloud, they are progressive by definition. Many Enterprises could simply not overcome the internal hurdles to use an app outside of their physical control. Even a dynamic company of this size will struggle with organizational weight and will need support to keep users productive.

A key strategy I have seen implemented in this type of environment is to have a designated advocate in every organizational unit. Connect these advocates together and give them a steady flow of release notes regarding UI updates. Very quickly these staff become the first line of support for users that need help. Over time they can proactively address new updates for people they work with every day. This is more efficient than asking a training organization to hold boring classes devoted simply to UI changes, that are reminiscent of Office Space.

Mid Sized Organizations

Organizations in this size range often have less defined processes, and may not have a dedicated support team for software. Very often the IT department fills this role. Often individuals that can have very disparate job titles become the “go to” problem solver for a part of the organization. Find and recruit these people, they like helping others or they would not become that person. Empower them and let them help you.

Another approach is to use your normal notification mechanism (possibly the one built into JIRA) to notify staff of changes to the interface that will affect them. Proactive communication, if consistently delivered, can build confidence and improve productivity.

Small Teams

Teams that are using JIRA Cloud are a much simpler scenario. It does not mean that less diligence is required to keep your team productive, but the approach is different. Watch for those that are getting behind, talk within the team at lunch or during meetings about changes.

My software teams fall into this category. I try to be aware of the various generations in the teams and anticipate problems. A perfect example is Windows 8. As I watch people use it, I see a clear divide between those that use the Metro interface vs those that avoid it at all costs. This does not mean users are less capable, they have had different experiences. Instead of ignoring this, use it to your advantage. It will increase your knowledge and improve the cohesiveness of the team.

Final Thoughts

This article was written about JIRA but it really applies to all kinds of software and systems. The consistent theme here is proactive communication. None of these strategies involve one person trying to solve every problem. Engage others, increase knowledge transfer, and build consensus. These are strategies that work in many situations and circumstances.

The rapid development of new features is one of the reasons I strongly advocate for JIRA software in many situations. Atlassian has done an amazing job building up the capabilities of the system at scale in a fairly unique way. The uniqueness of this is often unexpected to users and hopefully the strategies discussed here, or some variation, can help you keep your team moving forward for many years to come.

Edit-Style-1

Here is another example of UI differences within a major function of the application, editing a name.

Edit-Style-2

JIRA Case Study: Nested Workflows

Using custom issue types and multiple nested workflows to bring business management processes into a project without disrupting the core workflow.

Last month I had the pleasure of teaching a private JIRA Boot Camp at a national corporation on the East Coast. They had been using JIRA for a while, and had achieved a level of success in within their development team. They knew JIRA had the ability to play a larger role, but they were struggling to really integrate it into the business. They asked if I could come out and go through my normal curriculum but with an eye on their particular situation.

Working with the Director of IT, we decided to really push hard to complete the curriculum in two days and spend the third heavily focused on their internal challenges and their production environment. By the end of the day it was really clear this had been a wise choice. They were picking up the main curriculum very well, and they could see how to move development based items through the workflow. They were struggling with how to manage the business-related processes that precipitated and followed the software development process. Like most people, they understood JIRA could be so much more than an issue tracker, they just needed a little guidance to make it happen.

As we went through the workflow exercises in the curriculum, the problem crystallized. In their organization, initiatives would be proposed by various leaders of groups throughout the company. Those initiatives would go through an assessment, research, and approval process before any development occurred. They needed to track these initiatives so they knew what was coming, but kept mixing them into the development workflow. After we covered custom issue types, I approached the solution with them. They needed to nest a development workflow inside a workflow to track initiatives. This could be done with custom issue types and advanced workflow configuration.

First we white boarded the initiative workflow both before and after development occurred. The results are shown below.

Initiative-Workflow1

The process for the initiatives was fairly complex both before and after development. The entire development process was represented by a “development” status for the initiative. Important truth, the business process “around” development work is often far more complex than the development process itself.

After this we nailed down a straightforward workflow for the development process, represented in the next image. The essential process became crystal clear to them once we removed the distraction of the messy process surrounding it. I needed to coach them very little once the distractions were removed.

Development-Workflow2

The answer to the overall problem was to allow the original initiative to be created, researched and run through an approval process. This initiative then needed to be tied to the development work while it was being completed. Once this phase was completed, there was a well-defined business process that needed to be completed for the whole initiative.

The next challenge was how to implement this in JIRA. The first step was to define the two separate workflows and lay out the statuses and transitions of each. Even though there were some possibilities of sharing statuses between the workflows, we were very careful not to do so. I have learned to isolate workflows that have different purposes. I have written about this previously, here. Mixing the purpose of a workflow includes using a status from a different workflow that may share a name. If the meaning is different in any way then a status should not be shared.

We then created the custom issue types that would be used by each workflow. There were multiple custom issue types needed for each workflow. We created multiple custom issue types for each workflow, then negotiated the transition between the issue types and workflows in a way that fit the organization.

An initiative would ride through its process until it was approved. It was then transitioned to the development status. The initiative was then assigned a label and the development items were created and tagged with that label. The initiative was not allowed to transition out of development until all the items with that label were resolved. The development items then make their way through the process to completion, thus allowing the initiative to move forward to the review, field testing, and deployment stages in the first workflow.

Screenshot-2013-12-03-at-12.41.06-PM-e1386096862843

Another bonus of this approach was reporting. An agile board could be created for each initiative, allowing the stakeholder to monitor progress of his project. Another agile board could be created to track all the initiatives, another for initiatives by department, another for development tasks by developer.

The net result was that a very complex, opaque process made manageable and transparent by utilizing custom issue types, separate workflows and advanced workflow configuration to nest the two workflows together. Yet another example of how powerful JIRA is, and how strategic use of its flexibility can improve organizational efficiency.

JIRA Workflow Design Principles

Anyone familiar with JIRA understands that jumping into building a workflow without an overall plan can lead to problems. While navigating JIRA’s workflow editing tools, half of your brain is focused on your workflow design, and the other half is dealing with the tools. While I encourage new users to try their hand at the software, it is important to understand it is unlikely any first effort will be usable. Following are some suggested strategies that will help you avoid completely starting over, the normal result of a failed attempt at workflow development.

Pencil and Paper

First of all, grab a piece of paper and a pencil. A good workflow takes some thought and some iteration. Fully expect to erase and redraw statuses and transitions if you want to have a truly effective workflow. The more complex the problem domain, the longer it will take. Common mistakes that can take a long time in the editor can be sorted out quickly on a piece of paper. Having a sketch makes the work more easily done (therefore also a possible candidate for delegation).

Tasks, Time, and Resources

In my experience, a diluted focus is where even experienced JIRA users might fall down. Focus and flow are very important to the user experience. Focus can be diluted when the driving purpose of a workflow changes midstream. If a user is following a workflow focused on a task progressing through teams and suddenly has to deal with a time (deadline) based status, it can lead to frustration and mistakes. A good user experience is important in a support system like JIRA: a bad experience leads to poor performance.  I believe this focus can be achieved by a good initial decision on what type of workflow to build. I break these focuses down into three categories; tasks, time, and resources. Each one is very different, and probably should not be combined in one workflow.

Tasks

This is a natural way for many organizations to work, and possibly the best way to approach a workflow in JIRA. In this design mode you specifically map out the work based on the steps it will go through from start to completion. You should be able to easily describe statuses and needed transitions.

If you are concerned about a bottleneck in your staff capacity, inventory, or other resource issue, guard against modifying the workflow to accommodate this. For example, adding a status to the workflow to sort out an overcommitted resource will disrupt the workflow, this can better be handled within a task-based workflow by a screen popped in a transition. If you want to incorporate scheduling a coordination meeting, or other time issue, adding a status to represent this is also a bad idea. Instead, set a trigger to generate the meeting in a properly named status. Those are examples of diluting the effectiveness of a task-based workflow. If you do so, then you tend to start making workflow design decisions that can confuse users. This does not mean that capacity constraints and time considerations are not addressed. These can usually be exposed in filters and typically addressed in transitions.

Screenshot 2014-11-29 at 7.51.02 AM

Time

If your world is filled with Scrums, SLAs, or Gantt Charts, or if your workflow is completely budget driven, then you should consider a time-based workflow. Build your workflow around the processes and meetings that will occur. A good indicator of a time-based design is that your statuses look quite similar to titles in your emails and calendar events. There are lots of examples of this type of workflow, such as the one below. In a time-based workflow you can use post functions and triggers to set dates in an external system and tie the timing of the tasks to various statuses, transitions, and custom fields. If you tend to sort and look at issue lists based on date fields, then a time-based workflow might be a good choice.

Screenshot 2014-11-29 at 8.09.02 AM

Resources & People

Another way to slice through a workflow is to strongly consider resources and people directly in the design. This type of workflow is focused on capacity, issue counts at various stages in development, and looking for where you need more resources or people to maintain productivity. Statuses will be related to the functions or resources needed for a step in the workflow. A workflow designed in this way will make heavy use of custom fields, components, and automated assignment of issues in transitions. If you tend to sort your lists by assignee or component, then you are a good candidate to build your workflow this way. Including similar items to a task-based workflow as described above is natural. Make sure your workflow is consistent from start to finish with steps regarding resource allocation spread across the entire work cycle.

Screenshot 2014-11-29 at 8.27.25 AM

Silos of Work

If your workflow has more than eight statuses then you are likely going to find layout to be a struggle. One approach that can help is to think of the workflow as sections, or silos, of work. JIRA automatically does this for you by creating three categories to put your statuses in (To Do, In Progress, Done). You can take this into your layout by grouping these categories. There may also be pieces of your workflow that typically run in sequence with little deviation. Tightly group these in a small area to assist in the readability of your workflow. By thinking through this process you can avoid the spaghetti syndrome that permeates many workflows. Unfortunately, the best planning cannot prevent a JIRA update from making a mess out of your pretty workflow. But they can be easy to sort back out as long as you are using the same principles.

I show the Resource workflow example from the previous section below without this organization to demonstrate the point. I did not intentionally make it bad, I used the standard order generated by JIRA. The statuses are simply dropped in chronological order, and without some thought an intense mess can develop. Note how it is difficult to see the true flow of work.

Screenshot 2014-11-29 at 8.31.42 AM

Conclusion

When approaching the design of workflows in JIRA it is important to understand the need behind the workflow you are building, have a strong vision for that plan, and execute it with user efficiency in mind. The concepts discussed in this post are a good starting place, but there is much work to do to effectively execute a workflow. There are many good options for targeted training in this area, we recommend users start building workflows immediately and use that process as a platform to learn the system. As a user gains deeper understanding, they can immediately incorporate advanced concepts into their workflows.