

Anyone familiar with JIRA understands that jumping into building a workflow without an overall plan can lead to problems. While navigating JIRA’s workflow editing tools, half of your brain is focused on your workflow design, and the other half is dealing with the tools. While I encourage new users to try their hand at the software, it is important to understand it is unlikely any first effort will be usable. Following are some suggested strategies that will help you avoid completely starting over, the normal result of a failed attempt at workflow development.
Pencil and Paper
First of all, grab a piece of paper and a pencil. A good workflow takes some thought and some iteration. Fully expect to erase and redraw statuses and transitions if you want to have a truly effective workflow. The more complex the problem domain, the longer it will take. Common mistakes that can take a long time in the editor can be sorted out quickly on a piece of paper. Having a sketch makes the work more easily done (therefore also a possible candidate for delegation).
Tasks, Time, and Resources
In my experience, a diluted focus is where even experienced JIRA users might fall down. Focus and flow are very important to the user experience. Focus can be diluted when the driving purpose of a workflow changes midstream. If a user is following a workflow focused on a task progressing through teams and suddenly has to deal with a time (deadline) based status, it can lead to frustration and mistakes. A good user experience is important in a support system like JIRA: a bad experience leads to poor performance. I believe this focus can be achieved by a good initial decision on what type of workflow to build. I break these focuses down into three categories; tasks, time, and resources. Each one is very different, and probably should not be combined in one workflow.
Tasks
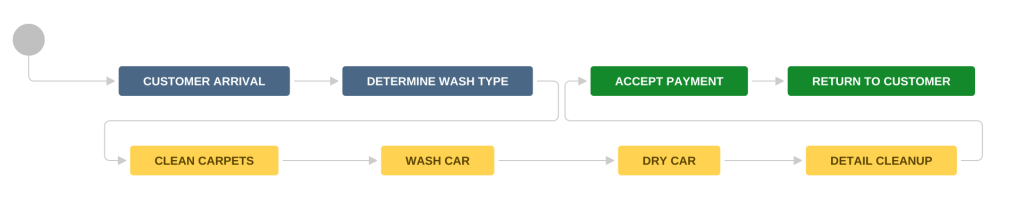
This is a natural way for many organizations to work, and possibly the best way to approach a workflow in JIRA. In this design mode you specifically map out the work based on the steps it will go through from start to completion. You should be able to easily describe statuses and needed transitions.
If you are concerned about a bottleneck in your staff capacity, inventory, or other resource issue, guard against modifying the workflow to accommodate this. For example, adding a status to the workflow to sort out an overcommitted resource will disrupt the workflow, this can better be handled within a task-based workflow by a screen popped in a transition. If you want to incorporate scheduling a coordination meeting, or other time issue, adding a status to represent this is also a bad idea. Instead, set a trigger to generate the meeting in a properly named status. Those are examples of diluting the effectiveness of a task-based workflow. If you do so, then you tend to start making workflow design decisions that can confuse users. This does not mean that capacity constraints and time considerations are not addressed. These can usually be exposed in filters and typically addressed in transitions.
Time
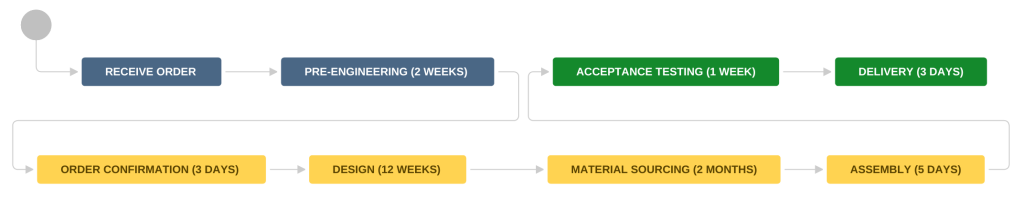
If your world is filled with Scrums, SLAs, or Gantt Charts, or if your workflow is completely budget driven, then you should consider a time-based workflow. Build your workflow around the processes and meetings that will occur. A good indicator of a time-based design is that your statuses look quite similar to titles in your emails and calendar events. There are lots of examples of this type of workflow, such as the one below. In a time-based workflow you can use post functions and triggers to set dates in an external system and tie the timing of the tasks to various statuses, transitions, and custom fields. If you tend to sort and look at issue lists based on date fields, then a time-based workflow might be a good choice.
Resources & People
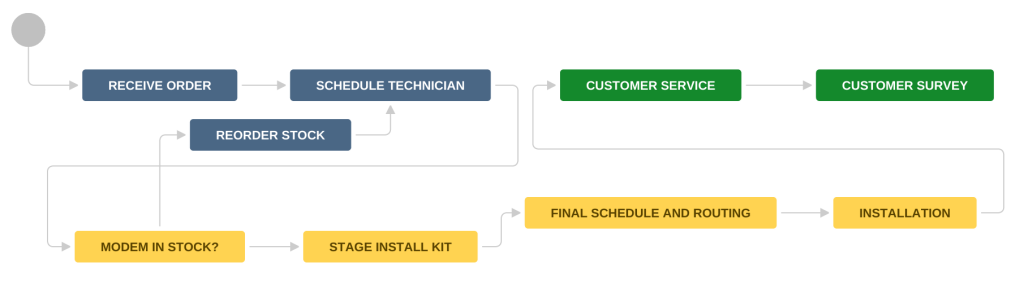
Another way to slice through a workflow is to strongly consider resources and people directly in the design. This type of workflow is focused on capacity, issue counts at various stages in development, and looking for where you need more resources or people to maintain productivity. Statuses will be related to the functions or resources needed for a step in the workflow. A workflow designed in this way will make heavy use of custom fields, components, and automated assignment of issues in transitions. If you tend to sort your lists by assignee or component, then you are a good candidate to build your workflow this way. Including similar items to a task-based workflow as described above is natural. Make sure your workflow is consistent from start to finish with steps regarding resource allocation spread across the entire work cycle.
Silos of Work
If your workflow has more than eight statuses then you are likely going to find layout to be a struggle. One approach that can help is to think of the workflow as sections, or silos, of work. JIRA automatically does this for you by creating three categories to put your statuses in (To Do, In Progress, Done). You can take this into your layout by grouping these categories. There may also be pieces of your workflow that typically run in sequence with little deviation. Tightly group these in a small area to assist in the readability of your workflow. By thinking through this process you can avoid the spaghetti syndrome that permeates many workflows. Unfortunately, the best planning cannot prevent a JIRA update from making a mess out of your pretty workflow. But they can be easy to sort back out as long as you are using the same principles.
I show the Resource workflow example from the previous section below without this organization to demonstrate the point. I did not intentionally make it bad, I used the standard order generated by JIRA. The statuses are simply dropped in chronological order, and without some thought an intense mess can develop. Note how it is difficult to see the true flow of work.

Conclusion
When approaching the design of workflows in JIRA it is important to understand the need behind the workflow you are building, have a strong vision for that plan, and execute it with user efficiency in mind. The concepts discussed in this post are a good starting place, but there is much work to do to effectively execute a workflow. There are many good options for targeted training in this area, we recommend users start building workflows immediately and use that process as a platform to learn the system. As a user gains deeper understanding, they can immediately incorporate advanced concepts into their workflows.