JIRA: A Fluid Interface

Strategies for successfully traversing the ever shifting Atlassian UI

Atlassian’s JIRA is a fascinating platform for me to use, teach about, and study. I have been working with computers since I was a child in the 80’s. My parents did not buy an Atari game machine when they were popular, we bought an Atari 400 computer. I did play games, but I had to type them in from the back of Byte magazine first.

To those who understand that last reference, we are few in number but we understand why so much works the way it does today. As I keep my eye on staying current in this field, I watch what develops in the context of the full path of the personal computer (pun intended).

In many ways, the fluid JIRA interface is a triumph of SaaS over the technical lethargy that typically comes with enterprise software. The application rapidly improves in any area the company focuses on. Missteps in design are sometimes corrected surprisingly quickly. Soft launches of new features are incredibly valuable, the new project interface is a perfect example. With the first soft launch it was horrid, now it works pretty well. With hundreds, and possibly thousands, of talented developers working on the application, the scope of the management problem is hard for many to fathom. It does yield some interesting results.

Multiple-generations-same-screen

Over the last few years there have been various waves of updating the UI in JIRA and other Atlassian products. I currently see four concurrent waves of UI modernization in JIRA. I am sure some of them will not expand much further but disappear, although not without creating potential confusion for users.

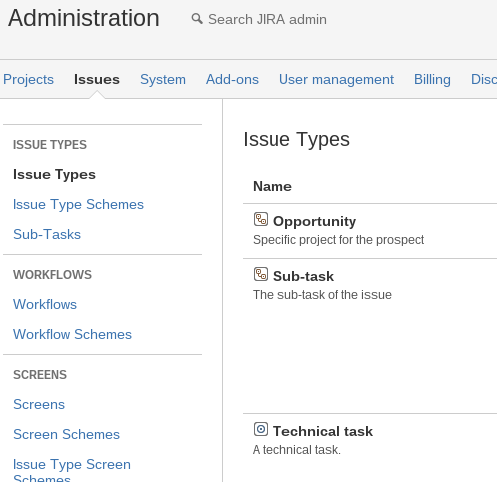
This challenge hits us directly in almost every class I teach. I will regularly run into a UI change that occurs during the class or while I am traveling to a class. This leads to some interesting results when, for example, you are setting up a project and end up in the administration pages without warning. It keeps you on your toes as an instructor.

Share-1

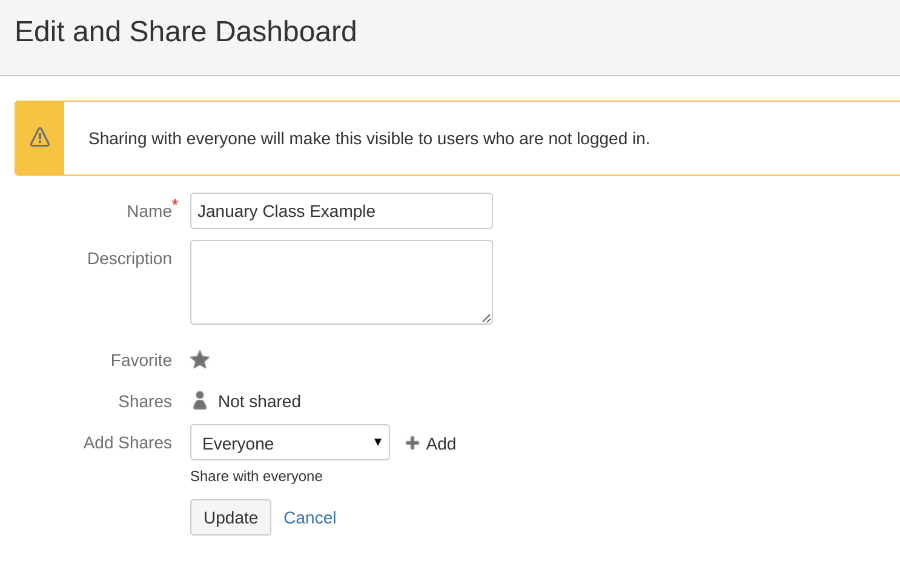
Above and below are two very different examples of interfaces to share something you create with other users.

Share-2

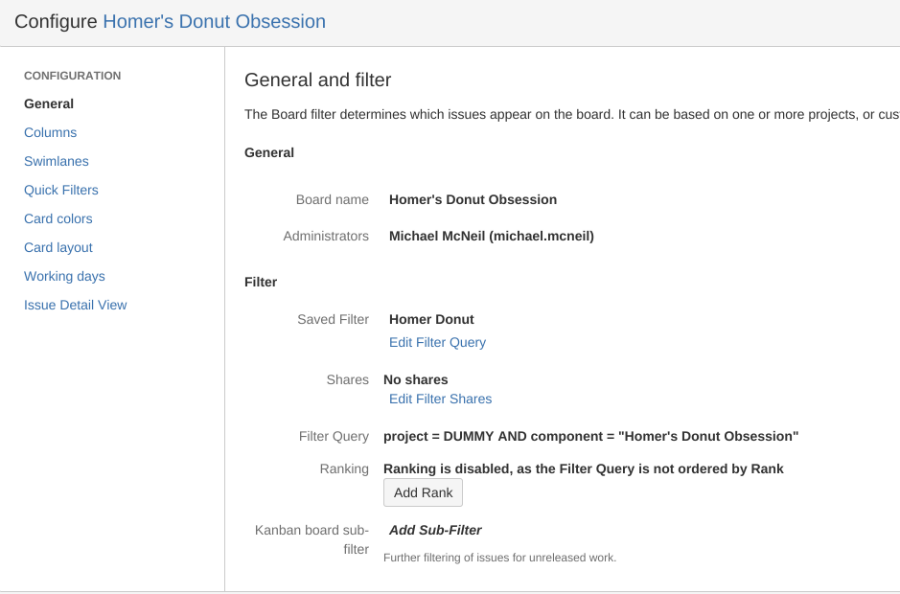
As a prime example, many more can be found in the images throughout the article, lets look at what users manage in the system. They manage Dashboards, Filters, and Agile Boards. The important features for users are creating, editing, sharing, showing favorites, these are just a start. Yet when you compare the UI mechanisms for all three, it is very rare for the three areas to work the same way. This simply confuses users.

From my perspective, there are three types of organizations using JIRA Cloud.

  1. Enterprises
  2. Mid sized organizations
  3. Small teams

Enterprises

If an Enterprise is using JIRA Cloud, they are progressive by definition. Many Enterprises could simply not overcome the internal hurdles to use an app outside of their physical control. Even a dynamic company of this size will struggle with organizational weight and will need support to keep users productive.

A key strategy I have seen implemented in this type of environment is to have a designated advocate in every organizational unit. Connect these advocates together and give them a steady flow of release notes regarding UI updates. Very quickly these staff become the first line of support for users that need help. Over time they can proactively address new updates for people they work with every day. This is more efficient than asking a training organization to hold boring classes devoted simply to UI changes, that are reminiscent of Office Space.

Mid Sized Organizations

Organizations in this size range often have less defined processes, and may not have a dedicated support team for software. Very often the IT department fills this role. Often individuals that can have very disparate job titles become the “go to” problem solver for a part of the organization. Find and recruit these people, they like helping others or they would not become that person. Empower them and let them help you.

Another approach is to use your normal notification mechanism (possibly the one built into JIRA) to notify staff of changes to the interface that will affect them. Proactive communication, if consistently delivered, can build confidence and improve productivity.

Small Teams

Teams that are using JIRA Cloud are a much simpler scenario. It does not mean that less diligence is required to keep your team productive, but the approach is different. Watch for those that are getting behind, talk within the team at lunch or during meetings about changes.

My software teams fall into this category. I try to be aware of the various generations in the teams and anticipate problems. A perfect example is Windows 8. As I watch people use it, I see a clear divide between those that use the Metro interface vs those that avoid it at all costs. This does not mean users are less capable, they have had different experiences. Instead of ignoring this, use it to your advantage. It will increase your knowledge and improve the cohesiveness of the team.

Final Thoughts

This article was written about JIRA but it really applies to all kinds of software and systems. The consistent theme here is proactive communication. None of these strategies involve one person trying to solve every problem. Engage others, increase knowledge transfer, and build consensus. These are strategies that work in many situations and circumstances.

The rapid development of new features is one of the reasons I strongly advocate for JIRA software in many situations. Atlassian has done an amazing job building up the capabilities of the system at scale in a fairly unique way. The uniqueness of this is often unexpected to users and hopefully the strategies discussed here, or some variation, can help you keep your team moving forward for many years to come.

Edit-Style-1

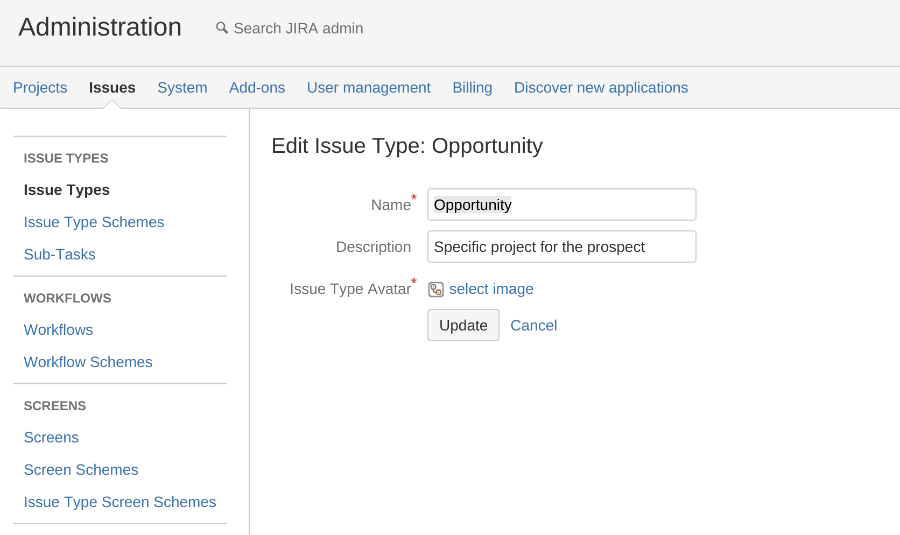
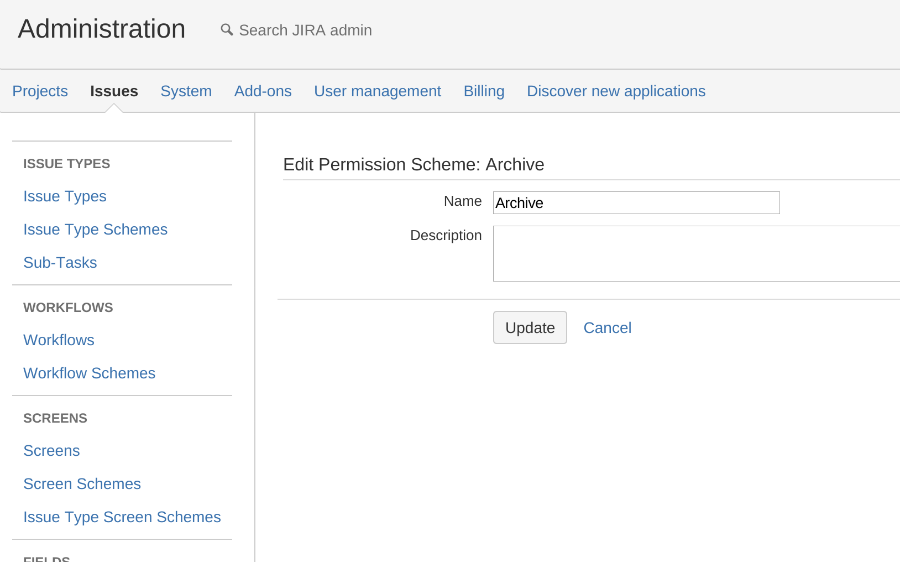
Here is another example of UI differences within a major function of the application, editing a name.

Edit-Style-2

JIRA Case Study: Nested Workflows

Using custom issue types and multiple nested workflows to bring business management processes into a project without disrupting the core workflow.

Last month I had the pleasure of teaching a private JIRA Boot Camp at a national corporation on the East Coast. They had been using JIRA for a while, and had achieved a level of success in within their development team. They knew JIRA had the ability to play a larger role, but they were struggling to really integrate it into the business. They asked if I could come out and go through my normal curriculum but with an eye on their particular situation.

Working with the Director of IT, we decided to really push hard to complete the curriculum in two days and spend the third heavily focused on their internal challenges and their production environment. By the end of the day it was really clear this had been a wise choice. They were picking up the main curriculum very well, and they could see how to move development based items through the workflow. They were struggling with how to manage the business-related processes that precipitated and followed the software development process. Like most people, they understood JIRA could be so much more than an issue tracker, they just needed a little guidance to make it happen.

As we went through the workflow exercises in the curriculum, the problem crystallized. In their organization, initiatives would be proposed by various leaders of groups throughout the company. Those initiatives would go through an assessment, research, and approval process before any development occurred. They needed to track these initiatives so they knew what was coming, but kept mixing them into the development workflow. After we covered custom issue types, I approached the solution with them. They needed to nest a development workflow inside a workflow to track initiatives. This could be done with custom issue types and advanced workflow configuration.

First we white boarded the initiative workflow both before and after development occurred. The results are shown below.

Initiative-Workflow1

The process for the initiatives was fairly complex both before and after development. The entire development process was represented by a “development” status for the initiative. Important truth, the business process “around” development work is often far more complex than the development process itself.

After this we nailed down a straightforward workflow for the development process, represented in the next image. The essential process became crystal clear to them once we removed the distraction of the messy process surrounding it. I needed to coach them very little once the distractions were removed.

Development-Workflow2

The answer to the overall problem was to allow the original initiative to be created, researched and run through an approval process. This initiative then needed to be tied to the development work while it was being completed. Once this phase was completed, there was a well-defined business process that needed to be completed for the whole initiative.

The next challenge was how to implement this in JIRA. The first step was to define the two separate workflows and lay out the statuses and transitions of each. Even though there were some possibilities of sharing statuses between the workflows, we were very careful not to do so. I have learned to isolate workflows that have different purposes. I have written about this previously, here. Mixing the purpose of a workflow includes using a status from a different workflow that may share a name. If the meaning is different in any way then a status should not be shared.

We then created the custom issue types that would be used by each workflow. There were multiple custom issue types needed for each workflow. We created multiple custom issue types for each workflow, then negotiated the transition between the issue types and workflows in a way that fit the organization.

An initiative would ride through its process until it was approved. It was then transitioned to the development status. The initiative was then assigned a label and the development items were created and tagged with that label. The initiative was not allowed to transition out of development until all the items with that label were resolved. The development items then make their way through the process to completion, thus allowing the initiative to move forward to the review, field testing, and deployment stages in the first workflow.

Screenshot-2013-12-03-at-12.41.06-PM-e1386096862843

Another bonus of this approach was reporting. An agile board could be created for each initiative, allowing the stakeholder to monitor progress of his project. Another agile board could be created to track all the initiatives, another for initiatives by department, another for development tasks by developer.

The net result was that a very complex, opaque process made manageable and transparent by utilizing custom issue types, separate workflows and advanced workflow configuration to nest the two workflows together. Yet another example of how powerful JIRA is, and how strategic use of its flexibility can improve organizational efficiency.

Custom Issue Types, A Real Asset in JIRA

I often receive questions from JIRA users arising from a lack of understanding of the underlying system architecture. It is not unusual to desire some functionality and instinctively know there must be a way to do it with the data and the tools available, but not quite grasp the best way to accomplish it. Often users do what they have done with their computers, phones, and tablets: they go to the marketplace. I have found that almost all of the needs of an organization can be met by the core system. This is not to say there is a lack of value in the marketplace add-ons, some can be tremendously helpful, but I find it problematic to rely on an external plugin for critical functionality.Screenshot-2014-12-19-at-10.33.11-AM

One core JIRA feature that is often under-utilized, and can be an answer to many perceived needs, is Custom Issue Types. Let’s take a look at four scenarios where a user might be tempted to look at add-ons for something JIRA can do with Custom Issue Types.

Need 1: I need a template for recurring and repetitive issues, how do I do that?

I find the strongest solution to be using JIRA’s custom issue types. If for example you have a background check requirement for new hires in your HR workflow, simply create a background check issue type. You can then associate fields, and custom screens with this issue type within your project..

Need 2: I have a particular aspect of our projects that is managed by a central group. How do I aggregate these into a single manageable list?

You can use a custom issue type to accomplish this goal on a per-project basis or across multiple projects. A filter, which can be selectively shared, can be created to display this custom issue type. This filter can then be used to create an agile board or a simple list view that will show issues across all projects that match the search criteria. Continuing with the background check analogy, if there is a central group that manages HR for a number of organizations, the filter can give them visibility to manage the process easily.

Need 3: I need to give an external user access to a part of our projects. How can I do this without that user seeing everything?

Using a security scheme that restricts a user to seeing only certain issue types will achieve this goal. JIRA’s issue security feature is an often overlooked aspect of issue management in JIRA, but one that offers a lot of possibilities. That same HR group likely has no business reading all the details associated with the projects they have to touch. Issue security can restrict their access to only what they need to see–limiting liability. This is a topic I can address in more detail in a separate article. (putting this on my to-do list)

Need 4: I have different types of work in my project. My workflow works for most of my process, but to accommodate everything would require a very complex workflow. How do I accommodate all the types of work within a manageable workflow?

Using custom issue types allows you to select a workflow specifically for each type of issue. This gives you a clean palette to customize how the work occurs, is tracked, etc. Your workflows do not even need to be based on the same principles when split by issue type. I wrote about this in a recent article. You can even send data and triggers to external systems through the transitions of your custom workflow. A background check is an example of a fairly unique process that could easily justify a unique workflow.

Conclusion

All of these needs can be met by utilizing custom issue types. I hope you can see how the combination of all of them makes managing the specific example a breeze. Many of these needs are real and have value across a large number of organizations. Exploring the toolbox in JIRA is important if you want to use the tool effectively. Like anything in life, a deep understanding will almost always yield a better result.

Controller As, and dividing controllers for modularity – Angular lunch

This month at the St. Louis Angular Lunch (which we host), John Baur explained the “controller as” syntax, which has come to be the preferred and recommended approach. Afterward, he showed examples of dividing a long, complex controller into shorter, more modular controller-components. Here is a video – we are experimenting with the best way to record these lunch talks, hopefully the code is readable enough. We’ll do something better as we learn how.

Transcript

We have also transcribed the the talk to text, provided below. This is a rough, first-draft transcription, so any errors are probably in that proces./strong>

Continue reading Controller As, and dividing controllers for modularity – Angular lunch

JIRA Workflow Design Principles

Anyone familiar with JIRA understands that jumping into building a workflow without an overall plan can lead to problems. While navigating JIRA’s workflow editing tools, half of your brain is focused on your workflow design, and the other half is dealing with the tools. While I encourage new users to try their hand at the software, it is important to understand it is unlikely any first effort will be usable. Following are some suggested strategies that will help you avoid completely starting over, the normal result of a failed attempt at workflow development.

Pencil and Paper

First of all, grab a piece of paper and a pencil. A good workflow takes some thought and some iteration. Fully expect to erase and redraw statuses and transitions if you want to have a truly effective workflow. The more complex the problem domain, the longer it will take. Common mistakes that can take a long time in the editor can be sorted out quickly on a piece of paper. Having a sketch makes the work more easily done (therefore also a possible candidate for delegation).

Tasks, Time, and Resources

In my experience, a diluted focus is where even experienced JIRA users might fall down. Focus and flow are very important to the user experience. Focus can be diluted when the driving purpose of a workflow changes midstream. If a user is following a workflow focused on a task progressing through teams and suddenly has to deal with a time (deadline) based status, it can lead to frustration and mistakes. A good user experience is important in a support system like JIRA: a bad experience leads to poor performance.  I believe this focus can be achieved by a good initial decision on what type of workflow to build. I break these focuses down into three categories; tasks, time, and resources. Each one is very different, and probably should not be combined in one workflow.

Tasks

This is a natural way for many organizations to work, and possibly the best way to approach a workflow in JIRA. In this design mode you specifically map out the work based on the steps it will go through from start to completion. You should be able to easily describe statuses and needed transitions.

If you are concerned about a bottleneck in your staff capacity, inventory, or other resource issue, guard against modifying the workflow to accommodate this. For example, adding a status to the workflow to sort out an overcommitted resource will disrupt the workflow, this can better be handled within a task-based workflow by a screen popped in a transition. If you want to incorporate scheduling a coordination meeting, or other time issue, adding a status to represent this is also a bad idea. Instead, set a trigger to generate the meeting in a properly named status. Those are examples of diluting the effectiveness of a task-based workflow. If you do so, then you tend to start making workflow design decisions that can confuse users. This does not mean that capacity constraints and time considerations are not addressed. These can usually be exposed in filters and typically addressed in transitions.

Screenshot 2014-11-29 at 7.51.02 AM

Time

If your world is filled with Scrums, SLAs, or Gantt Charts, or if your workflow is completely budget driven, then you should consider a time-based workflow. Build your workflow around the processes and meetings that will occur. A good indicator of a time-based design is that your statuses look quite similar to titles in your emails and calendar events. There are lots of examples of this type of workflow, such as the one below. In a time-based workflow you can use post functions and triggers to set dates in an external system and tie the timing of the tasks to various statuses, transitions, and custom fields. If you tend to sort and look at issue lists based on date fields, then a time-based workflow might be a good choice.

Screenshot 2014-11-29 at 8.09.02 AM

Resources & People

Another way to slice through a workflow is to strongly consider resources and people directly in the design. This type of workflow is focused on capacity, issue counts at various stages in development, and looking for where you need more resources or people to maintain productivity. Statuses will be related to the functions or resources needed for a step in the workflow. A workflow designed in this way will make heavy use of custom fields, components, and automated assignment of issues in transitions. If you tend to sort your lists by assignee or component, then you are a good candidate to build your workflow this way. Including similar items to a task-based workflow as described above is natural. Make sure your workflow is consistent from start to finish with steps regarding resource allocation spread across the entire work cycle.

Screenshot 2014-11-29 at 8.27.25 AM

Silos of Work

If your workflow has more than eight statuses then you are likely going to find layout to be a struggle. One approach that can help is to think of the workflow as sections, or silos, of work. JIRA automatically does this for you by creating three categories to put your statuses in (To Do, In Progress, Done). You can take this into your layout by grouping these categories. There may also be pieces of your workflow that typically run in sequence with little deviation. Tightly group these in a small area to assist in the readability of your workflow. By thinking through this process you can avoid the spaghetti syndrome that permeates many workflows. Unfortunately, the best planning cannot prevent a JIRA update from making a mess out of your pretty workflow. But they can be easy to sort back out as long as you are using the same principles.

I show the Resource workflow example from the previous section below without this organization to demonstrate the point. I did not intentionally make it bad, I used the standard order generated by JIRA. The statuses are simply dropped in chronological order, and without some thought an intense mess can develop. Note how it is difficult to see the true flow of work.

Screenshot 2014-11-29 at 8.31.42 AM

Conclusion

When approaching the design of workflows in JIRA it is important to understand the need behind the workflow you are building, have a strong vision for that plan, and execute it with user efficiency in mind. The concepts discussed in this post are a good starting place, but there is much work to do to effectively execute a workflow. There are many good options for targeted training in this area, we recommend users start building workflows immediately and use that process as a platform to learn the system. As a user gains deeper understanding, they can immediately incorporate advanced concepts into their workflows.

Task Based User Interfaces

Here at Oasis Digital, the bulk of our work is on complex business data systems. checkThese projects sometimes involve a so-called task-based user interface. Briefly, this is an interface where the operations available to the user are presented in terms of the problem domain, rather than in terms of editing data. Other names for this idea include “task-focused user interface” and “inductive user interface”.

Origins

I was unable to determine the specific research/practice origins of task-based UI, but it is most commonly seen as arriving from three main directions. First, the inductive user interface guidelines published by Microsoft around 2001 lay out a detailed description and motivation. Second, the domain driven design (DDD) and command query responsibility separation (CQRS) communities often described task-based UI as suitable for use in front of the system built with those principles. Third, simply looking at mass-market software there are numerous examples.

CRUD

Task-based UI is the opposite of CRUD UI, a convenient foil. Many software systems have numerous features which are readily described as CRUD: create, read, update, delete. Some developers describe their work as primarily creating CRUD systems, with either pride or disdain. When analyzing a proposed feature or proposed software project, we sometimes evaluate the extent to which the project is “just CRUD” versus behavioral functionality. Brought to the user interface, CRUD typically means screen after screen in which users can make an entity of some kind, find an existing one, update one, or remove one. In other words, a minimal veneer over basic database operations.

Simple CRUD user interfaces have the advantage that they are generally easy to create, and amenable to common tooling. Many development environments offer wizards or libraries to ease such creation, and this dates back to at least early 1990s, and probably much farther than that.

Therefore, CRUD has a lot of appeal when first creating a new application. Unfortunately, a system built primarily around CRUD tends to make behavior beyond minor validation unduly difficult to implement. If you find yourself squeezing business logic into an “on change” or “on click” event handler somewhere, you are probably experiencing this difficulty. As systems grow in complexity this bad fit can consume vast amounts of time and money.

There is a way out, and that is a task-based user interface, one which presents the user with options and actions which fit the problem domain of the software, rather than those which appear to manipulate data in trivial ways.

Change of Address Example

A common example to explain task-based UI is a change of address operation in a system which has subscribers, members, or some other class of people to whom things might be mailed etc. The CRUD approach to change of address is simple: the user searches for the appropriate user record, views that record, moves the cursor to the address fields, types over those values, and clicks “save”. Very convenient, very easy to program.

Unfortunately, down the line if there is nontrivial behavior in the system, it can be extremely difficult to determine what such an edit means. Was the address corrected because it had been mis-entered in the past? Was the ZIP Code changed because the post office changed the ZIP code assigned to that physical location? Or does this edit represent the person moving to a different place of residence? If the latter, how might that affect them in terms of the problem domain?

To avoid this, a task-based user interface would not only present address fields which can be edited. Rather, the user would see information about a person (including their address) then have options (buttons or whatever else is suitable in the visual UI guidelines at hand) with names like “correct mis-entered address”, “subscriber moved to another residence”, etc. Such explicit actions make it possible to capture the underlying domain-level meaning, rather than just edits to data fields. A downstream system receiving this information could then respond appropriately.

Choose Your Words Wisely

Task-based user interface is therefore to a considerable extent about words: the words which describe actions the user can take. If a system merely uses a task-based user interface on top of a CRUD-centric back-end implementation, then the words can at least be chosen well in the user interface. If the system uses a domain driven approach internally, then some of the well-chosen words in the user interface may become part of the ubiquitous language used throughout the implementation.

I encourage developers to consider a task-based approach even if the underlying system is not particularly domain driven.

Add, Edit, Delete, +, –

Speaking of words, having built numerous user interfaces, I very often still “default” to wire framing with button labels like “add” and “delete”. Such things are fine for an early initial wireframe, but task-based design principles suggest reconsidering whether a more specific set of operations is suitable.

An example came up at work today with a list of employees, and the initial proposal was a “delete” button next to each one. But one does not merely delete an employee: at even the most heartless of companies there will be quite a lot more process involved in removing an employee from a list of employees. A system which manages the employees then, should probably have some sort of process flow around that removal, and it should use words other than “delete”.

A Final Quip

If the user wanted Excel, they would use Excel. If they are using an application which is instead specific to a problem domain, then it should have features, both internally and at the user interface level, relevant to that problem domain.

Links

http://en.wikipedia.org/wiki/Task-focused_interface
http://msdn.microsoft.com/en-us/library/ms997506.aspx
http://codebetter.com/iancooper/2011/07/15/why-crud-might-be-what-they-want-but-may-not-be-what-they-need/
https://cqrs.wordpress.com/documents/task-based-ui/
http://stackoverflow.com/questions/12255874/what-is-an-example-of-a-task-based-ui
http://codebetter.com/gregyoung/2010/02/16/cqrs-task-based-uis-event-sourcing-agh/

ES6 for AngularJS – Angular Lunch

A few months ago, Oasis Digital started a monthly St. Louis Angular Lunch. At the November 2014 lunch, we had a guest speaker: Mark Volkmann of OCI. Mark talked about ES6 and the Traceur compiler, and briefly how they fit in to developing Angular applications today.

Transcript

We have transcribed the talk about to text, provided below. This is a rough, first-draft transcription, so any errors are probably from that process.

Continue reading ES6 for AngularJS – Angular Lunch

The Good, the Bad, and the Ugly – Toshiba CB2

I have written hundreds of articles and dozens of reviews over the years. I can honestly say that reviewing the Toshiba 13” FHD Chromebook 2 has been the most difficult. The difficulty has arisen from a number of directions. On one hand Toshiba has directly addressed many of the gripes chromebook users have had (IPS display, 1920×1080 resolution, battery life). On the other hand there have been some very questionable choices such as materials and build quality. Because of the positives, there are only two chromebooks that can even be compared, the Samsung 13” FHD Chromebook 2 and the Pixel. The first makes good sense, similar price, features etc. Comparing to the Pixel has been an adventure. I will explain more as we walk through the review.

Toshiba CB2 groupI have created a unique comparison approach for this review. I feel confident I can efficiently and effectively contrast the Samsung and the Toshiba. In each major category I can clearly identify a winner. When comparing to the Pixel, outside of battery life the Toshiba always loses, so I pondered how to effectively communicate the comparison. I have chose to identify a percentage of the Pixel’s excellence that the Toshiba achieves.

Processor

Samsung vs. Toshiba  – Tie

Toshiba vs Pixel – 75%

Using the Bay Trail processor for a few weeks was a great way to compare with the Samsung ARM processor I used for over a month in Europe on a daily basis. I have really gotten a very good feel for both, to use for real work over time, and they perform similarly. They are both a step slower than the Pixel or other muscular Chromebooks like the Dell or Lenovo. This step down was NOT severe enough to bother me in any substantive way. Sure, a pile of tabs opened simultaneously will take a second or two longer. This is not really important to my productivity. As memory seems to affect things more (all 3 had 4GB of RAM) on Chrome OS, I found productivity to be strong with the Toshiba. Given the way Chrome OS is developing I do not expect it to become a problem in the future.

Octane 2.0 using the latest stable release (38.0.2125.110 (64-bit))

Pixel – 20488
Dell 11 – 11680
Samsung CB2 13 – 6904
Toshiba CB2 13 – 7517

Some notes on the benchmarks. While you can see my rant on benchmarks here, it should be noted that the four Chromebooks all have very different processors in them. I can honestly say that the experience with ChromeOS does not drop off much moving between any of these devices. When looking at the range of scores it appears there should be on the surface. I would continue to argue that memory is far more important to a smooth Chrome experience than processor speed.

Screen

Samsung vs Toshiba – Toshiba in a landslide

Toshiba vs Pixel – 80%

Both the Samsung and the Toshiba have Full HD 1920×1080 screens. This is where the similarity ends. The Samsung uses a TN display (circa 1990’s) while the Toshiba employs an IPS display which has become the norm in the last decade for displays used by reasonable humans. An IPS display is simply required for outdoor use and I have been stunned that it has taken this long for them to start becoming standard on Chromebooks. My theory is that manufacturers made millions of TN displays for Netbooks a decade ago. These displays have been sitting in a warehouse all this time and they figured they could dump them on a platform they thought likely to fail and make a few bucks. No facts to back this up, just a theory.

The Toshiba screen is quite nice. It is sharp, the colors are correct, and the viewing angles are very good for a laptop at this price point. The only real negative is the lack of a matte finish. The glossy, glassy nature of the screen makes outdoor use more difficult. Not as poor as the Samsung but a headache-generator to be sure. I am writing this article in direct sun at the moment. I will be pausing for a while after this section because of the glare and the associate headache that is starting.

Comparing the Toshiba screen to the Pixel is interesting. Next to a display like the Samsung’s the Pixel looks fantastic, next to a good display like the Toshiba you really see the excellence. It was very similar to when I compared the Pixel to a Macbook Pro. You simply had to say wow. I still have not seen a laptop screen at any price that is better than the Pixel.

The format was interesting to contrast as well. The 16:9 aspect ration of the Toshiba is quite different than the 3:2 aspect ratio of the Pixel. Both can provide side by side windows effectively but the Pixel offers much more height. I think the 3:2 aspect ratio is superior in screen sizes over 15” while 16:9 provides the needed width for multitasking at smaller form factors.

Chassis

Samsung vs Toshiba – Samsung in a landslide

Toshiba vs Pixel – 20%

Toshiba DesignUsing the Toshiba CB2, feeling the materials and looking back at recent product lines, I cannot help but scratch my head at the awful designs Toshiba comes up with. I have become truly curious what broken process is yielding such poor results on top of very well executed engineering. I get the feeling that as a company, Toshiba would sit down at a five star restaurant and order a Mountain Dew and a plate of chicken fingers. There seems to be a lack of any sense of class at all.

For example a few years ago we needed a laptop quickly. My partner went to the local Micro Center and picked up the most powerful laptop he could. He picked up a high end Toshiba machine we labeled “racing stripes” for its big, gaudy red stripe and liberal use of chrome in the chassis. This unit would embarrass most high schoolers, it was so obnoxious. Mercifully the unit died but left a strong impression on us.

The Toshiba CB2 is similarly lost in terms of design. The outside cover is presumably inspired by a waffle iron. There is also one advertisement on the unit that cannot be removed–for Skullcandy of all things. Why would I want a nice Chromebook that I use every day, and which would appeal to businesses and institutions, to constantly associate with a brand like that? Absolutely goofy in my opinion.

End of rant…

I know I am going to be criticized on this rating. I have this simple proof to offer, we ordered three of the Toshibas, and two of them have had build issues. One of the units has had all but two of the screws fall out of the bottom. One of the other units has a piece of paper (shown in the picture below) sticking out from behind the screen.Toshiba-CB2-Screen-Defect

Then there are the materials used to make the devices. In my review of the 13” Samsung CB2 I lamented the use of cheaper materials than the 11” CB2. Here I can tell you that the Samsung is made of far better stuff than the Toshiba. I think Toshiba chose the worst materials I have seen on a Chromebook and possibly on any laptop I have ever used from a name brand manufacturer.

The issue was simply amplified in my week long alternation between the Pixel and the Toshiba. I was reminded by the starkness of what my eyes were beholding, the Pixel is still the best laptop made in my personal opinion. Yes, most people lament the Pixel as an overpriced idiotic exercise, but it has been a wonder in my heavy use. By contrast I was constantly irritated by the chassis (color, texture, etc) every time I switched back to the Toshiba.

The only positive I found with the chassis design was the lightness of the device. Likely because of the cheap materials the Toshiba is a breeze to carry around compared to the other two. I have no idea what the spec sheets say, the device simply felt the lightest in regular use.

Keyboard, Trackpad

Samsung vs Toshiba – Toshiba

Toshiba vs Pixel – 90%

When it comes to the keyboards all three of the devices have excellent feel and sensitivity. I can easily touch type my way around without any loss of productivity or consistently missed combinations. These are all first class keyboards, the Pixel uses obviously higher end materials but this does not affect the performance of the other two.

I am beginning to wonder if there is a “Keyboard Czar” at Google that oversees all the input devices used on Chromebooks. I am seeing a very nice consistency and quality in all the Chromebook keyboards I use. A big pat on the back is deserved to whomever drove the manufacturers to use decent keyboards instead of the awful stuff you see on many cheap Windows laptops and netbooks.

In the touchpad department the devices are close, but the Pixel and the Toshiba are simply better. The surface might not hold up as well as the Pixel over time (plastic vs glass) but it feels fantastic. I also like the click pressure required on the Toshiba best of all the devices. It is very natural and superior to even the Pixel in constant, all day, use.

Battery Life

Samsung vs Toshiba – Tie

Toshiba vs Pixel – 200%

Everyone knows the Pixel has barely passable battery life. This is partly why it is my “roam around the house” device and not my “go everywhere” Chromebook. The surprise was the equality in battery life between the Samsung and the Toshiba. I expected the IPS screen and Intel processor to cause the Toshiba battery to be shorter-lived than the Samsung. It was not, it was fantastic. In my travels the last couple of weeks the Toshiba could go all day with heavy use. I rarely worried about the battery, and it charged very quickly. By contrast the Pixel runs out of juice by lunch and takes the rest of the day to charge!

Conclusion

Sorry to disappoint but the Pixel is still king, even when compared to the latest MBP from Apple. The Toshiba did not best it.

BUT, the Toshiba is an easy recommendation despite the chassis irritations because of the price and the screen. You simply cannot find a better balance if your focus is not on looks. In weeks of use I could not find any real flaws in the technical execution of the device. It is a very effective tool and I ultimately make my choices on this basis. I will be retiring the Samsung after a short stay in my arsenal and using the Toshiba as my primary Chrome OS device

I give the Toshiba a strong recommendation, I have not seen a better low cost device. As successful as it has been so far, I expect other manufacturers to follow suit and end this silly use of antiquated, awful displays.

JIRA Workflows for 1st Timers

New JIRA users often run into a predictable set of problems when they jump in to build a workflow. If you are new to JIRA, I encourage you to get some training before you move beyond learning and start pushing workflows to users. If you want to get going quickly, here are some guidelines that can help

Some common problems are:bigstock-Newbie-Blue-Grungy-Stamp-On-Wh-72764086

  • Starting with a custom workflow. Before you do this, set up a project and send real work through the default workflow. By doing this you will gain an understanding of what workflows do and more importantly, what they do not do. Jumping into a custom workflow guarantees starting over at some point.
  • Dead ends in the workflow. It is not unusual to create a status that transitions responsibility for the item out of your organization. An item can sit there for quite a while, but make a path to return. There should never be a status in your workflow (including closed) that has a transition in but not out.
  • The opposite extreme to dead ends is when every status can lead to every other status. This is often a new JIRA user’s response to the frustration of a poorly designed workflow. This is a cop out, take the time to understand the work and build a workflow to support it. Think through your workflow and build a natural path that covers the primary use case. Work has a purpose and is not scattered, your workflow should reflect this.
  • Confusing statuses and transitions. First, a status is, as named, a state. It is a resting point in the path through the workflow. A transition is a move between two states and represents specific actions. Second, here are some analogies that might help: Statuses are to transitions like nouns are to verbs or cities are to highways.
  • Reverse paths are very important to users. Even if it does not make sense from a workflow perspective, users will make mistakes and move an item forward accidentally. Give them a quick, easy way to fix it, unless you want to be fielding a series of requests to manually move items between statuses. Always make a way out for a user that accidentally clicks a transition.
  • Once you learn how to build restrictions on transitions use them sparingly. This is a common mistake in many areas of IT. Over-restriction ruins what might be a positive user experience.
  • Minimization is important. It is very common for new workflow designers to lay out statuses where an item will never land for more than a few minutes. Take a look at your workflow, and unless it is a critical point to log, do not make a status of this type. I use the following rule: if an item will never spend the night in a status, the status should not exist. If you have a status that is really important and the user must take action, consider making it a field on a screen that pops during a transition.

JIRA is an enterprise class application and as such requires a certain level of training to be effective. Find a mentor who has used JIRA extensively, take a look at any of the online training resources available. If you would like a quick formal training that will get you running, you could consider our class at http://jirabootcamp.com. If you would like a deep sequence of training on specific topics, Atlassian has some great courses available here.

Jira Jumble, a Test Data Generator for Jira

Update: Jira Jumble, and a wide range of Jira-related training and services, are now available through our sister company Expium.


At Oasis Digital, we teach a Jira class in which students learn hands-on how to build workflows, administer Jira, and overcome common challenges. While writing the course material, we realized that it is difficult to fully understand the features unless you have a significant amount of data in Jira: issues, projects, users, with important dates in a range of dates near the date of the class.

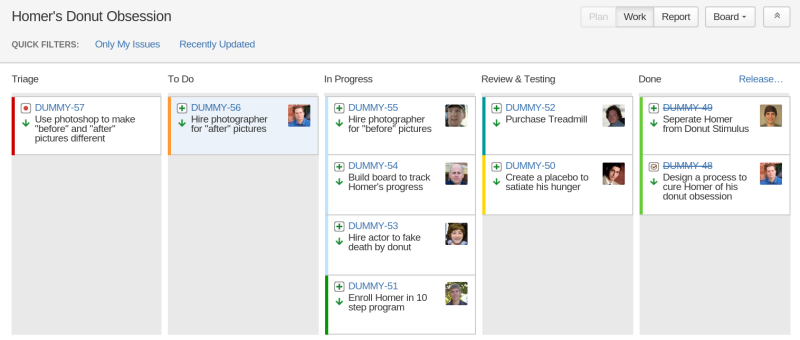
One obvious way to obtain this is to use or copy a real (“production”) Jira instance, but students are wisely hesitant, as are we, to bring up a copy of a production Jira instance (full of proprietary information) to use in class. Instead, we need to be able to generate a populated Jira instance with random but useful data. In the past there have been tools for this from Atlassian or other makers, but we found none of those tools are available for the current (as of 2014) Jira versions; and they had been packaged as Jira plug-ins for Jira Server, which means they cannot be installed into Jira Cloud (formerly called Jira OnDemand).

We solved this problem by creating Jira Jumble, a random data generator tool for Jira. We then realized that it would probably be helpful to many other people using or learning Jira so we made it available online. We expect to add additional features and enhancements over time based on the class needs and the feedback we receive.

JIRA Jumble  Test Data for JIRA

Please give it a try, we are eager to hear what people think of it.

As a reminder, this test data generator is intended to be used to populate a new, empty, throw away Jira instance for testing and learning. It works with both Jira Server and Jira Cloud. Do not import its data to your production Jira Server or Jira Cloud instance!

(photo credit)

JIRA Training 103 – The Right Tool

I was reflecting on my time at the Atlassian Summit today and put some pieces together. Throughout the conference I would hear the keynotes (mostly Atlassian leadership) and session speakers wax on about the improvements in the products and where things were going. (On a side note, this was one of the best events I have attended in my career. Well run, excellent content, and great participation from attendees that came in from around the world.)

I have found the Atlassian products to be very effective and on the mark in terms of enhancing productivity. The message I heard loud and clear from the Atlassian speakers was that they are streamlining their toolbox, making it easier to use, more efficient, and more intuitive. I am impressed with the persistence they have shown in this increase of efficiency as I have watched the product develop over the last few years. It has not succombed to the mind-numbing massive feature infusion so prevalent in our industry. There are countless examples of this phenomenon, led very obviously by Microsoft products.

[box type=”note” size=”medium” border=”full”]Other JIRA Resources

Other JIRA Articles:

JIRA Training 102 –The Little Things 
JIRA Training 101 – Workflows
Using JIRA – Be a Winner not a Loser
Adapting a Microsoft Project mind to a JIRA world

Our JIRA Training Course:
JIRA Boot Camp

[/box]

What I find interesting is how this attractive message was diluted and changed not far from the main stage. I spoke to various business leaders and speakers at the “Bash” and in the halls. For the most part I heard a lot about process improvement, amazing new features, visibility into teams, improved (increased) reporting, and better (more) documentation. These can be good things, but they miss the point of the tools’ creators. It reminds me of how hard it is to change mindsets and habits. Business leaders have been conditioned to want more data, more information, deeper analysis. Often this runs counter to a business’s primary mission and, if uncontrolled, can be very destructive.

Lets slice it this way: if you want your organization to be profitable and successful you need to maximize the output of your organization. This means that the supporting pieces around the core work (the part that makes a profit), need to be as small as possible and the core work needs to be as massive as possible in your workflow. Successful managers think this way and the Atlassian tools are built to accomplish this. Reporting, timekeeping, and yes, even user stories are supporting mechanisms to the core work, yet the expansion of these was the focus of many of the non-Atlassian speakers and attendees at the Summit.

Stay Focused

Online support. Toolbox with tools on laptop. 3d
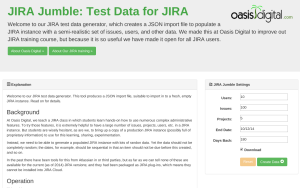
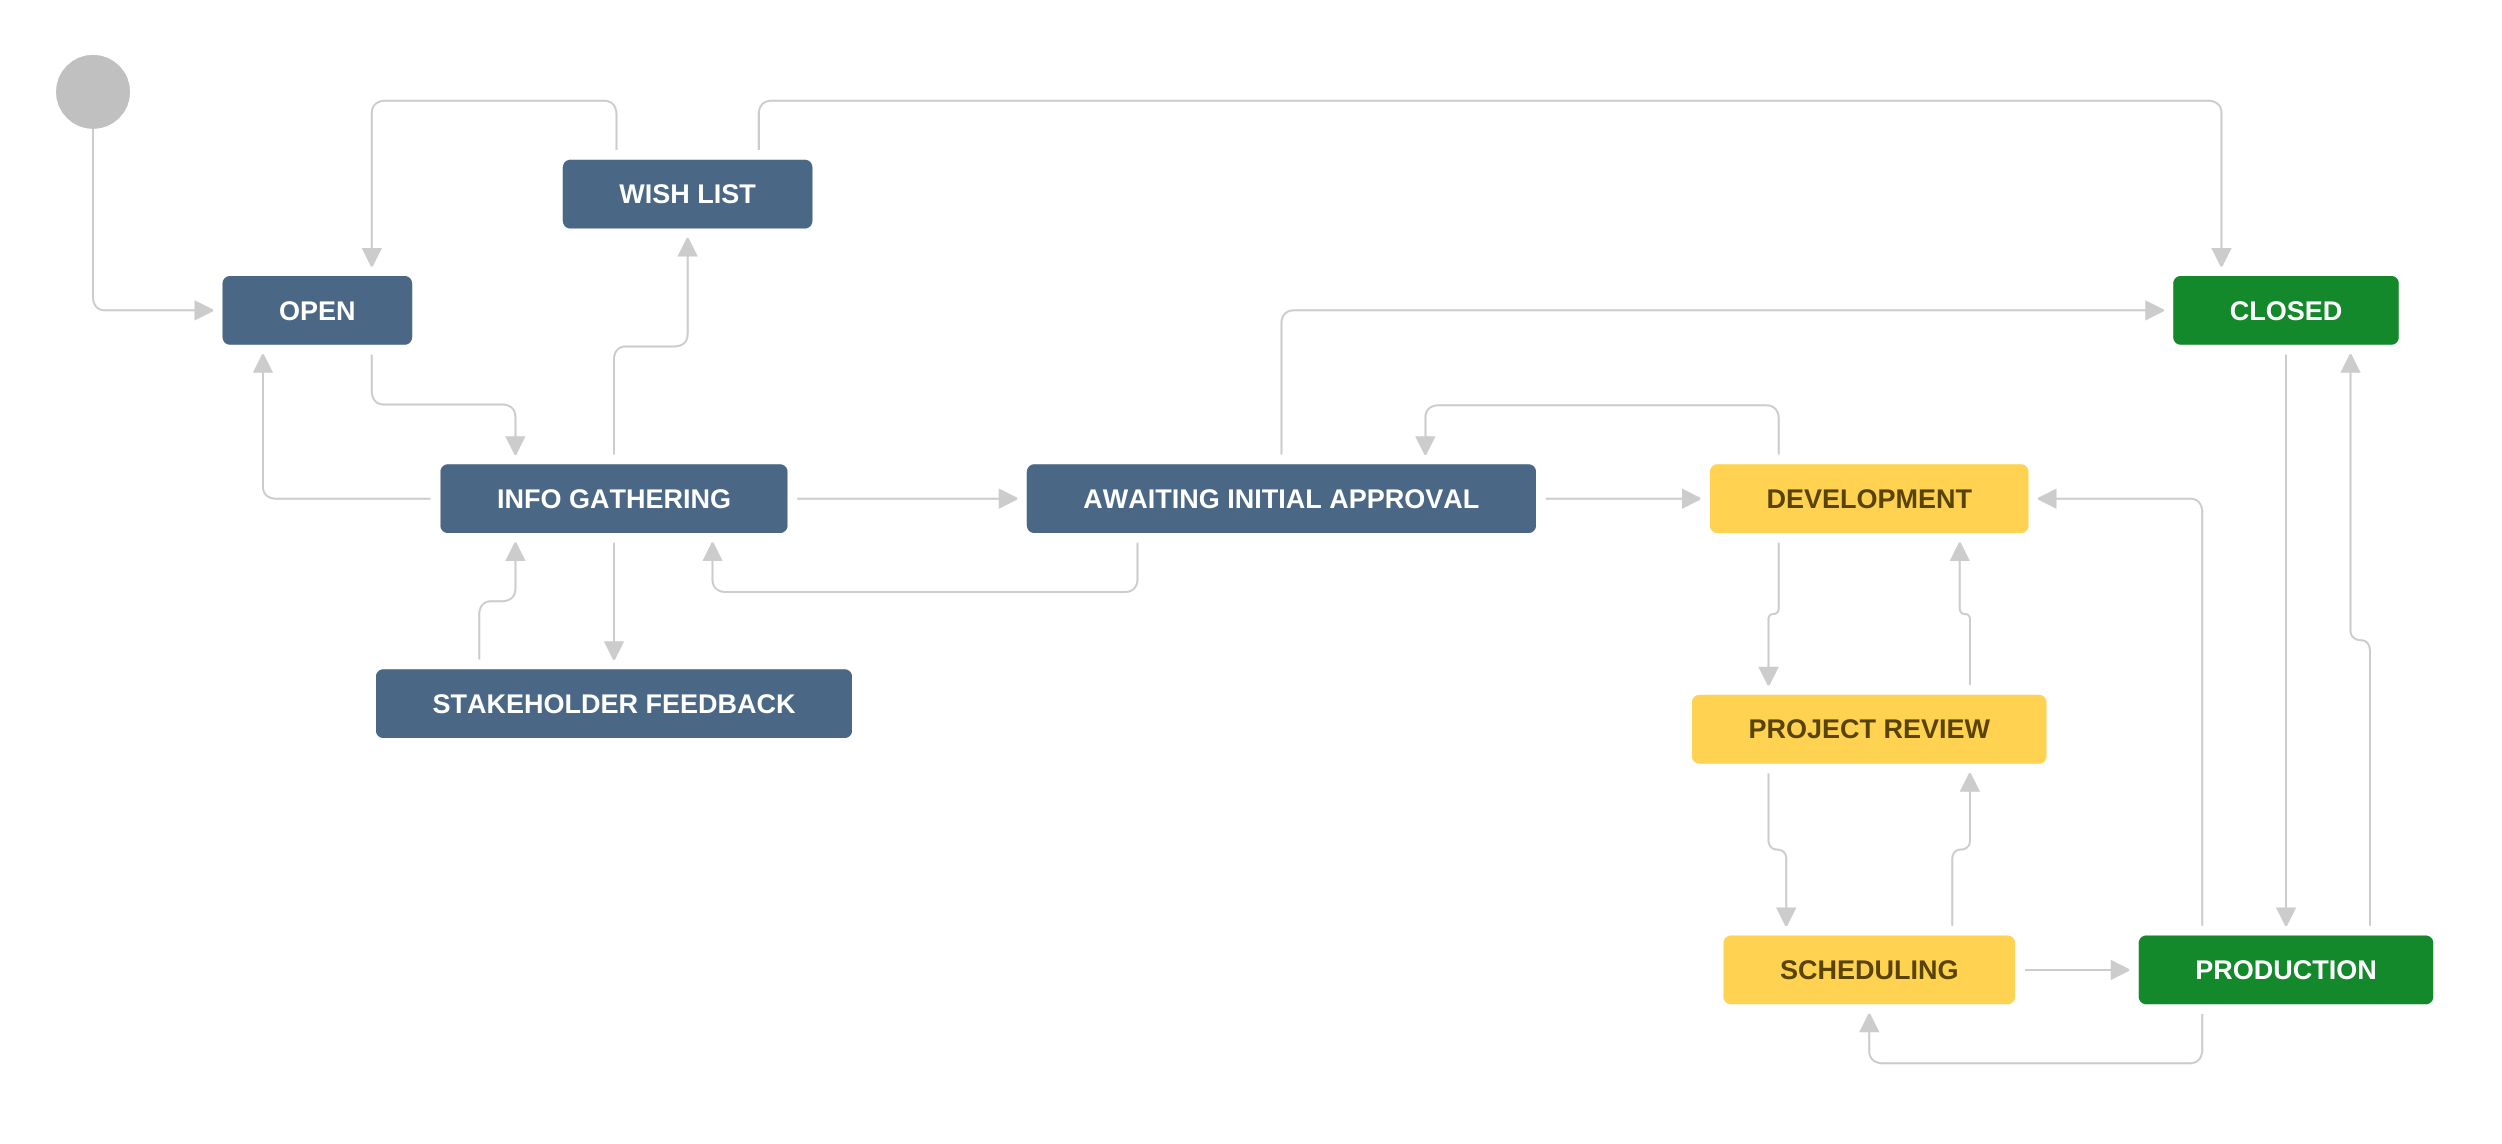
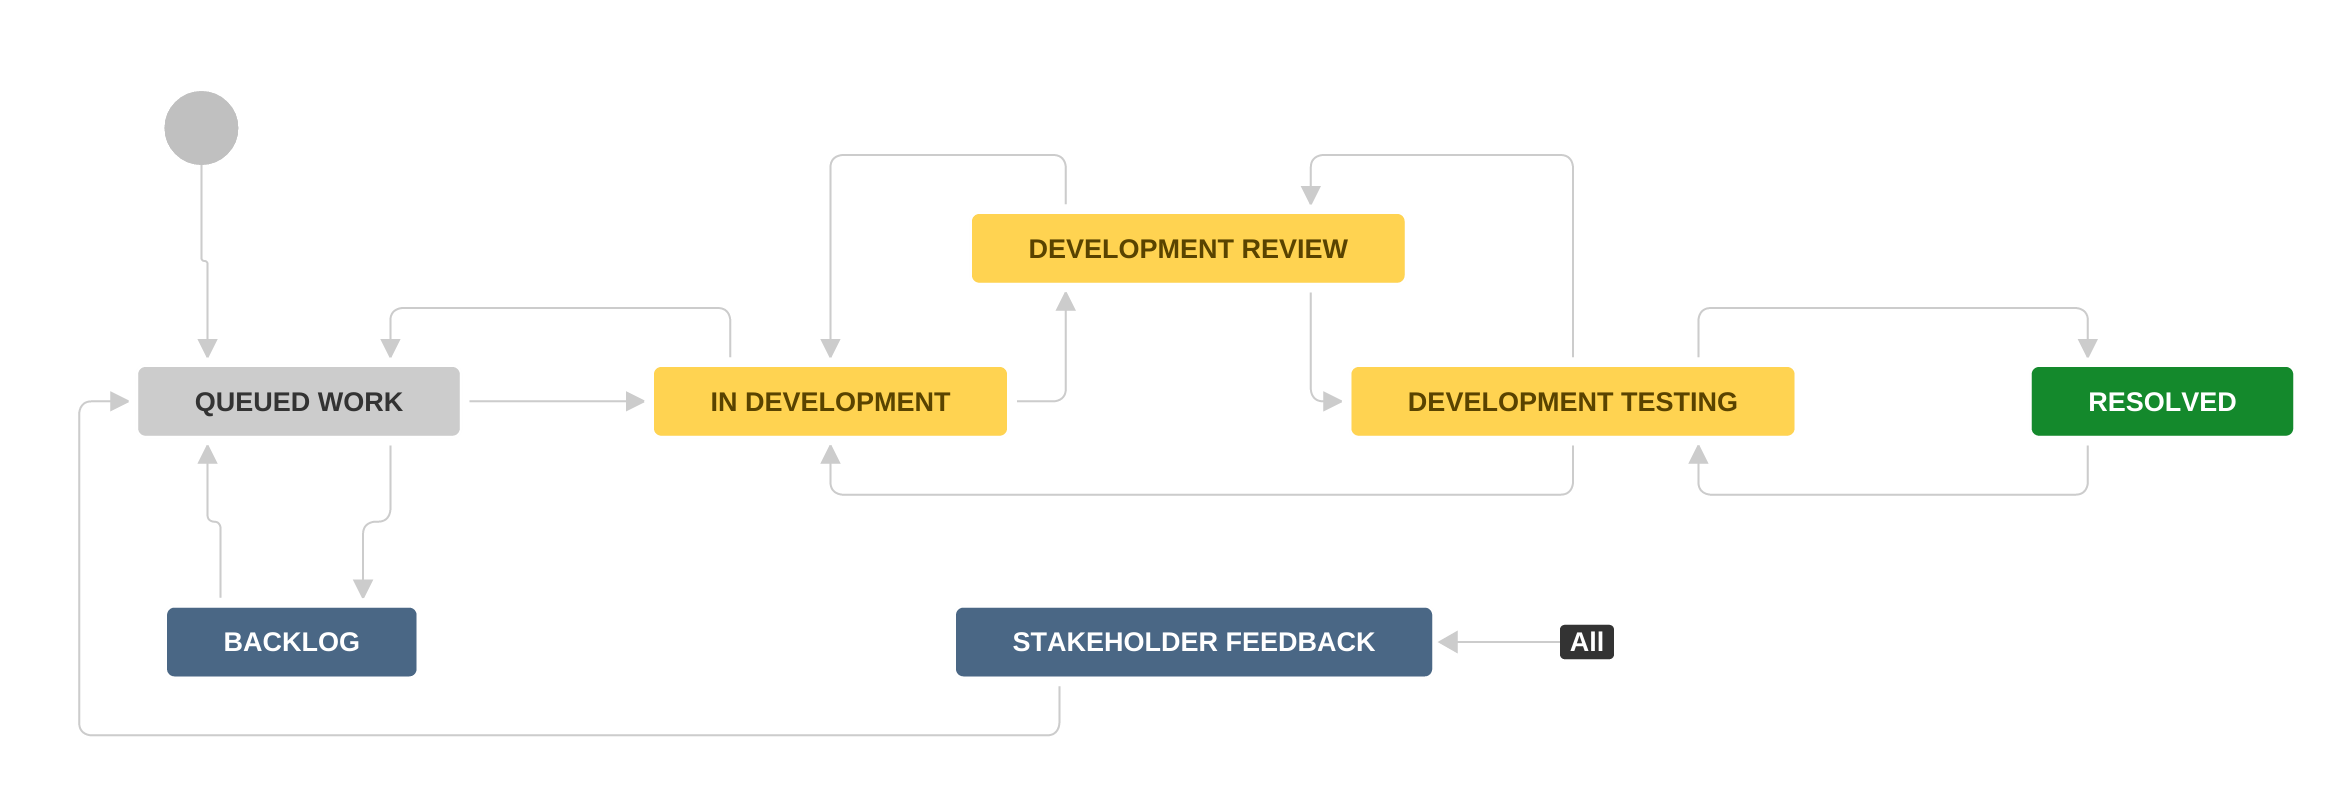
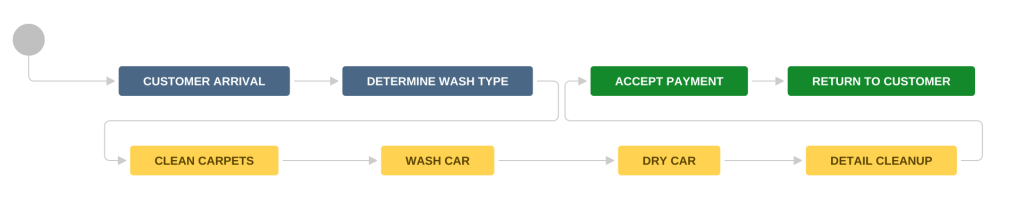
The focus starts at the usage and configuration of your workflow in JIRA. With a good workflow, important actions and reporting metrics can be automatic or at least reasonably simple. Some of the new features like automated transitions and integrated dev tools facilitate this well. As you lay out your workflow, be sure to deconstruct your processes to understand what is critical to your business productivity and what is not. Spend the extra time to keep your staff in that highly productive part of your workflow. Focusing on improving the productive capacity of your team will not only help you but it will help your staff feel empowered and successful.

Looking Ahead

The incredible efficiency offered by JIRA and other Atlassian tools has opened up a whole new set of markets for the company. The relentless focus on productivity has pushed JIRA in particular into the forefront of workflow management. It is quite simply flexible enough to run most organizations better than very high dollar systems employed by corporations. I think we will see a transformation in the coming years. What started out as a developer’s issue tracker could very well be the engine that drives business for many years ahead.

Data Services for AngularJS Applications

I wrote recently about data/API services for complex “single page” JavaScript-heavy web applications. Everything there applies to AngularJS as well as other frameworks (Ember, Knockout, React, etc.), but there are some particulars to keep in mind for ease of interaction between an AngularJS-largeAngularJS web application and a data service. This topic is also asked about in almost every “Angular Boot Camp” class I teach, so by posting this I have an online resource to point at.

Use RESTful URLs and HTTP Methods

By following RESTful patterns rather than inventing ad-hoc patterns for a server API shape, your code will fit in more easily with the rest of the software industry. This reduces the friction in bringing on more developers, in integrating your application with others, and so on. A RESTful server API will operate easily with AngularJS’s built-in mechanisms for working with a server, whether you use plain $http, $resource, or Restangular. For example, all of those already assume that the HTTP status codes indicate success and failure, so do not make up your own way of encoding failure within HTTP “200” success.

Avoid dogma in REST design, though. Most of the time, you can make a server API shape reasonably RESTful with approximately the same implementation effort as something ad hoc. If you have a case where a RESTful design will require substantially more work than something else, consider an “escape hatch”: a portion of your API that isn’t particularly RESTful, hidden behind a generic POSTable endpoint.

Make Data Binding Easy

I assume that by choosing AngularJS, developers aim to leverage its strengths rather than fight it. That means embracing “HTML enhanced”, data binding, and other banner AngularJS features, rather than manually manipulating the DOM (which immediately fails code review here), mostly passing information around using bindings and $watch rather than events, etc.

Therefore, if possible make your data service return data in a shape already suitable for binding in your AngularJS application. Done well, this can reduce the amount of JavaScript code you must write to populate a complex screen to almost nothing. By complex, I mean a screen which contains the modern equivalent of numerous master detail relationships, hundreds of fields, etc.

Of course, JavaScript is a powerful and convenient language for data structure manipulation, so in a sense it does not matter what shape of data is returned from a server; it is always possible to process that data into a shape suitable for data binding. Hence this guideline is oriented toward ease and speed of development when the server code is being written fresh.

(As an aside, I am not 100% sold on data binding; there are other approaches, like that taken by React, which have significant advantages. But if you are using AngularJS, embrace its strengths. Use data binding pervasively.)

Make Commands / Saves Easy Also

Following along from the above, a conveniently and idiomatically crafted AngularJS application will typically yield JavaScript data structures suitable for PUT or POSTing back to a data backend. Make your server accept PUT or POST of updated or new data in the same object “shape” as it returned data. This way, the data can make a round-trip from the server, through data bindings, to be manipulated by a user, then back to the server; all with very little code to write.

This applies to commands (in the CQRS sense) also. If a user is working with the screen via data binding, then that data binding can often yield a data structure ready to send to a server with a couple of lines of code. If you find it necessary to write extensive lines of code to formulate a server interaction, perhaps either your data binding or server should be adjusted stat.

Consider NodeJS on the Server Side, for Code Sharing

Working with complex client-side web development, you will almost certainly use NodeJS in your development toolchain, even if you are not using NodeJS for your data services.

But NodeJS is worthy of consideration for this key reason: it enables code sharing between the front end and back end. With some care in crafting modules, chunks of functionality which must be implemented on both sides of the client/server API (such as validation, but also many kinds of domain logic) can be reused across both, ensuring consistent implementation and eliminating duplication.

There are numerous other platforms worthy of consideration for other reasons. Stay tuned here (and follow me on twitter), I will have more to write about that.

Guard Your Innovation Budget

If your organization is in the process of adopting AngularJS for the first time, consider not simultaneously adopting a new server-side technology. As humans we each have a certain ability to absorb change, and doubly so for organizations comprised of many humans working together. You will probably get better results if you switch to a new client-side development toolkit in a different year then you switch to a new server side development toolkit. I think of this as having an “innovation budget” which can either be concentrated on one layer at a time, or diluted across more than one layer.

Help Wanted

If anyone knows of convenient source code examples already online of doing these things well versus poorly, please contact me – I would love to add links. Given sufficient time I may create the examples, but with the pace of change in our industry these tools could be obsolete before that happens!